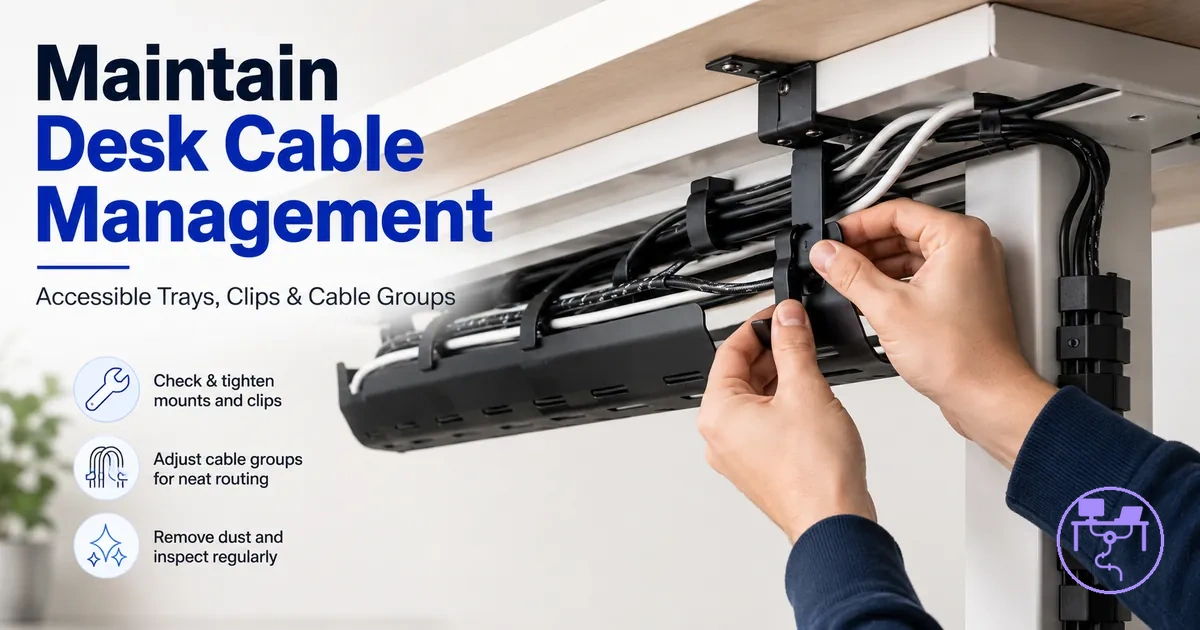
Desk Cable Management System Maintenance
Desk cable management system maintenance is the ongoing process of keeping an installed cable setup organized, accessible, and adaptable after installation. It focuses on preserving an existing cable layout rather than creating a new one. A maintained setup can remain easier to inspect and adjust when device changes, cable load, mounting conditions, or power-strip placement evolve over time.
Desk cable management system maintenance includes inspection, adjustment, rerouting, cable labels, and accessory replacement when the cable path no longer matches the current setup. The goal is to keep the cable tray, cable clips, sleeves, ties, power strip, and slack working together as a functional cable routing system. For readers who need broader background context, the desk cable management system guide explains the overall role of these components within a complete setup. Maintenance also helps identify areas where access, cable grouping, or routing conditions may need adjustment.
This page focuses on maintaining an installed desk cable management system, not on first-time installation or product selection. The emphasis is on preserving and improving an existing setup through practical adjustment and review. Outcomes such as reduced clutter, improved access, or smoother cable organization may depend on cable load, hardware condition, adhesive strength, desk type, and ongoing device changes.
As a desk setup changes, small issues can develop through moved devices, added desk cords, altered cable routing, or aging accessories. Understanding what to inspect and how to evaluate the condition of the existing cable setup provides a useful foundation before reviewing specific inspection criteria and maintenance decisions.
What Desk Cable Management Maintenance Changes
What Desk Cable Management Maintenance Changes refers to the condition, accessibility, routing, grouping, and safety characteristics of an existing cable setup after maintenance is performed. Maintenance changes how cables are organized and supported within the current layout rather than changing the purpose of the setup itself. The maintenance process applied to an existing cable setup can make cable access, identification, and adjustment easier when device arrangements evolve.
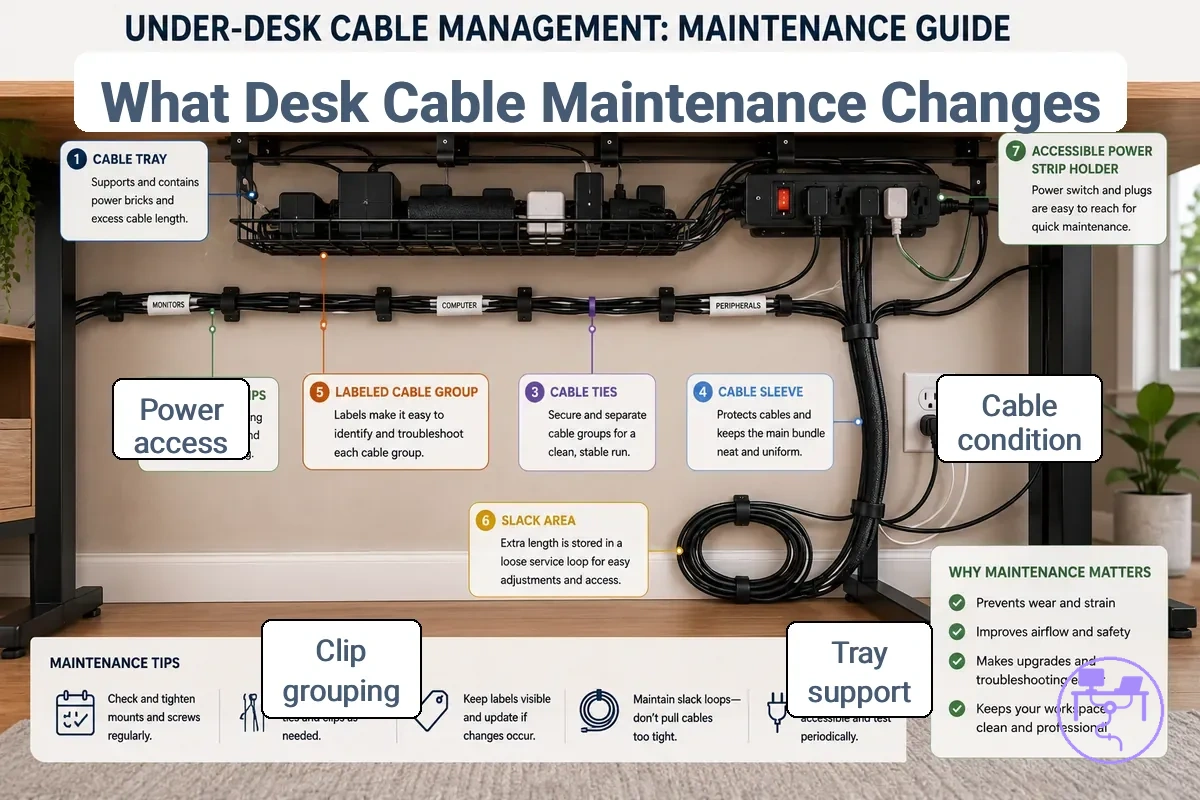
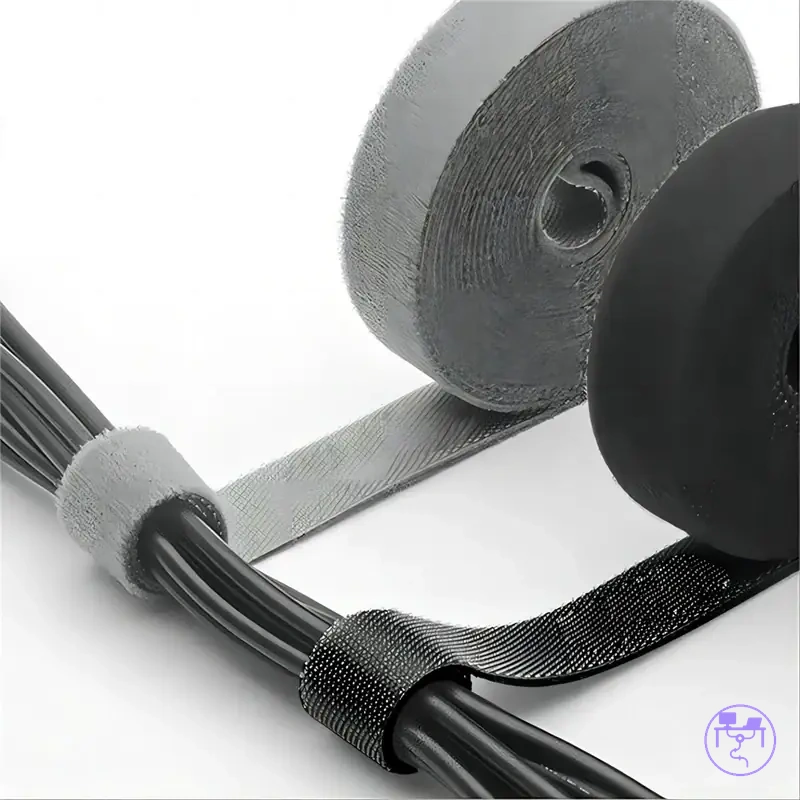
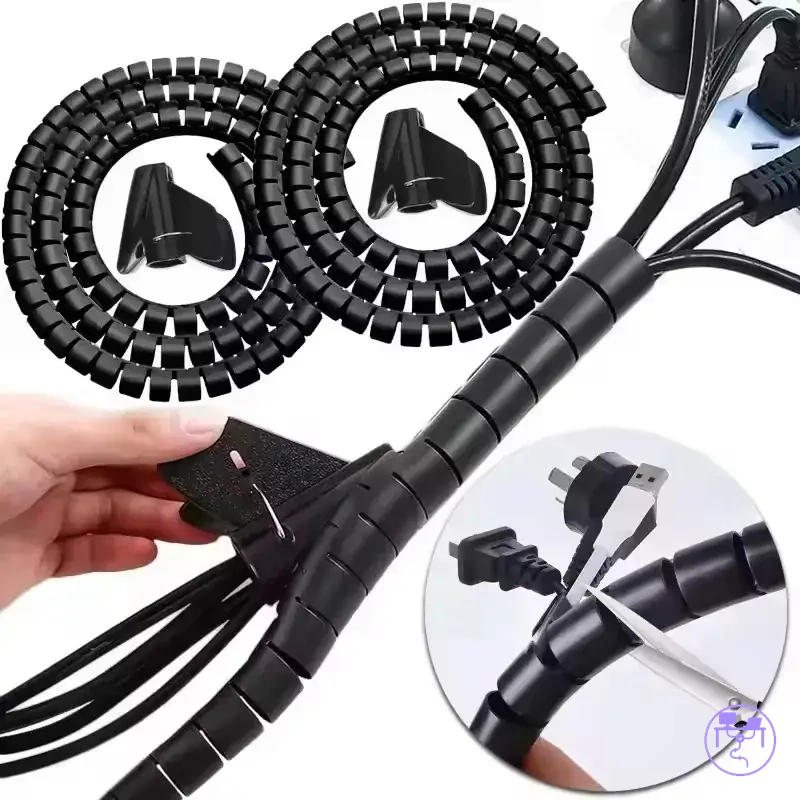
What Desk Cable Management Maintenance Changes can be viewed through the components that are routinely adjusted during maintenance. The image labels which parts change during routine adjustment and shows how cable organization, accessibility, routing, grouping, and support are distributed across the installed setup.
- Cable condition: adjusted slack and routing can improve usability and may reduce clutter when cable paths remain clear.
- Cable tray: maintained tray support can help hold grouped cables and improve cable organization.
- Clips and ties: repositioned clips or ties can improve wire grouping when device locations or cable lengths change.
- Sleeves and labels: updated sleeves and labels can simplify identification of cable ends after device changes.
- Power strip holder: adjusted placement can improve access and may reduce strain on connected power cords.
Maintenance changes the working condition of components such as the cable tray, clips, ties, sleeves, labels, power strip holder, slack areas, and cable access points. These maintenance changes can affect accessibility, cable organization, and day-to-day usability, although outcomes may vary based on cable load, hardware condition, and layout changes. The visible result is often a cable setup that remains easier to review and adjust over time.
Maintenance improves an existing layout, but it does not replace proper installation planning when the original setup is structurally wrong. If cable paths, support locations, or mounting decisions were unsuitable from the beginning, maintenance may provide only limited improvement. What changes during maintenance is the condition and organization of the installed setup, not the underlying structure that was originally planned.
When the Cable Layout Needs Inspection or Adjustment
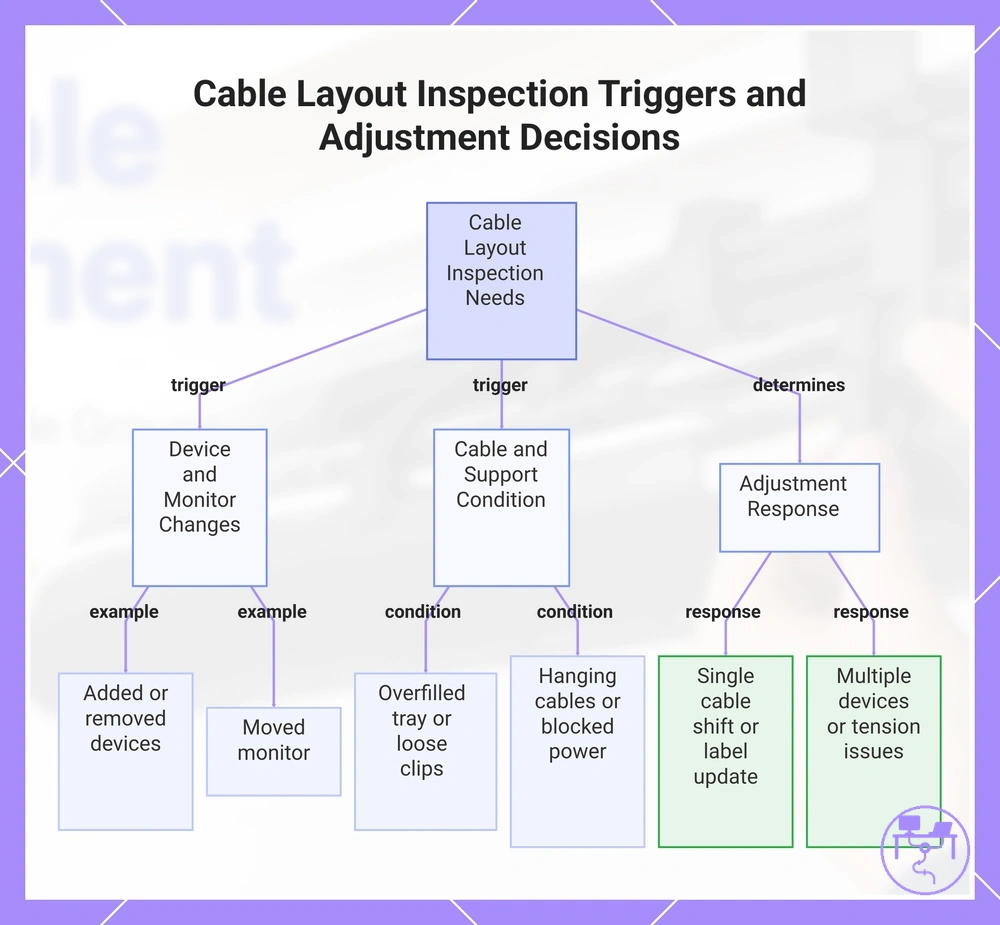
Inspection is needed when the cable layout becomes inaccessible, loose, overloaded, affected by device changes, or shows visible clutter that interferes with normal use. When the Cable Layout Needs Inspection or Adjustment, reviewing visible conditions helps identify whether maintenance is required and what level of adjustment may be appropriate.
When the Cable Layout Needs Inspection or Adjustment, use the following checklist to verify maintenance triggers before work begins:
- Added device or new cable → review the cable run, grouping, and slack.
- Removed peripheral → adjust unused desk cords and recover excess slack.
- Moved monitor → check cable tension and review routing if movement becomes restricted.
- Loose clips or weakened adhesive condition → inspect cable hold and attachment points.
- Overfilled tray → review cable load and reorganize grouped cables.
- Hanging cables → adjust support points to improve cable access and control.
- Missing or outdated cable labels → update identification after device changes.
- Blocked power access → inspect the power strip area and restore plug accessibility.
Device changes, loose accessories, moved monitors, and changing cable loads are common inspection triggers. An overfilled tray, hanging cables, or increasing cable tension can indicate that the current cable layout no longer matches the way the setup is being used. Visible clutter may also signal that routing, grouping, or support points need adjustment.
A small adjustment is often sufficient when a single cable has shifted position, a cable label needs updating, or a loose clip can be secured without affecting the rest of the cable setup. A fuller reroute may be more appropriate when multiple new devices have been added, cable tension affects movement, or the existing cable run no longer supports current usage. The appropriate response depends on usage frequency, desk movement, adhesive condition, and overall cable load.
This chart shows the main triggers that indicate a cable layout needs inspection and the appropriate level of adjustment based on the situation.
Inspect Cable Paths, Tray Load, Clips, and Slack
Inspection should start with the cable path before changing hardware, clips, ties, or routing decisions. Inspect Cable Paths, Tray Load, Clips, and Slack by reviewing the physical route first so visible conditions can be understood before any adjustment is made.
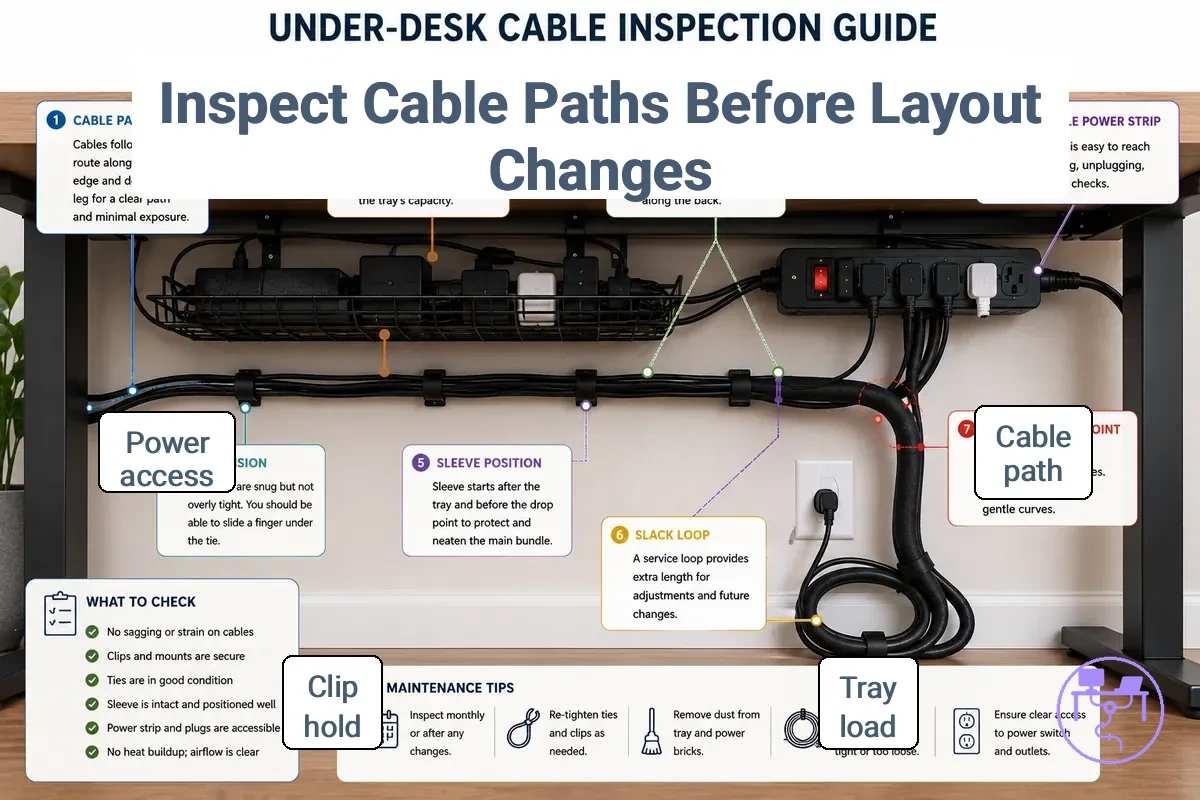
Inspect Cable Paths, Tray Load, Clips, and Slack using the inspection sequence below. The image labels the points to check before changing the layout and helps identify how each condition may affect the maintenance outcome.
- Cable path → check the cable route for crossings, pinched sections, or unsupported spans; these conditions may indicate that routing needs review before adjustment.
- Tray load → check whether cables sit comfortably within the tray capacity; a crowded tray may limit access and make future changes harder.
- Clip hold → inspect clips for movement, loosening, or weakening adhesive; reduced hold can allow cable weight to shift the wire path.
- Tie tension → check whether ties hold cables together without creating excessive pressure; unusually tight grouping may reduce flexibility during adjustments.
- Sleeve position and slack → inspect sleeve alignment and cable slack; moderate cable slack can support movement better than a fully stretched cable run.
- Power-strip access → verify that plugs, cords, and power-strip access remain reachable; restricted access may complicate maintenance and future device changes.
Cable path, tray load, and clip hold should be evaluated together because each condition influences support and accessibility. A cable path that remains stable, a tray load that appears manageable for the current cable weight, and clips that continue holding securely can indicate that only minor adjustment may be needed. Changes in any of these conditions can affect the maintenance outcome and may justify a closer review.
Slack and bend pressure should be assessed with the desk's movement and cable weight in mind. Cable slack that allows normal monitor or desk movement without creating hanging loops is often easier to manage than a fully stretched cable route. Bend pressure may deserve attention when cables appear sharply compressed because strain can increase as the cable path changes.
Before making adjustments, record observations about the cable path, tray load, clip hold, tie tension, sleeve position, slack, bend pressure, and power-strip access. Keeping a simple record of these conditions helps compare the cable layout before and after maintenance and supports more consistent adjustment decisions.
Check Loose Cables, Falling Clips, and Overfilled Trays
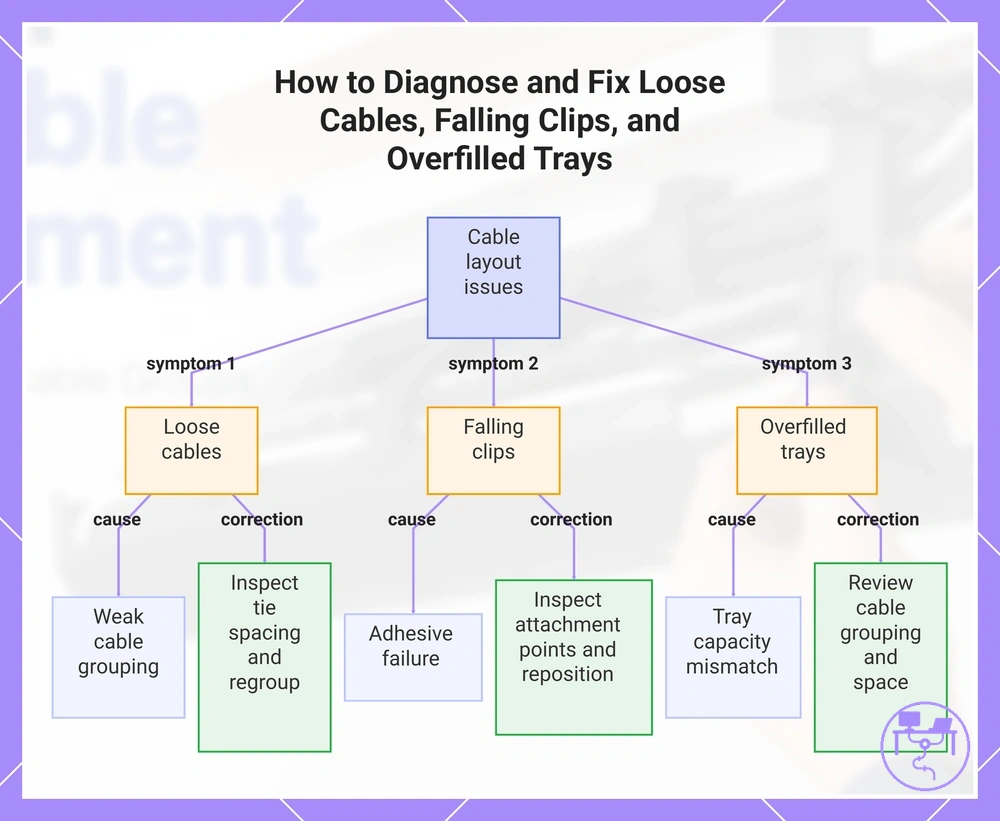
When loose cables, falling clips, or overfilled trays appear during inspection, the likely cause is often a local support or organization issue rather than a complete layout failure. Check Loose Cables, Falling Clips, and Overfilled Trays to identify the visible symptom, the likely attribute causing it, and the most appropriate correction.
- Loose cables → cable weight, excess slack, or weak cable grouping may reduce support; inspect tie spacing and regroup cables where needed.
- Falling clips → adhesive failure, desk surface condition, or poor clip placement may reduce clip hold; inspect attachment points and consider repositioning.
- Overfilled trays → tray capacity may no longer match the current cable load; review cable grouping and available tray space.
- Dangling wires near the cable path → spacing between support points may be too wide; inspect cable weight distribution and support placement.
- Crowded tray with compressed cable bundles → cable grouping may limit access and organization; review whether cables can be distributed more evenly.
These symptoms can have more than one cause. For example, a falling clip may result from adhesive failure, but it may also be affected by cable weight or placement. Likewise, overfilled trays may indicate a tray capacity issue, while loose cords can result from reduced support or uneven tie spacing.
If a single clip loses hold or a small cable group becomes loose, a quick accessory adjustment may be enough. In contrast, when loose cables, falling clips, or overfilled trays continue to appear across multiple areas, the cable layout may need broader review or rerouting. For recurring layout-level issues, see fix recurring cable problems.
This chart shows the common symptoms, their likely causes, and corrective actions for cable layout issues.
Keep Power Cords and Power Strips Secure During Checks
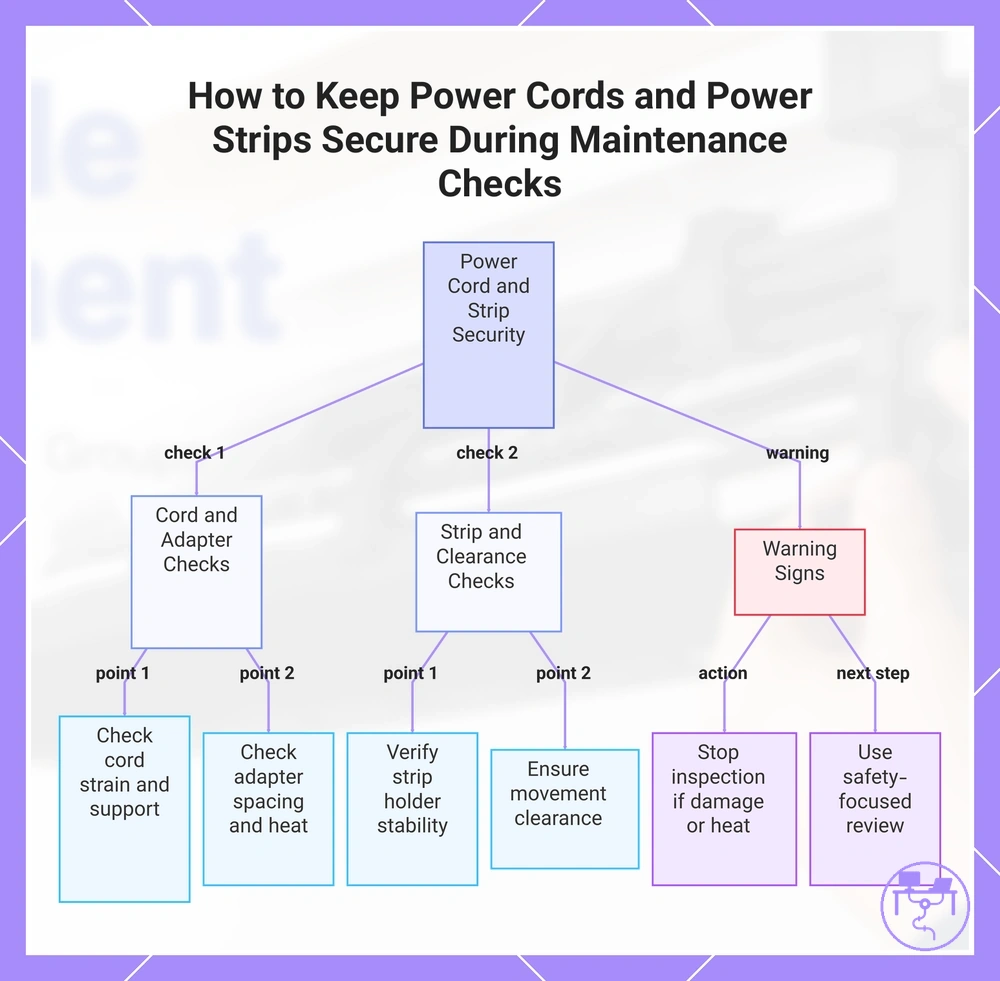
Power cords should stay accessible, untensioned, and supported during maintenance checks. Keep Power Cords and Power Strips Secure During Checks by confirming that power cords, adapters, power strips, and holders remain reachable without strain or blocked plug access.
Keep Power Cords and Power Strips Secure During Checks with this safety checklist that verifies access, strain, heat exposure, and movement clearance during inspection:
- Power cords → check for strain and keep the cable path supported without pulling on plugs.
- Power strips and holders → confirm that the power strip holder keeps the strip stable while maintaining plug access.
- Adapters → review spacing and heat exposure when adapters are positioned close together or near surrounding materials.
- Movement clearance → verify that cords have enough clearance for normal desk movement without creating tension.
- Cord access → ensure plugs and connected cables remain reachable during maintenance checks.
- Damaged cords or questionable placement → stop routine inspection and use a more safety-focused review.
Strain, heat exposure, and blocked access can reduce maintenance quality by making inspection and adjustment more difficult. Power cords that remain supported, adapters with reasonable spacing, and power strips with clear plug access are generally easier to inspect and manage. Cable organizers can support safe handling, but they should not be treated as a solution for overloaded power use.
If damaged cords, unusual heat, blocked plugs, or questionable power-strip placement are noticed during inspection, review how to keep power cords safe before continuing with routine maintenance adjustments.
This chart shows the key safety checks and warning signs for securing power cords, adapters, and power strips during inspection.
Adjust the System After Device or Layout Changes
Adjustments should follow the device change rather than disturb unaffected cables. When device changes or layout changes occur, update only the affected cable groups inside the existing system so cable length, grouping, labels, and access remain manageable.
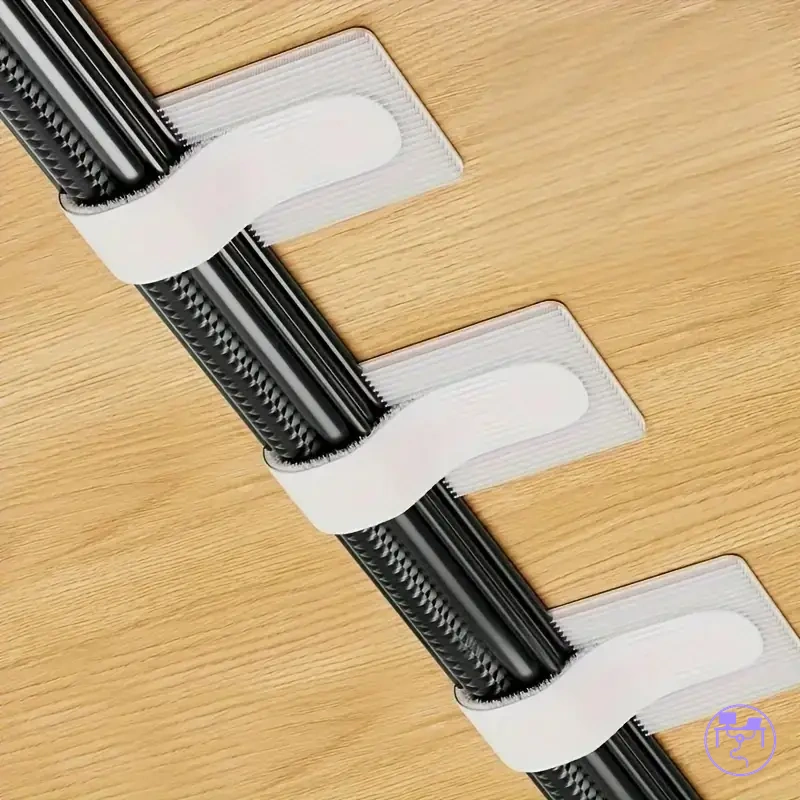
Adjust the System After Device or Layout Changes by identifying which cable groups changed and which remain untouched. The image demonstrates how a new or moved device can affect route direction, slack, labels, and access points while the existing tray and unaffected cable groups remain in place.
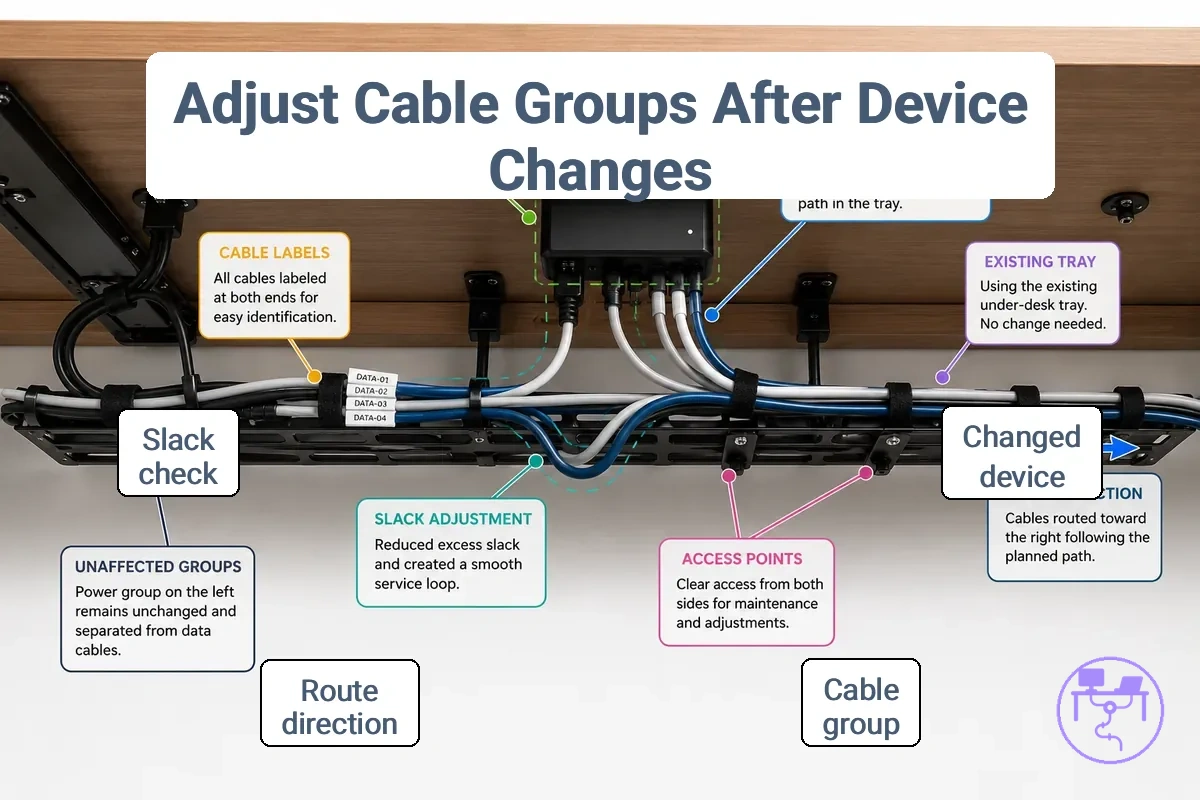
- Identify the device change → locate new monitors, chargers, peripherals, docking station connections, or moved devices; verify which cable group is directly affected.
- Review cable length and slack → check whether the affected cables still reach their connection points without excessive tension; verify that unused slack remains controlled.
- Adjust grouping → update cable groups around the changed device while leaving unrelated cable bundles in their current position; verify that grouping still supports access.
- Update labels → revise labels when cables are added, removed, or reassigned; verify that each affected cable remains identifiable.
- Check route direction → review whether the existing wire route still supports the changed device location; verify that cable paths remain accessible.
- Decide between a small adjustment and a fuller reroute → a small adjustment may be enough when only one cable group changes and access remains clear; consider a fuller reroute when route direction, cable length, or multiple cable groups no longer fit the current layout.
- Verify the final arrangement → confirm that new monitors, chargers, peripherals, power bricks, and docking station connections remain accessible while unaffected cables stay in their existing groups where practical.
Device changes can alter cable length, grouping, labels, and access even when most of the existing system remains unchanged. Added devices, removed devices, and moved devices may require only local adjustments if the current cable path still supports the updated layout.
A small adjustment is often suitable when slack, route direction, and access remain acceptable after the change. A fuller reroute may be appropriate when multiple cable groups are affected or when the existing route no longer supports the revised layout. After adjustments are complete, verify that access points, labels, and cable groups reflect the current desk setup.
Disconnect and Identify the Cables That Changed
Only changed cables should be identified before rerouting. Disconnect and Identify the Cables That Changed by isolating the affected device, cable ends, labels, adapters, power cords, data cables, and cable groups without disturbing the whole layout.
- Unplug the affected device and identify the connected power cords, data cables, and adapters.
- Trace the cable ends from the affected device to the nearest cable group and verify which cables changed condition.
- Check labels and mark any affected cable that no longer matches its current connection or route.
- Separate the changed cables from nearby cable groups and verify that unrelated cables can usually remain in place.
- Example: if a docking station is moved, identify only the docking station cable group and verify its cable ends before rerouting.
Cable ends and labels provide the quickest way to identify changed cables. Labels help distinguish power cords, data cables, and adapters when multiple cable groups follow a similar route. If identification remains unclear, mark the affected cable ends before changing the route.
Reroute Cables Through Existing Trays, Clips, Sleeves, and Ties
When device changes alter the cable path, changed cables should follow the existing route where fit and access allow. Reroute Cables Through Existing Trays, Clips, Sleeves, and Ties by reusing the installed structure and adjusting only the cable run that changed, then verify route, slack, and access after rerouting.
- Route the changed cables through existing trays and verify that cable direction follows the current cable path.
- Guide the cable run through clips and confirm that access points remain reachable.
- Use sleeves where cable groups need consolidation and verify that cable direction remains clear.
- Adjust ties to manage slack and check that the cable run remains serviceable.
- Review bend pressure at turns and entry points, then verify that the route does not create unnecessary cable stress.
- Route follows the existing tray path.
- Slack remains controlled and usable.
- Access points remain reachable.
- Bend pressure remains appropriate for the cable direction.
Existing trays, clips, sleeves, and ties can help preserve neatness and serviceability when the cable load still fits the installed structure. Existing trays can support cable direction, while clips and sleeves can help keep cable groups organized along the cable path. Ties can help manage slack when access points and cable runs still suit the updated layout.
If the cable load no longer fits the available tray space, clips no longer support the cable run, or access points become restricted, the existing hardware may not provide adequate support for the updated route. In those cases, review broader routing options and reroute cables when needed.
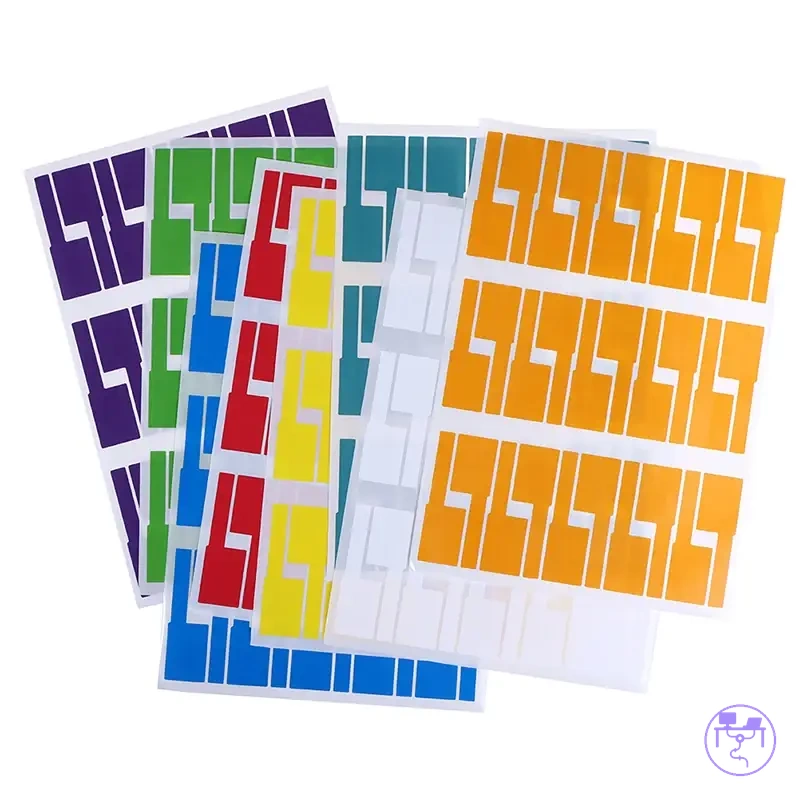
Relabel Cable Ends Before Closing the Layout
Cable ends should be relabeled before bundling or closing the adjusted layout. Relabel Cable Ends Before Closing the Layout so device names, cable groups, and cable types remain easier to recognize during future changes, and use the checklist below to reduce confusion after bundling.
Visible label placement works best when labels remain accessible near cable ends after adjustment. Distinguish power cables from data cables with clear wording rather than relying only on cable appearance. Removable labels may be more practical than fixed labels when device names or cable groups are likely to change.
- Relabel cable ends with device names before closing the cable group.
- Mark power cables and data cables with different label text when both appear in the same cable group.
- Keep visible label placement near access points where labels can still be read after bundling.
- Use removable labels when future changes may require updates.
- Example pattern: “Monitor Power” and “Dock Data” provides simple cable identification that can remain useful after future changes.
Replace Weak Cable Management Accessories
Replacement is usually better than reuse when weak accessories or worn accessories no longer provide adequate hold, access, or support for the current cable layout. Replace Weak Cable Management Accessories by checking whether the accessory can still perform its intended function or whether its condition creates recurring maintenance issues.
Hold, removability, capacity, and access are practical criteria for replacement decisions. Reusable ties and Velcro straps may remain suitable when they still secure cable groups and can be adjusted without damage. Removable adhesive clips, sleeves, tray supports, labels, and power strip holders may need replacement when reduced hold, limited access, or reduced capacity affects maintenance quality.
| Accessory | Weak condition | Reuse or replace signal | Maintenance outcome |
|---|---|---|---|
| Reusable ties | Reduced grip or adjustment range | Reuse if hold remains adequate; replace if adjustment becomes unreliable | Improved cable grouping control |
| Velcro straps | Reduced fastening strength | Reposition if placement is the issue; replace if fastening no longer holds | More consistent cable access |
| Removable adhesive clips | Weak attachment to desk surface | Reposition if the surface condition changed; replace if hold remains poor | More stable cable routing |
| Sleeves | Limited capacity or restricted access | Reuse when cable grouping still fits; replace when access becomes difficult | Improved cable organization |
| Tray supports, labels, and power strip holders | Reduced support, readability, or accessibility | Replace when maintenance access or support is affected | Easier maintenance and adjustment |
The table compares replacement decisions by accessory condition, not by product type or brand. An accessory that still provides adequate hold and access may be reused, while an accessory that only suffers from placement issues may respond to repositioning. Replacement becomes more appropriate when the accessory condition continues to limit support, accessibility, cable grouping, or cable load management.
Use a reuse, reposition, or replace approach for cable management accessories. Reuse when hold, removability, capacity, and access remain suitable. Reposition when the accessory still functions but its location reduces effectiveness. Replace when worn condition, reduced support, limited access, or reduced capacity continues to affect maintenance quality after adjustment.
Here are product examples that may make comparison easier. Before buying, always review the compatibility criteria, essential features, and product details.
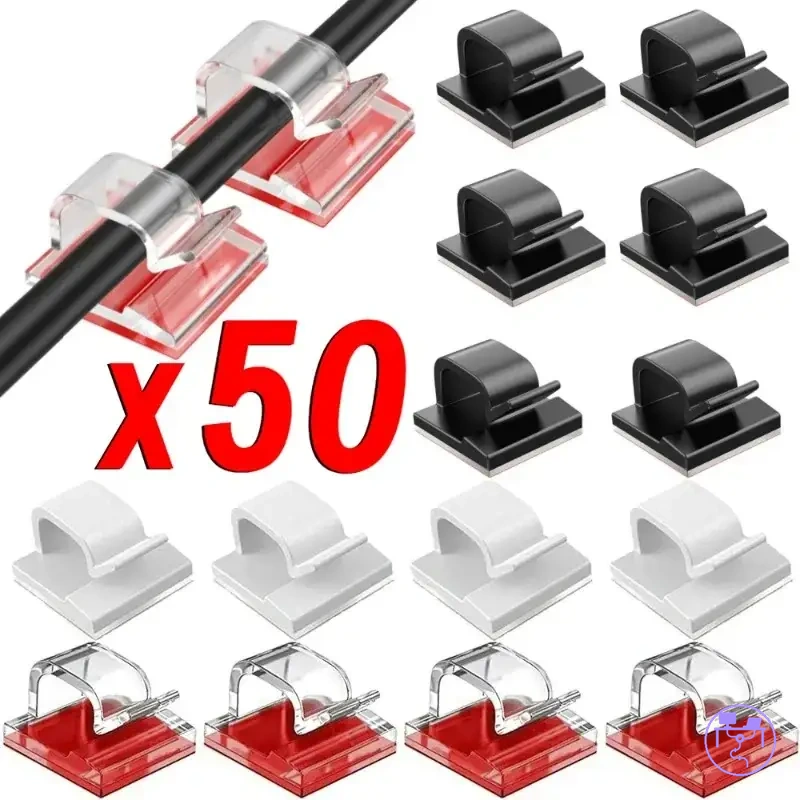
Reusable Ties, Removable Clips, Sleeves, and Holders
Reusable ties, removable clips, sleeves, and holders matter during maintenance because their attributes control how easily cables can be adjusted later. Reusability, adhesive removability, cable capacity, grip strength, desk-surface compatibility, access, and replacement ease all affect whether an accessory supports future adjustment or creates extra work.
Reusable Ties, Removable Clips, Sleeves, and Holders should be evaluated by condition rather than ranking. The table connects accessory attributes to maintenance outcomes for temporary setups, changing devices, and heavier cable bundles.
| Entity or accessory | Attribute | Value or condition | Effect or decision |
|---|---|---|---|
| Reusable ties | Reusability | Can be opened and tightened again without damage | Useful when cable groups change often or access is needed later |
| Removable clips | Adhesive removability | Depends on desk surface condition and adhesive hold | Reposition when placement is wrong; replace when hold becomes unreliable |
| Sleeves | Cable capacity | Works when the cable grouping still fits without restricting access | Use for grouped cables; reconsider when heavier bundles reduce flexibility |
| Holders | Grip strength | Should support the held item without shifting during normal adjustment | Keep when support remains stable; replace when support becomes weak |
| Clips, sleeves, and holders | Replacement ease | Varies by removability, access, and desk-surface compatibility | More suitable for temporary setups when future changes are likely |
Clean Up Cable Clutter After Adjustments
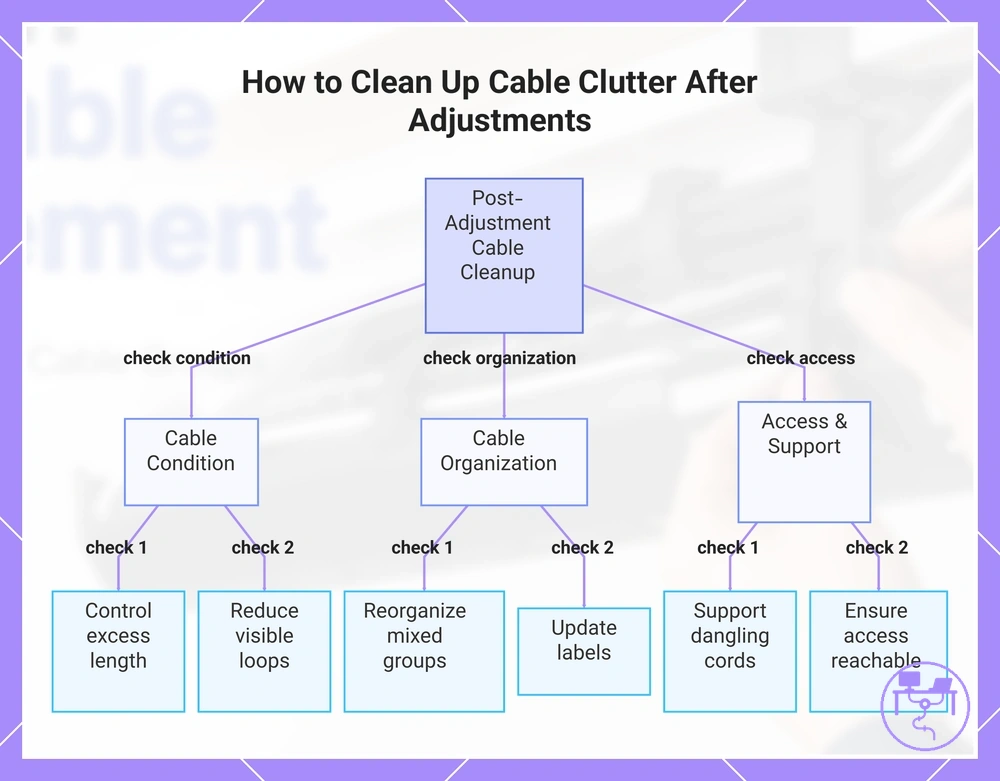
Cable clutter can return after even small adjustments, and cleanup removes the leftover clutter created during the change. Clean Up Cable Clutter After Adjustments by verifying visible loops, unused cable length, labels, and access gaps so the post-adjustment cable layout remains easier to maintain.
- Unused cable length → verify that excess length is controlled and does not create new cable clutter.
- Visible loops → check whether loops remain after the adjustment and reduce them when access is not affected.
- Dangling cords → inspect loose cords and floor-to-desk runs for sections that may need additional support.
- Mixed cable groups → confirm that cable groups remain organized for cable identification and current device connections.
- Labels → verify that labels still match the current cable layout after adjustments.
- Access gaps → check that plugs, cable ends, and maintenance access points remain reachable.
Unused cable length, visible loops, dangling cords, and mixed cable groups are common cleanup variables after a device change. A clean cable layout may require minor cable cleanup even when the main route remains unchanged, particularly when loose cords, labels, or floor-to-desk runs no longer match the updated arrangement.
For example, after adding one new device, cleanup may involve controlling a small amount of unused cable length, updating a label, and checking for visible loops or access gaps around the new connection. The existing system can often remain in place when the checklist confirms that clutter from the adjustments has been addressed.
This chart shows the key verification checks to perform after cable adjustments to prevent clutter from returning.
Prevent Recurring Cable Problems
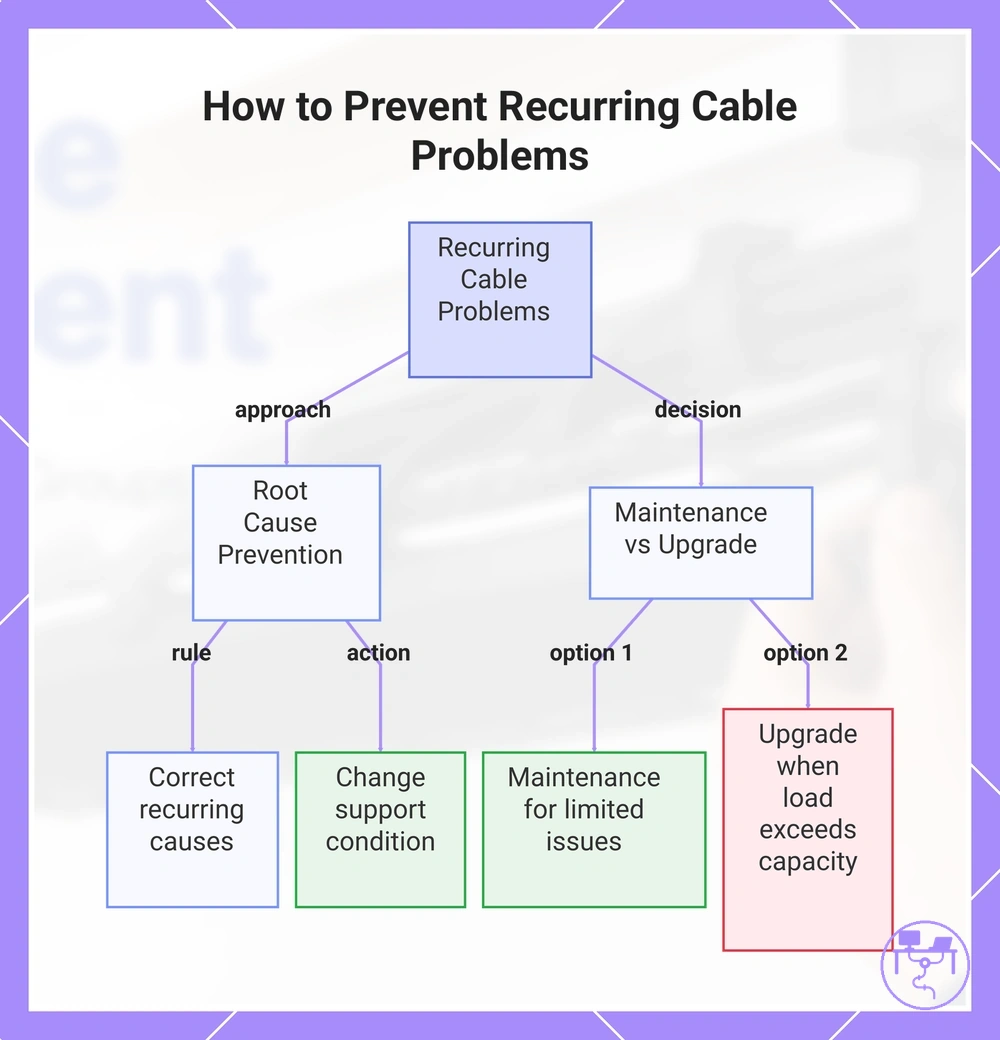
Prevention depends on correcting recurring causes, not just tidying visible cables. Prevent Recurring Cable Problems by linking each recurring symptom to its cause, condition, and next-step decision after maintenance.
- Recurring looseness → accessory wear or changing cable load may require stronger support or adjusted grouping.
- Overfilled trays → tray capacity may no longer match the current cable load, which can affect upgrade timing.
- Falling clips → surface condition, cable weight, or worn adhesive may require repositioning or replacement.
- Unlabeled cables → missing identification can create recurring clutter during future layout changes.
- Blocked power access → new connections may require safer power handling and clearer plug access.
- Poor slack control → repeated movement may require a revised slack point or route adjustment.
Habits, cable load, and accessory wear commonly influence recurring cable problems. When repeat cable issues return after the same correction, prevention may depend on changing the support condition rather than repeating the adjustment. Overfilled trays and falling clips may also indicate that current accessories no longer match the updated layout.
Unlabeled cables, blocked power access, and poor slack control can create recurring clutter even when the main route remains mostly unchanged. Labels support cable identification during future changes, while access gaps and slack conditions may need review when desk movement, device additions, or layout changes occur.
A maintenance fix may be sufficient when the cause is limited to labeling, slack adjustment, or a local support issue. Upgrade timing may deserve review when recurring cable problems continue because cable load exceeds available capacity, accessory wear returns quickly, or repeated adjustments no longer produce a stable maintenance outcome. In those situations, reviewing the cost and value of upgrading can help compare recurring fixes with a higher-value upgrade.
Here are product examples that may make comparison easier. Before buying, always review the compatibility criteria, essential features, and product details.
This chart shows how to prevent recurring cable problems by addressing root causes and deciding between maintenance and upgrade approaches.