How to Install a Desk Cable Management System
Installing a desk cable management system starts with preparing the desk underside, choosing a mounting method, fixing the tray or channel securely, then routing cables with enough access and slack for daily use. The installation should match the desk surface, cable load, hardware type, and power strip position rather than forcing every cable into one hidden path.
A desk cable management system guide helps frame the whole setup, but the installation itself should stay focused on what can be checked, marked, mounted, grouped, and verified under the desk. Screw-mounted hardware may suit a stable mounting surface, clamp-on hardware may suit a removable setup, and adhesive parts may work better for lighter cable support when the surface and product design allow it.
Before mounting, disconnect and untangle the device cables, group them by function, and check whether trays, clips, sleeves, ties, power strip holders, and basic tools are ready. Cable labels can help later maintenance when multiple device cords look similar after routing.
The main installation decision is whether the selected hardware can hold the planned cable bundle without blocking drawers, knees, desk frames, outlet reach, or future device changes. Heavy adapters and power strips usually need more deliberate support than light peripheral cables, and adhesive-only placement can become unreliable when cable tension, surface condition, or weight exceeds what the product is designed to handle.
Keep cable hiding, advanced routing, and mistake correction subordinate to the installation process: first confirm fit, mount the main support, secure the power area, route the cable groups, and verify that the system stays accessible and stable before treating appearance as the final priority.
Installation Fit Checks for the Desk and Cable Load
Installation fit checks for the desk and cable load depend on the desk underside, available mounting space, cable volume, and the weight that the cable management system is expected to support. A desk cable management system is more likely to install cleanly when the mounting area is accessible and the planned cable bundle matches the support method.
These installation fit checks help identify conditions that may affect mounting strength, clearance, or cable organization before hardware is attached. The visual below highlights the desk areas and cable-load factors that should be reviewed before installation.
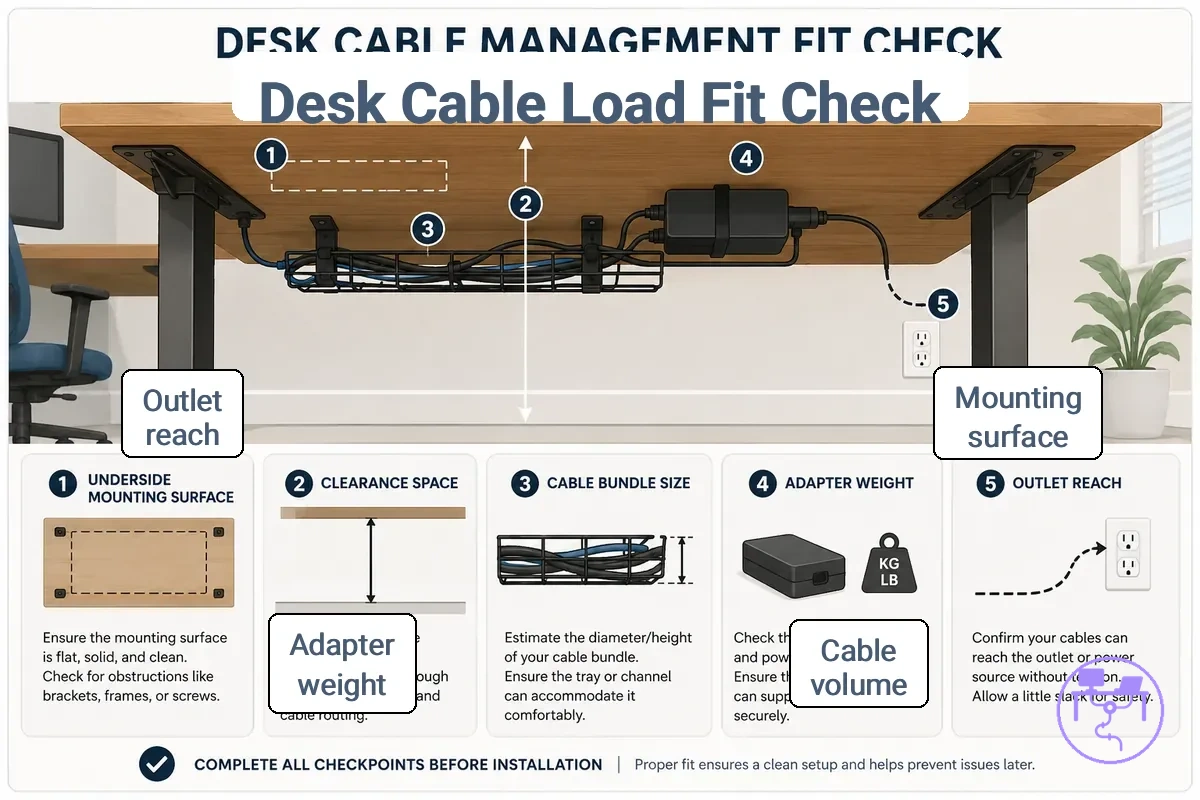
Desk material, underside thickness, and mounting access can influence hardware selection. If the desk includes support bars, shallow mounting zones, or limited underside clearance, the installation decision may require a different mounting position or support method. Related considerations are covered in desk mounting compatibility.
Cable load should be evaluated as a complete bundle rather than as individual cables. Power adapters, power strips, and grouped device cables can create more weight and occupy more space than expected, especially when the underside area is narrow or already crowded.
Use the following checklist before installation:
- Check whether the desk underside provides a clear and accessible mounting surface.
- Verify that the desk material and mounting area suit the intended hardware type.
- Confirm that cable bundles, adapters, and power accessories can fit within the planned support area.
- Check whether outlet reach and power strip placement allow practical cable routing.
- Verify that drawers, frames, or structural components will not interfere with the mounting location.
- Review whether limited clearance or heavier cable groups may require a different installation approach.
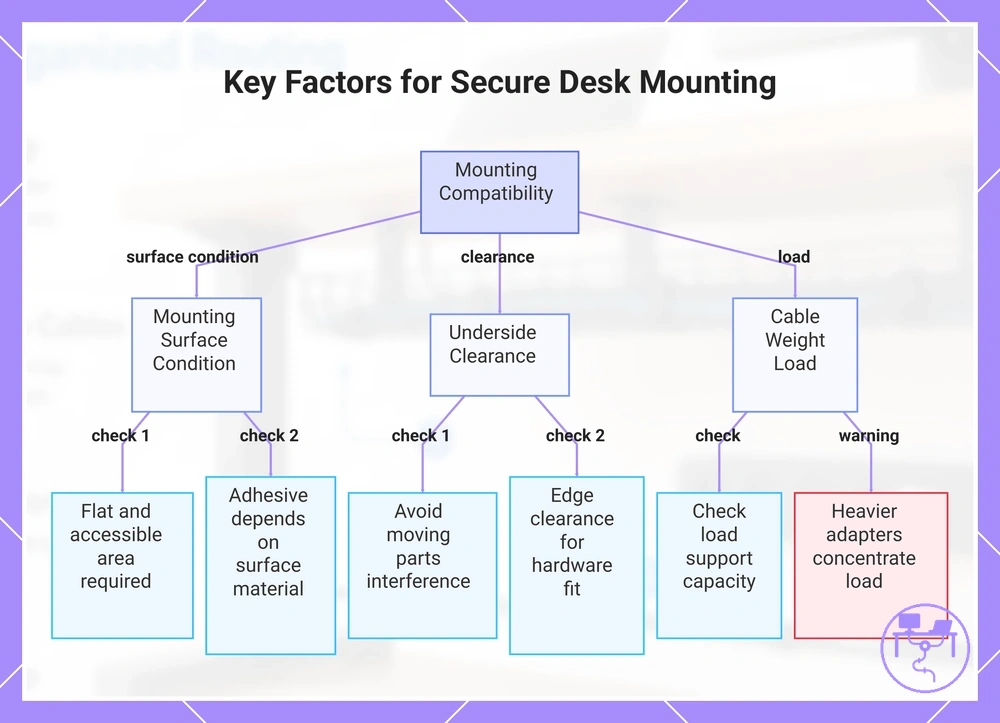
Mounting surface, underside clearance, and cable weight
Mounting surface, underside clearance, and cable weight determine whether a tray, channel, clip, or holder can mount securely under the desk. Compatibility depends on the mounting surface condition, available clearance, and whether the planned cable load matches the support method.
Before installation, review the local conditions that can affect mounting stability. Surface material, nearby moving parts, and the combined weight of cables and adapters may influence whether the selected mounting location remains suitable.
- Check whether the mounting surface provides a flat and accessible area for secure attachment.
- Verify that desk frames, drawers, keyboard trays, or other moving components will not interfere with the mounted hardware.
- Confirm that edge clearance allows the tray, channel, clip, or holder to fit without obstruction.
- Review whether cable bundles and power adapters create a load that the mounting method can reasonably support.
- Check whether adhesive-based mounting depends on surface condition, material, and cable weight.
- Verify that cable routing does not place continuous tension on the installed hardware.
Limited underside clearance can reduce placement options, while heavier adapters may concentrate load in a smaller area. When mounting space is restricted or cable weight is unevenly distributed, a different mounting position or support method may provide a more secure result.
This chart shows the three main factors that determine whether a desk mounting method can securely hold cable management hardware, along with the key checks for each factor.
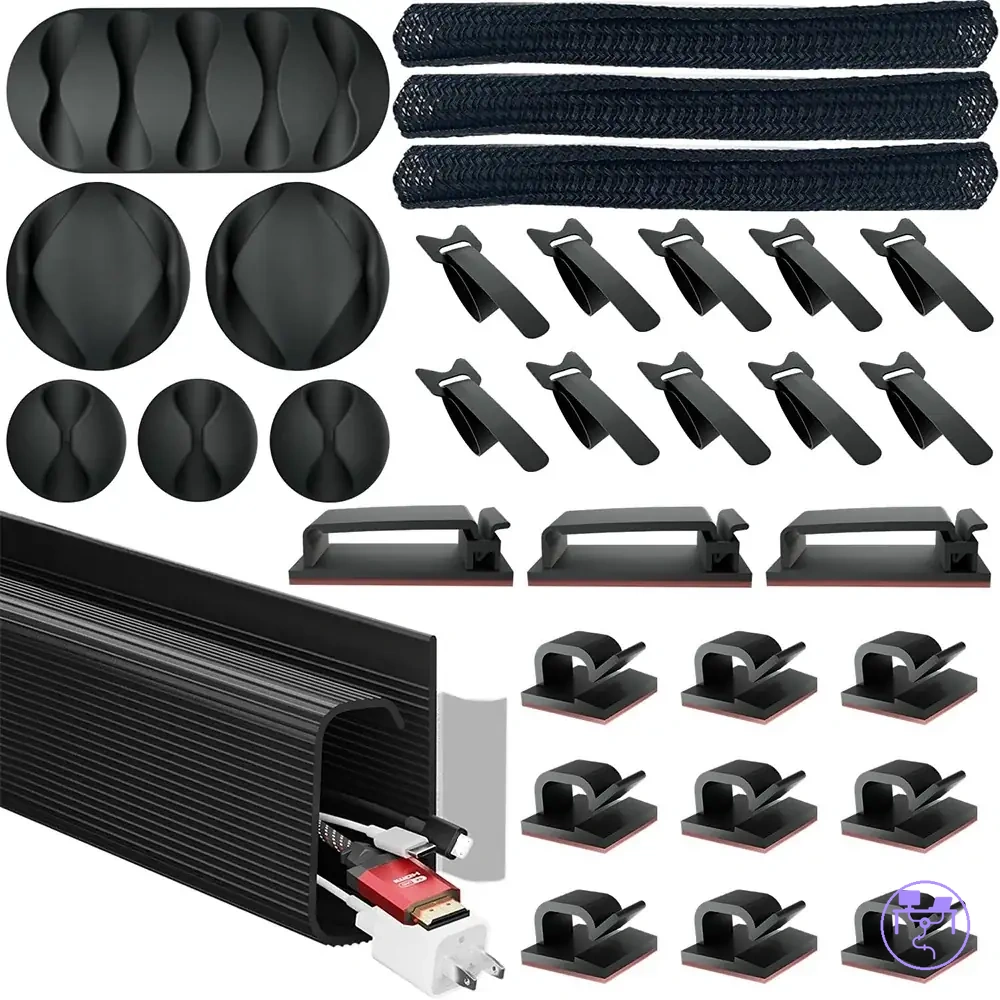
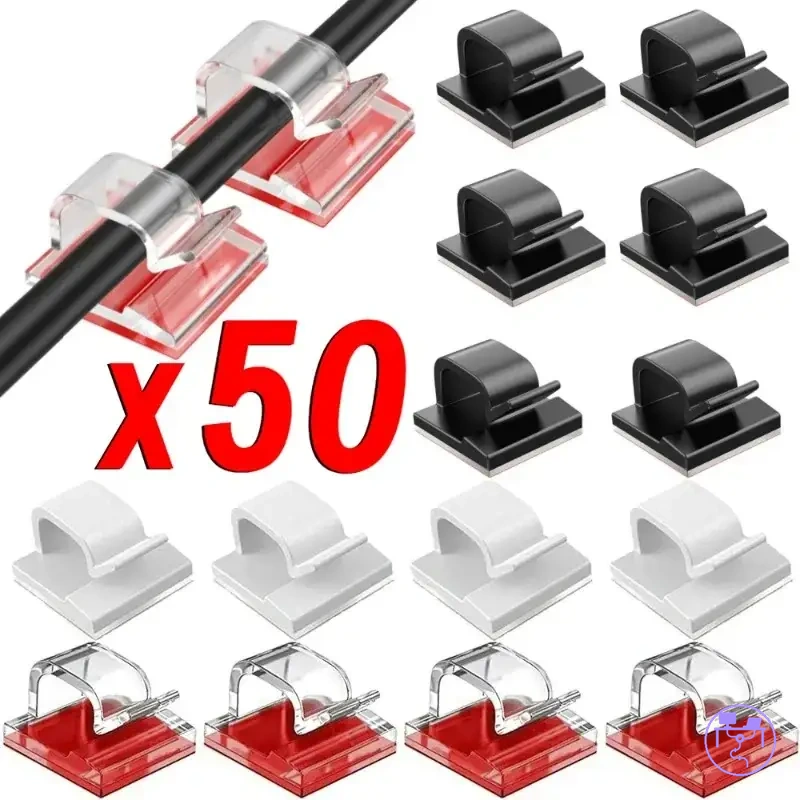
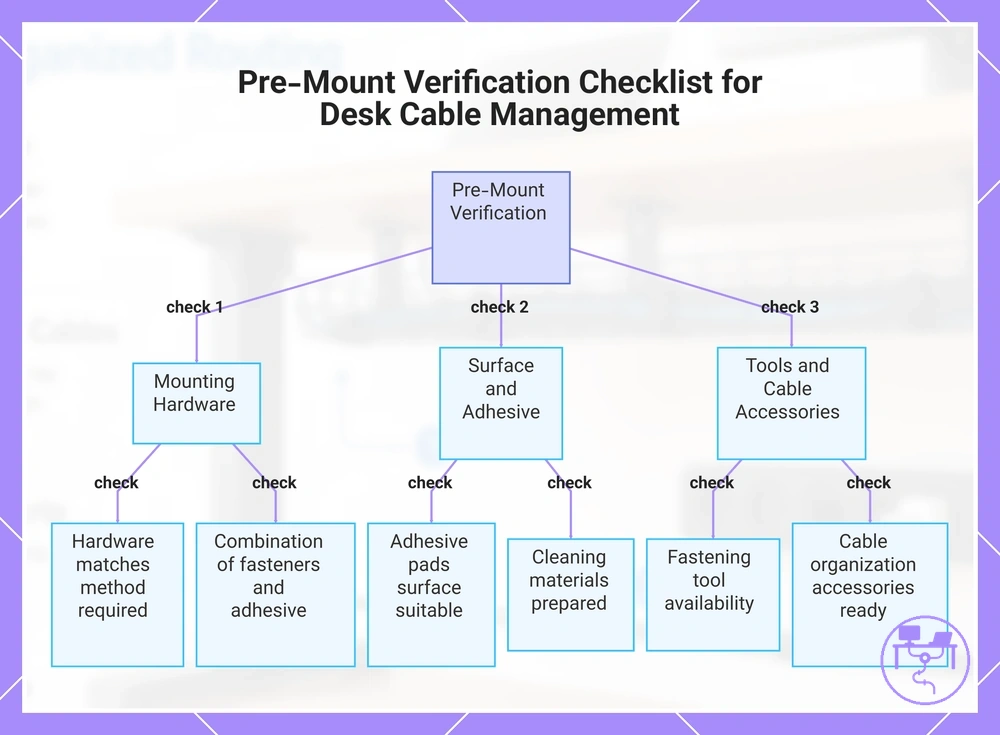
Hardware, fasteners, adhesive surfaces, and basic tools
Hardware, fasteners, adhesive surfaces, and basic tools should be verified before mounting begins so the desk cable management system can be installed with the required attachment and organization components ready. The required items may vary by mounting method, product design, and desk surface condition.
Review the available cable management parts and confirm that the necessary installation components are available before fastening hardware. Adhesive and screw requirements may differ depending on the desk surface and the attachment method used by the cable management system.
- Check that screws, brackets, clamps, or other mounting hardware are available when the installation method requires them.
- Verify that adhesive pads are appropriate for the intended mounting surface when adhesive attachment is used.
- Prepare surface cleaning materials to remove dust, residue, or debris before mounting.
- Confirm whether a screwdriver, drill, or similar fastening tool is needed for the selected hardware.
- Check that cable clips are available for guiding and securing cable groups after installation.
- Verify that cable sleeves, ties, or similar accessories are ready for organizing cable bundles.
- Review whether the installation depends on a combination of fasteners and adhesive support rather than a single attachment method.
This chart shows the key items to verify before mounting a desk cable management system, including hardware, surface preparation, and tools.
Choosing the Right Mounting Method Before Installation
Choosing the right mounting method before installation depends on desk condition, permanence, cable load, and how often the cable management system may need to be removed or adjusted. Screw-mounted, clamp-on, and adhesive methods can each work when the desk surface, support needs, and access requirements match the installation path.
The mounting method affects both stability and removability, so the choice should be made before trays, channels, or holders are positioned. The visual below compares the main installation paths by desk requirement, support behavior, removal impact, and suitable use condition.
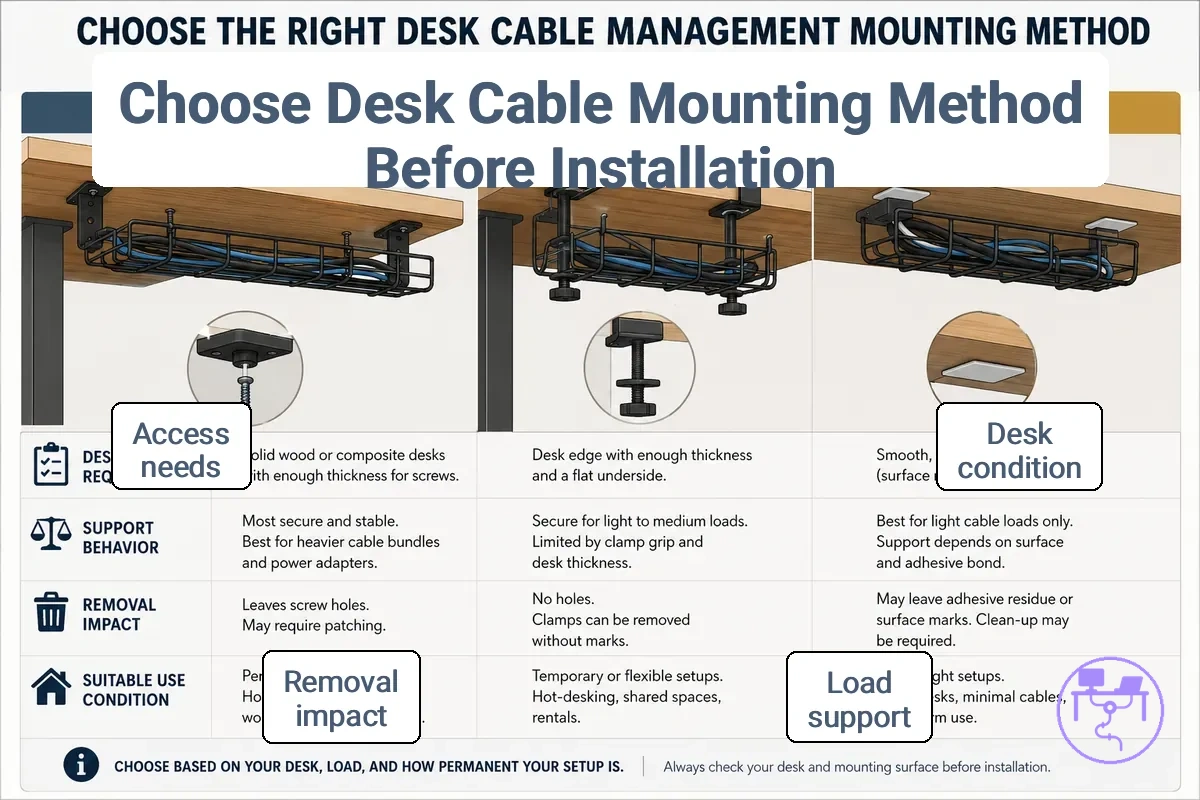
| Mounting method | Desk requirement | Strength level | Removal impact | Best-fit condition |
|---|---|---|---|---|
| Screw-mounted | Drillable underside with suitable material and thickness | Often stronger for trays and heavier cable groups when installed correctly | May leave holes or surface marks | More permanent setups, heavier cable trays, and supported power areas |
| Clamp-on | Accessible desk edge with enough clearance for the clamp | Can support removable setups when the edge shape and cable load fit the clamp design | Usually easier to remove than drilled hardware | Renters, no-drill desks, and setups that may need adjustment |
| Adhesive | Clean surface with enough contact area for the adhesive base | Usually better for lighter clips, raceways, or sleeve holders than heavy adapters | May leave residue or lose grip depending on surface and load | Light cable routing, low-load accessories, and desks that should not be drilled |
A renter or user with a desk that should not be drilled may prefer clamp-on or adhesive support when the cable load is light enough. A setup with heavier power strips, large cable trays, or concentrated adapter weight may require a more secure support method if the desk surface allows it.
Screw-mounted trays and channels
Screw-mounted trays and channels are often suitable when the desk underside can accept fasteners and the cable management system requires a more permanent mounting approach for trays, channels, or heavier cable groups. Installation should begin by checking desk construction, mounting location, and hardware requirements before marking or drilling any mounting points.
- Check whether pilot holes are appropriate for the desk material and the mounting hardware being used.
- Verify that screw length matches the available desk thickness to reduce the risk of surface damage or fastener protrusion.
- Confirm that bracket spacing aligns with the tray or channel mounting points and the expected cable load.
- Review whether tray weight, cable bundles, and power accessories may increase stress on the mounting area.
- Avoid assuming that drilling is suitable when desk construction, internal supports, or material thickness cannot be verified, because hidden components or limited material depth may affect installation.
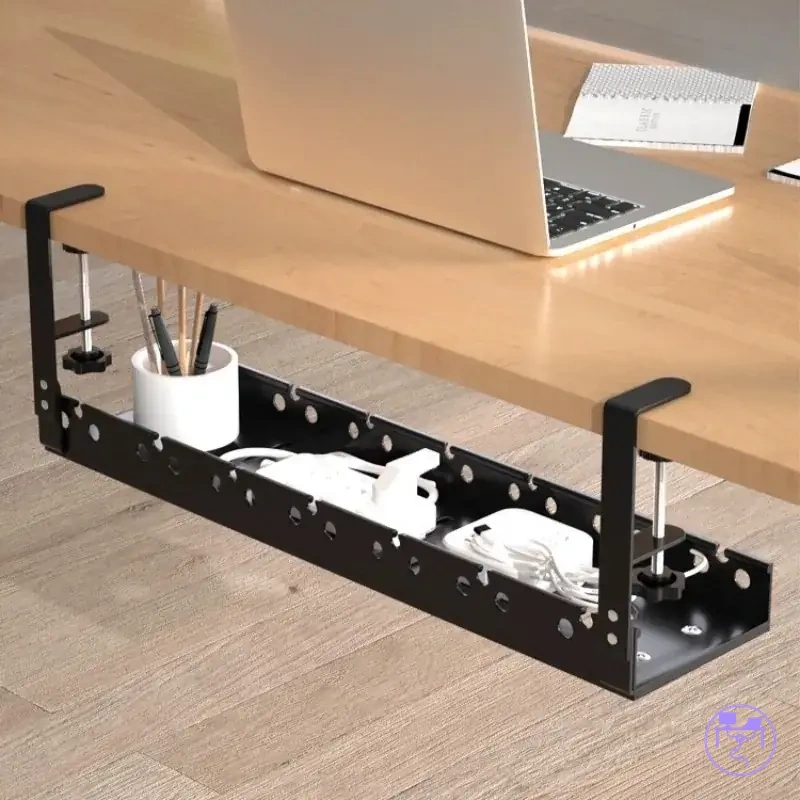
Clamp-on trays for no-drill desk setups
Clamp-on trays for no-drill desk setups are often suitable when the desk cable management system needs a removable mounting method and the desk surface should not be drilled. Installation should begin by checking whether the desk edge, underside shape, and expected cable load match the clamp design before fastening the tray.
Clamp fit depends on desk edge shape, available clearance, and the way the tray transfers load to the desk. Use the following checks before mounting a clamp-on tray:
- Verify that the clamp opening range can accommodate the desk edge thickness.
- Check whether an underside lip, bevel, or structural feature may interfere with clamp contact.
- Confirm that drawers, frames, or other components leave enough clearance for the clamp hardware.
- Review whether the planned cable bundle, adapters, or power accessories create a load that the clamp-mounted tray can reasonably support.
- Check that the clamp can sit evenly against the desk edge without relying on partial contact or obstruction-prone mounting points.
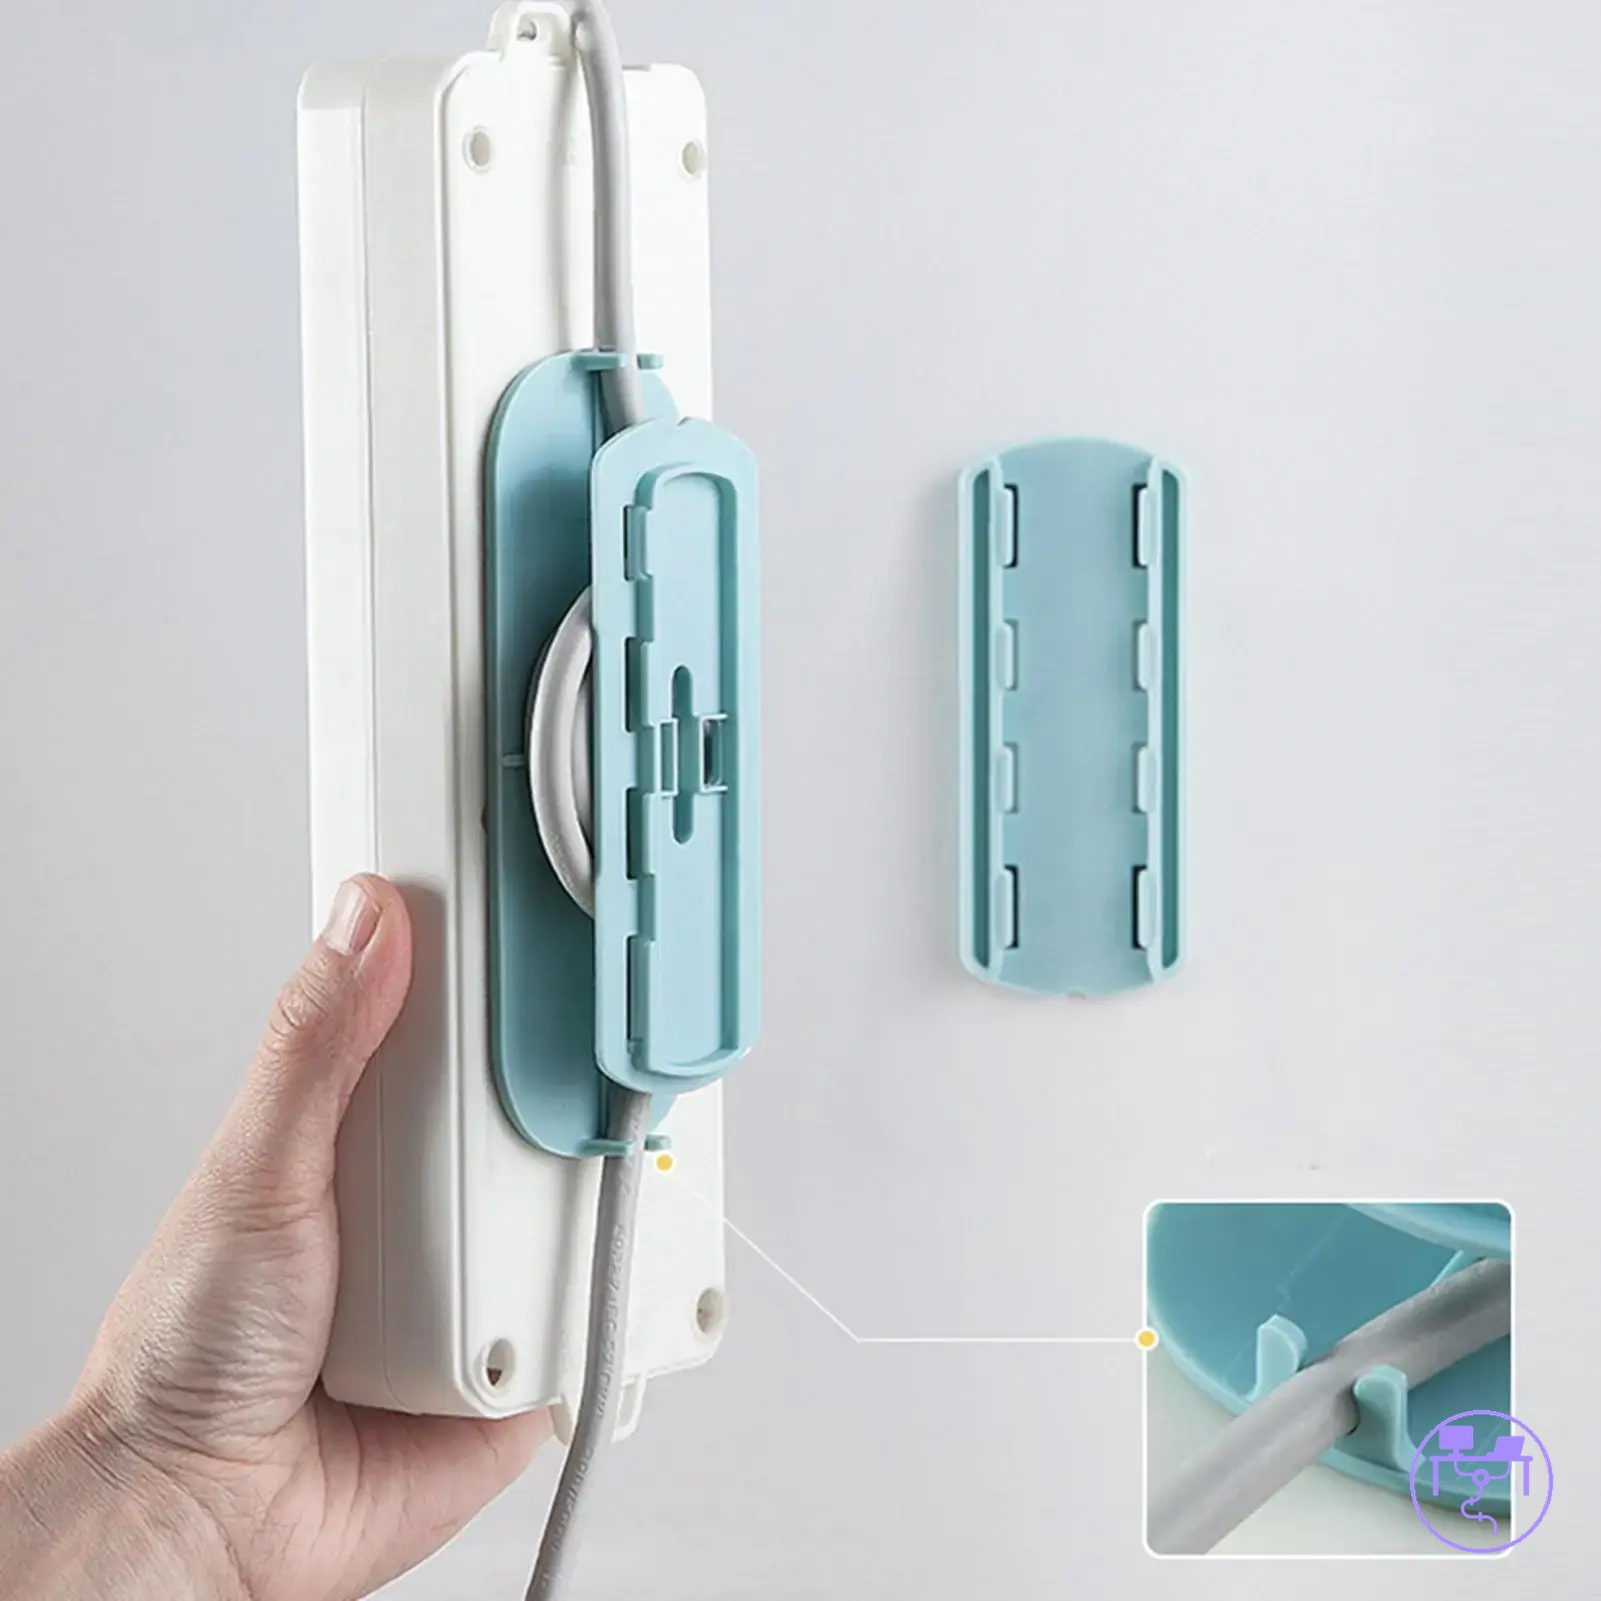
Adhesive raceways, wire clips, and sleeve holders
Adhesive raceways, wire clips, and sleeve holders are often appropriate when the desk cable management system only needs support for lighter cable routing and the mounting surface allows reliable adhesive contact. Installation should begin with a clean surface and an assessment of cable weight before attaching any adhesive-backed component.
- Clean and dry the mounting surface before applying adhesive components, because dust, residue, or moisture may reduce adhesive contact.
- Allow any recommended curing period before placing ongoing cable load on the raceway, clip, or holder.
- Check whether cable tension may pull against the adhesive attachment point, especially near bends, edges, or moving equipment.
- Verify that sufficient adhesive contact area is available for the mounting surface and component design.
- Use adhesive supports primarily for lighter wires and cable organization tasks when cable weight and attachment conditions are appropriate.
- Avoid assuming that adhesive raceways, clips, or holders can support heavy adapters or concentrated power-related loads, because holding capacity may depend on surface condition and load distribution.
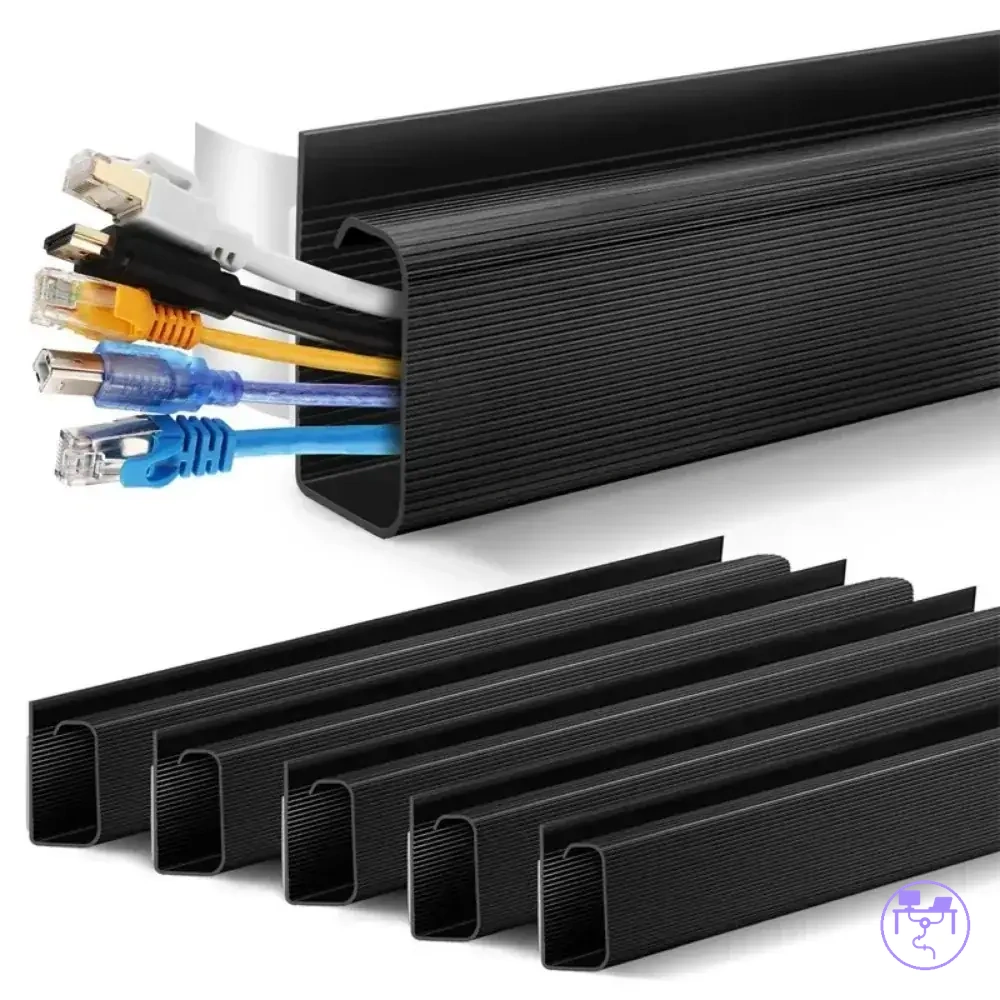
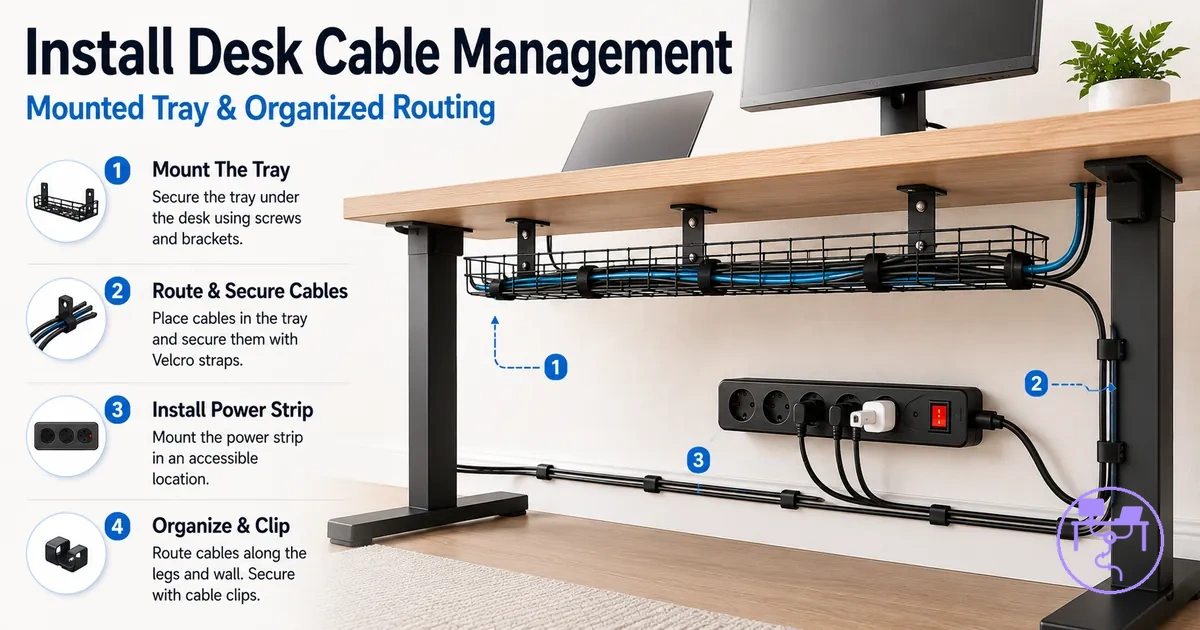
Mounting the Main Cable Tray or Channel Under the Desk
Mounting the main cable tray or channel under the desk starts with selecting a position that supports cable access, tray stability, and a clear routing path for the desk cable management system. The mounting location should be verified before fastening because tray placement can affect clearance, future cable organization, and access to connected equipment.
Mounting the Main Cable Tray or Channel Under the Desk becomes easier when the tray position, alignment path, and fastening points are identified before installation. The visual below demonstrates the placement sequence and the key mounting checks that help prevent alignment and clearance issues.
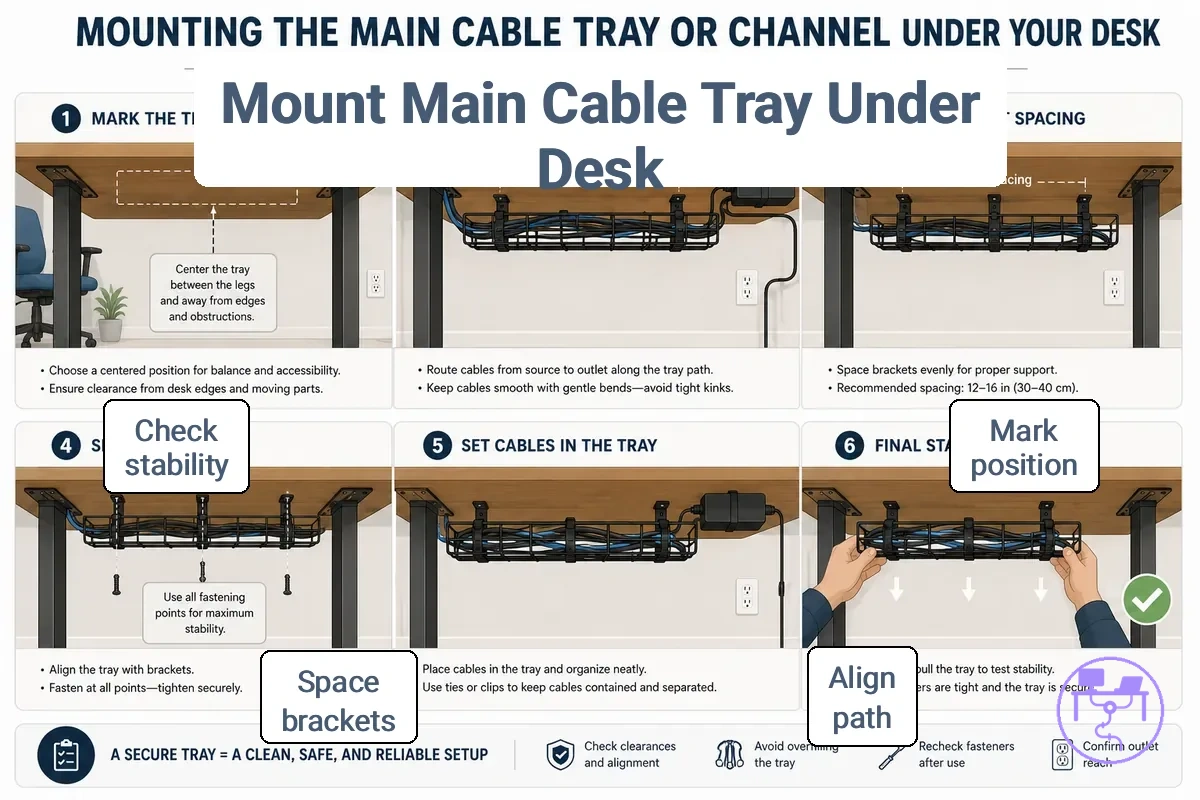
- Mark the intended tray or channel position under the desk after confirming that the location does not interfere with drawers, frames, or other desk components.
- Align the tray or channel with the planned cable path so cable entry and exit points remain practical for later routing.
- Check bracket spacing against the mounting points provided by the tray or channel design.
- Fasten the mounting hardware using the attachment method appropriate for the selected system and desk surface.
- Verify tray orientation before fully securing the hardware so the opening and cable access direction match the intended routing path.
- Check that all fasteners are secure without excessive tightening when over-tightening could affect mounting hardware, tray alignment, or desk surfaces.
- Verify that the mounted tray or channel remains properly positioned and does not obstruct drawer movement or planned cable routes.
Marking the tray position and cable path
Marking the tray position and cable path starts with defining where cables need to travel before any tray, channel, clamp, or fastener is installed. The mounting location should follow the actual cable route so the desk cable management system supports device connections without requiring major path changes later.
- Identify the outlet direction and mark the general route that cables will follow from the power source toward the desk equipment.
- Mark the expected cable entry points for monitors, peripherals, and other connected devices so the tray or channel location aligns with those connection areas.
- Position the tray or channel along the planned route and verify that the tray length supports the intended cable path without creating unnecessary detours.
- Mark screw locations, clamp positions, or other mounting points after confirming that the tray orientation matches the planned cable route.
- Verify the complete path before fastening hardware and avoid routing cables first, because hardware placement may need adjustment to match the final cable direction.
For broader preparation before marking mounting points, review the installation planning checklist so tray placement and cable routing decisions remain aligned.
Securing brackets, clamps, screws, or adhesive bases
Securing brackets, clamps, screws, or adhesive bases starts after the tray, channel, or base position has been checked against the desk surface and cable path. The fastening method should hold the selected part in place without assuming unsupported load capacity or forcing the desk material beyond what the hardware and surface can tolerate.
- Align brackets with the tray or channel mounting points before tightening so the support remains even across the installed component.
- Set clamp pressure gradually when using a clamp-mounted base, because uneven or excessive pressure may affect grip, alignment, or desk edge condition.
- Check screw depth against the available desk thickness before fastening to reduce the risk of surface damage or protrusion.
- Press adhesive bases against a clean, suitable contact area so the adhesive surface can sit flat and make consistent contact.
- Verify the installed tray, channel, or base with a light stability check before adding the full cable group, since final support depends on fastener type, desk condition, and product design.
Checking tray stability before adding cables
Checking tray stability before adding cables helps identify mounting issues before cable bundles or power accessories add weight to the installed support. This quick verification can help prevent sagging, slipping, or weakening adhesive contact before the desk cable management system is put into use.
- Check whether the tray or channel shows wobble when light pressure is applied at different points along the mounted component.
- Verify that brackets maintain full contact with the mounting surface and do not show visible gaps or shifting.
- Confirm that clamp-mounted hardware remains in position and does not move during a basic stability check.
- Inspect adhesive attachment points for consistent surface contact and signs that the adhesive bond may not be fully secure.
- Check that nearby drawers, frames, or desk components still have sufficient clearance around the mounted tray or channel.
- Verify that the mounted support appears ready for the planned cable group before adding cables, adapters, or power accessories, because final performance may depend on cable load and mounting conditions.
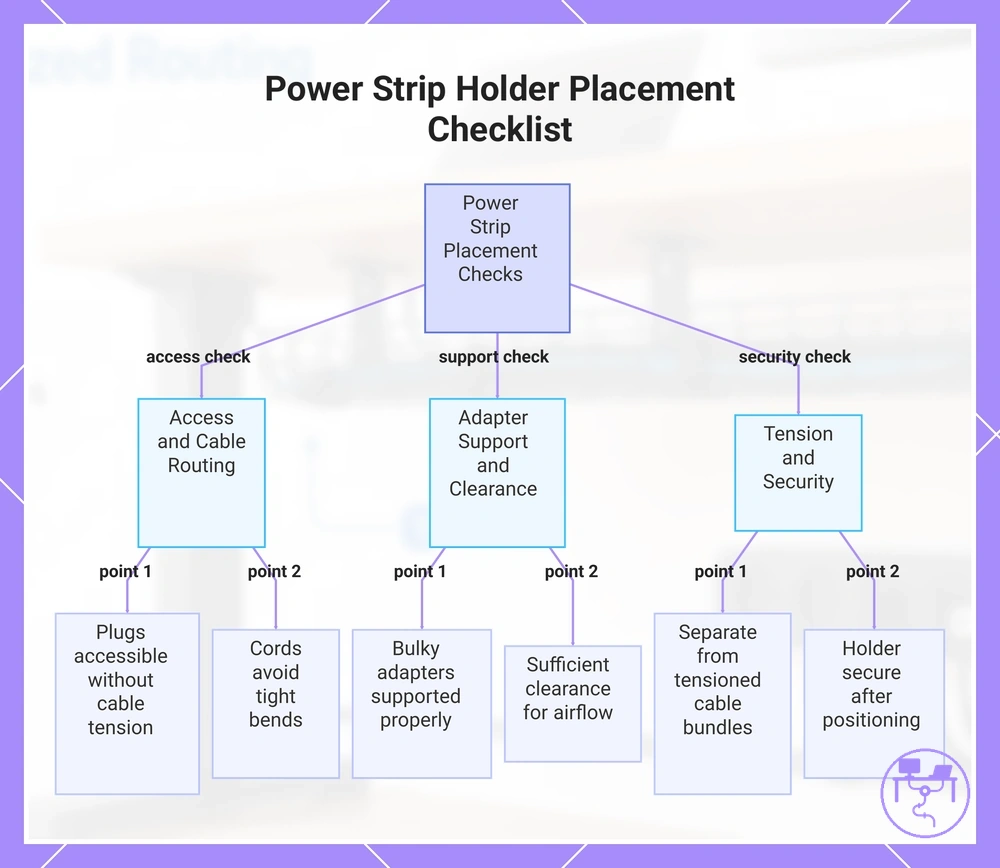
Installing the Power Strip Holder and Adapter Support
Installing the Power Strip Holder and Adapter Support depends on placing power accessories where cord reach, access, ventilation, and mounting support remain practical for the intended setup. A desk cable management system may become harder to organize when a power strip or bulky adapter is positioned where cable strain, restricted access, or inadequate support affects placement.
Power strip placement should be reviewed before mounting because holder position, plug access, cord routing, and adapter size can influence how the installation is supported. The goal is to keep power accessories accessible while reducing unnecessary stress on cables, plugs, and mounting hardware.
The following checklist can help verify practical placement before cables and power accessories are fully organized:
- Position the holder where plugs remain accessible without requiring excessive cable tension.
- Check that power cords follow a natural path and avoid tight bends near plug or adapter connections.
- Verify that bulky adapters are supported appropriately and do not rely on a single cable connection to carry their weight.
- Allow sufficient clearance around power strips and larger adapters when crowded placement may limit airflow.
- Separate power accessories from cable bundles that remain under tension, because continuous pulling force may affect routing and support conditions.
- Confirm that the holder remains secure after the planned power strip, adapters, and cable groups are positioned.
Power strip holders and adapter supports help manage placement and cable organization, but detailed electrical safety requirements, equipment ratings, and power-load considerations may require guidance beyond installation and positioning decisions.
This chart summarizes the key placement checks to verify before installing a power strip holder and organizing cables.
Positioning the power strip for access and cord reach
Positioning the power strip for access and cord reach starts with choosing a location where outlets remain reachable and connected cords can follow a natural path without unnecessary strain. A desk cable management system is easier to maintain when power strip placement aligns with device locations, cord length, and available space under the desk.
Before securing the power strip, verify that the planned position supports both accessibility and cable routing. The following checklist can help confirm practical placement conditions:
- Check that plug orientation allows cables to enter and exit without creating tight bends near the power strip.
- Verify that connected devices can reach the power strip without stretching cords across the desk underside.
- Confirm that the power switch remains accessible when occasional access may be needed.
- Allow enough space around larger adapters so nearby outlets remain usable when adapter size affects spacing.
- Check that the power strip does not interfere with knees, drawers, footrests, or moving desk components.
- Verify that cable bundles do not place continuous pulling force on connected plugs when equipment is adjusted.
A concealed position may reduce visible cable clutter in some setups, but outlet access, cord reach, and desk movement should guide the final placement decision rather than visibility alone.
Using screws, holders, or heavy-duty adhesive safely
Using screws, holders, or heavy-duty adhesive safely depends on the weight of the power strip or adapter, the desk surface, and how easily the installation may need to be removed later. A desk cable management system may require different support methods when equipment weight, mounting conditions, or removal requirements change the demands placed on the holder.
Support strength and removal risk can vary by mounting method. The comparison below highlights key conditions that may affect attachment choice and long-term support.
| Support method | Placement considerations | Removal considerations |
|---|---|---|
| Screw-mounted holders | May be appropriate when the desk surface can accept fasteners and the supported load requires a more secure attachment method. | Removal may leave mounting holes or surface marks. |
| Strap-style holders | Can help support power strips or adapters when holder dimensions and mounting conditions suit the equipment. | Removal depends on the holder design and attachment method. |
| Heavy-duty adhesive pads | Depend on surface preparation, adhesive contact area, equipment weight, and mounting conditions. | May leave residue or require surface cleanup after removal. |
Before final installation, check that the mounting surface is prepared appropriately, verify that the selected holder matches the intended equipment load, and inspect the installation for signs that movement, cable tension, or surface conditions could affect support over time. Adhesive-only support may not be appropriate when equipment is heavier, heat-sensitive, or dependent on mounting conditions that can change during use.
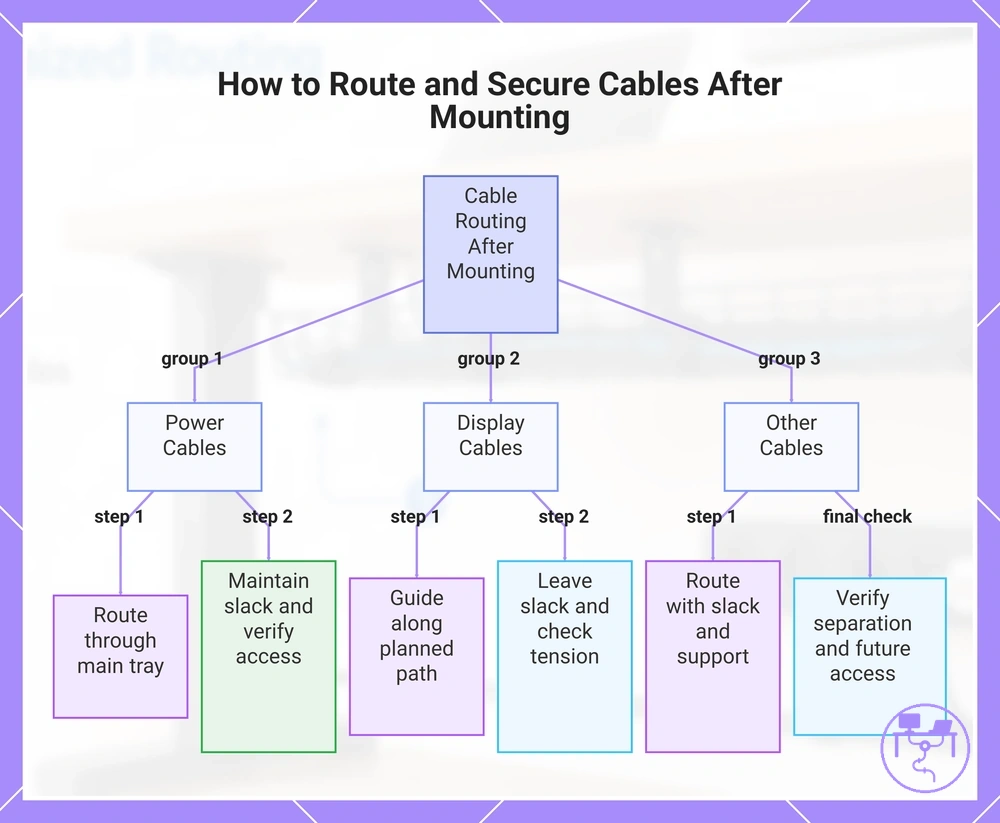
Routing and Securing Cables After Mounting
Routing and securing cables after mounting starts with grouping cables by function and guiding each cable group through the installed desk cable management system while preserving access, slack, and future adjustment points. The final routing path may depend on cable type, path length, equipment placement, and how often connected devices are moved or reconfigured.
After trays, channels, holders, and power accessories are mounted, route each cable group according to its purpose and access requirements. The following sequence can help keep cable paths organized while maintaining future access.
- Power cables: Route power cables through the main tray or channel, maintain enough slack near connected equipment, secure the cable group with appropriate holders or ties, and verify that plugs and power accessories remain accessible when adjustments are needed.
- Display cables: Guide display cables along the planned path between monitors and connected equipment, leave movement slack where monitor position may change, secure the cable group at support points, and check that cable tension does not increase during monitor adjustment.
- Peripheral cables: Route keyboard, mouse, audio, or accessory cables through secondary paths when available, preserve enough slack for normal device movement, secure the cable group without over-compressing cables, and verify that devices can still be repositioned comfortably.
- Adapter cables: Position adapter cables so cable weight is supported by the mounting system rather than the connector alone, maintain a service loop when equipment may be moved, secure the cable group to reduce shifting, and check that adapters remain accessible for inspection or replacement.
- Final verification: Check that cable groups remain separated where practical, confirm that moving desk components do not interfere with routed cables, and verify that future access points remain available for maintenance or equipment changes.
Once cable groups are routed and secured, users who want a cleaner visual result can explore ways to hide cables after installation while preserving access to the installed cable management system.
This chart shows the main steps for routing power, display, and other cables after mounting, including a final verification check.
Grouping power, display, and peripheral cables
Grouping power, display, and peripheral cables starts with separating cable types by function so the desk cable management system remains easier to route, inspect, and adjust later. Cable groups may require different amounts of slack, different routing paths, and different access points depending on connected equipment and device layout.
Each cable group serves a different purpose, so organizing them separately can help preserve routing clarity and future service access. The following grouping approach keeps cable handling focused on function rather than technical cable taxonomy.
- Power cords: Keep power cords grouped together within the main tray or channel, maintain enough slack near power accessories, and preserve access to plugs or power strips when equipment changes may occur.
- Display cables: Route display cables as a dedicated group between monitors and connected devices, leave movement slack where screens may be adjusted, and secure the group so cable tension remains manageable during repositioning.
- USB and peripheral cables: Group keyboard, mouse, audio, and similar peripheral lines separately from power cords when practical, maintain enough slack for normal device movement, and keep connection points accessible for replacement or reconfiguration.
- Adapter leads: Keep adapter leads near the associated power accessory, support cable weight through the mounting system where possible, and preserve access for inspection or equipment changes.
- Final grouping check: Verify that cable groups remain identifiable, confirm that slack is available where movement may occur, and check that future maintenance can be performed without disturbing unrelated cable groups.
Using clips, sleeves, and ties without blocking access
Using clips, sleeves, and ties without blocking access starts with securing cable groups in a way that keeps connectors, adapters, and adjustment points reachable. A desk cable management system should reduce cable movement while still allowing cables to be unplugged, rerouted, or inspected when the setup changes.
Neat cable organization is most useful when cable supports do not restrict future adjustments. Use the following checklist to balance cable control and access.
- Clip spacing: Position clips along the cable path so cables remain guided while still allowing individual cables to be removed or adjusted when needed.
- Sleeve entry points: Keep sleeve openings accessible so cables can be added, removed, or separated without disturbing the entire cable group.
- Reusable ties: Use ties that can be reopened when equipment changes may require cable replacement, inspection, or rerouting.
- Optional labels: Label cable groups when multiple connections follow the same path and future identification may simplify maintenance.
- Port and adapter clearance: Leave enough space around ports, plugs, and adapters so clips, sleeves, or ties do not obstruct connections during adjustments.
- Final access check: Verify that cable groups remain secure while connectors and cable paths can still be reached without disturbing unrelated cable groups.
Leaving safe slack for movement and future changes
Leaving safe slack for movement and future changes starts with keeping enough cable length available for adjustment while avoiding cable tension, sharp bends, or restricted movement. A desk cable management system is easier to maintain when cable groups can move with connected equipment and still remain accessible for future changes.
Functional slack depends on the cable path, connected devices, and how the desk setup moves during use. Use the following checks to confirm that cable groups remain flexible without creating routing problems.
- Sitting and standing desks: Check cable movement throughout the desk's operating range when desk height changes may increase cable tension.
- Monitor arms: Leave enough slack near monitor arm movement points so display cables can follow arm adjustments without pulling against connectors.
- Power reach: Verify that power cords can reach outlets, power strips, or adapters without remaining under continuous strain.
- Bend radius: Check that cable routing avoids sharp bends where cables enter trays, channels, clips, or connected devices.
- Future device changes: Preserve accessible slack near connection points when devices may be added, replaced, repositioned, or disconnected later.
Installation Problems to Check Before Daily Use
Installation problems to check before daily use usually appear as movement, cable strain, blocked access, or weak support in the desk cable management system. These issues should be corrected before regular use because loose mounts, overloaded trays, tight bends, and poor power placement can make the installation harder to maintain.
Use the diagnostic checklist below to match each visible symptom with a likely cause, an immediate check, and a practical correction path.
| Symptom | Likely cause | Immediate check | Correction path |
|---|---|---|---|
| Tray, channel, or holder moves when touched | Loose fasteners, weak adhesive contact, or poor clamp grip | Check bracket contact, screw hold, clamp pressure, or adhesive surface contact. | Re-mount the component if the support method no longer holds the installed part securely. |
| Tray sags after cables are added | Cable load may exceed the support method or concentrate weight in one area | Check whether heavy adapters, bundled cords, or power accessories are loading one section. | Reduce cable load, redistribute weight, or change to a stronger support method when the desk surface allows it. |
| Cables bend sharply near exits or connectors | Routing path may be too tight or cable slack may be insufficient | Check cable entry points, exit points, and connector areas for tight turns. | Revisit routing and add functional slack where cable movement or connector strain is visible. |
| Drawers, knees, or moving desk parts hit the installation | Mounting position may block normal desk movement or clearance | Check drawer travel, leg space, footrest movement, and height adjustment if applicable. | Re-mount the tray, channel, or holder in a clearer position before daily use. |
| Power strip or adapters are hard to reach or strained | Poor power placement, short cord reach, or unsupported adapter weight | Check plug access, switch access, cord path, and whether adapters pull on connected cables. | Adjust power placement, support bulky adapters, or reroute cable groups to reduce strain. |
If the same issue continues after a basic correction, use a more specific process to fix installation mistakes before adding more cables or hiding the setup.
Loose screws, slipping clamps, and weak adhesive points
When a tray, channel, or holder moves after installation, the likely cause is a loose fastener, clamp movement, adhesive lift, uneven surface contact, or a support method that no longer matches the installed load. These mounting problems can reduce stability in a desk cable management system and should be checked before continued use.
Most local mounting failures can be diagnosed by matching the symptom with the likely cause and a correction path.
- Loose screws: A tray or bracket shifts during a light movement check. The cause may be insufficient fastening, mounting stress, or a desk surface that no longer holds the fastener well. Check whether the screws remain secure in the mounting surface. Re-tighten only when the fastener still holds, or re-mount the hardware if the attachment point is no longer reliable.
- Slipping clamps: A clamp-mounted component moves along the desk edge. The cause may be reduced clamp pressure, uneven edge contact, or increased cable load. Check clamp contact points and verify that the clamp remains seated correctly. Reposition or re-mount the clamp if movement continues.
- Weak adhesive points: An adhesive base begins lifting from the mounting surface. The cause may be limited surface contact, surface contamination, or load conditions that exceed the adhesive attachment. Check for lifting edges or incomplete contact. Reapply, replace, or change the support method when the adhesive bond no longer remains secure.
- Uneven mounting surfaces: A tray, holder, or channel sits unevenly after installation. The cause may be irregular surface contact or mounting hardware that does not sit flush. Check alignment and contact areas. Reposition the hardware if uneven support affects stability.
- Overloaded hardware: Brackets, clamps, or adhesive mounts show strain after cables and accessories are added. The cause may be concentrated weight or a support method that is not suited to the installed load. Check where weight is distributed, then reduce cable load, redistribute accessories, replace hardware, or use a different mounting approach when needed.
Overloaded trays, tight bends, and unsafe power placement
Overload and strain can appear even when a desk cable management system is mounted correctly. Excess cable weight, sharp routing angles, or poorly supported power accessories may create stability concerns that become more noticeable as cables, adapters, and devices are added.
Use the checklist below to identify conditions that may require adjustment, load redistribution, or a different support approach.
- Tray sagging: Check whether the tray bends, tilts, or shows visible strain after cables are installed. Excess cable weight or concentrated loading in one area may place more stress on the mounting system.
- Bundled adapter weight: Check whether multiple adapters or power accessories are grouped in a single location. Concentrated weight may increase the load on trays, holders, clamps, or mounting points.
- Compressed cords: Check whether cable bundles are tightly packed inside a tray, sleeve, or channel. Restricted space may make cable routing, inspection, or future adjustments more difficult.
- Sharp bends: Check cable entry points, exit points, and connector areas for tight turns. Sharp bends may increase cable strain when equipment is moved or repositioned.
- Heat clearance: Check whether adapters, power strips, or cable bundles are crowded into confined areas. Additional clearance may help when connected equipment generates heat during normal use.
- Unsupported power strips: Check whether the power strip is supported by its mounting method rather than by connected cords alone. Unsupported weight may increase strain on cables, plugs, or mounting hardware.
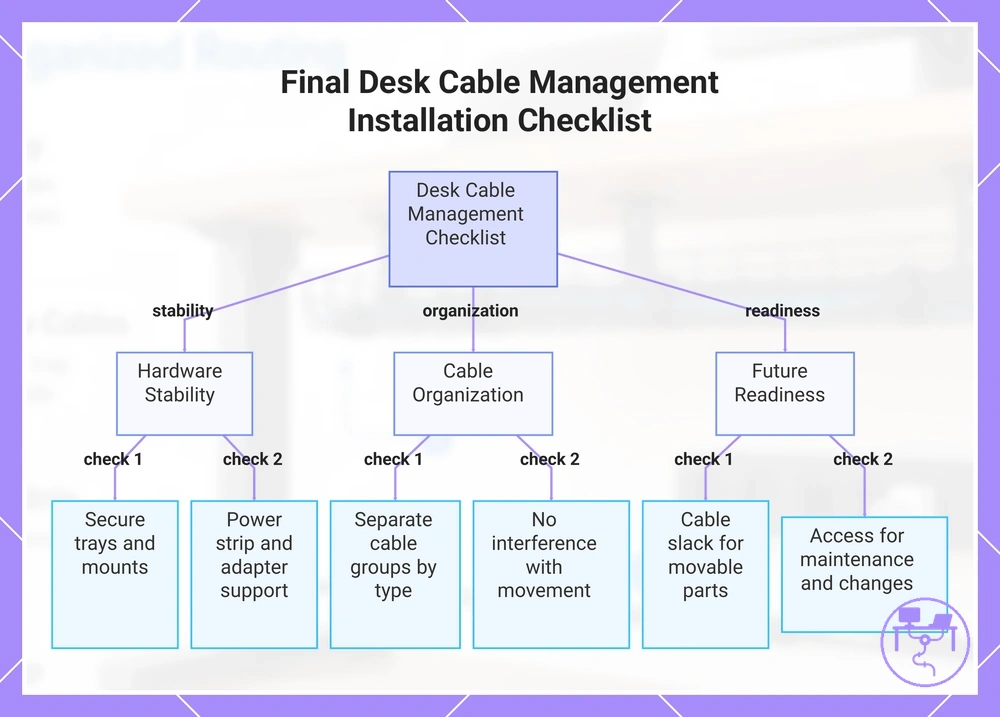
Final Desk Cable Management Installation Checklist
A final desk cable management system check confirms that mounted hardware, cable routing, power support, cable slack, and future access remain suitable for daily use. The checklist below helps verify that the installation is complete without repeating every setup step.
Review each point after cables, trays, holders, and power accessories are in their final positions. Any item that does not pass inspection may require adjustment, re-mounting, load redistribution, or routing changes depending on the installation conditions.
- Check that trays, channels, clamps, screws, and adhesive mounts remain secure and show no visible movement during a light stability check.
- Verify that power cables, display cables, and peripheral cables remain organized as separate cable groups where practical.
- Confirm that the power strip is supported by its mounting method and is not suspended by connected cords.
- Check that adapters have enough surrounding space and do not place concentrated weight on unsupported cable connections.
- Verify that cable slack remains available where equipment, monitor arms, or adjustable desks may require movement.
- Check that desk movement, drawers, and nearby components do not interfere with routed cable groups.
- Confirm that plugs, adapters, cable groups, and mounting hardware remain accessible for future inspection, maintenance, or equipment changes.
If each checklist item is confirmed, the desk cable management system appears mounted, routed, supported, and prepared for normal daily use based on the current setup conditions.
This chart groups the final checklist points into three key categories: hardware stability, cable organization, and future readiness, to verify that the desk cable management system is fully installed and ready for daily use.
The products below are useful examples for comparing available options. Before buying, check that the compatibility criteria, key features, and product details match your needs.