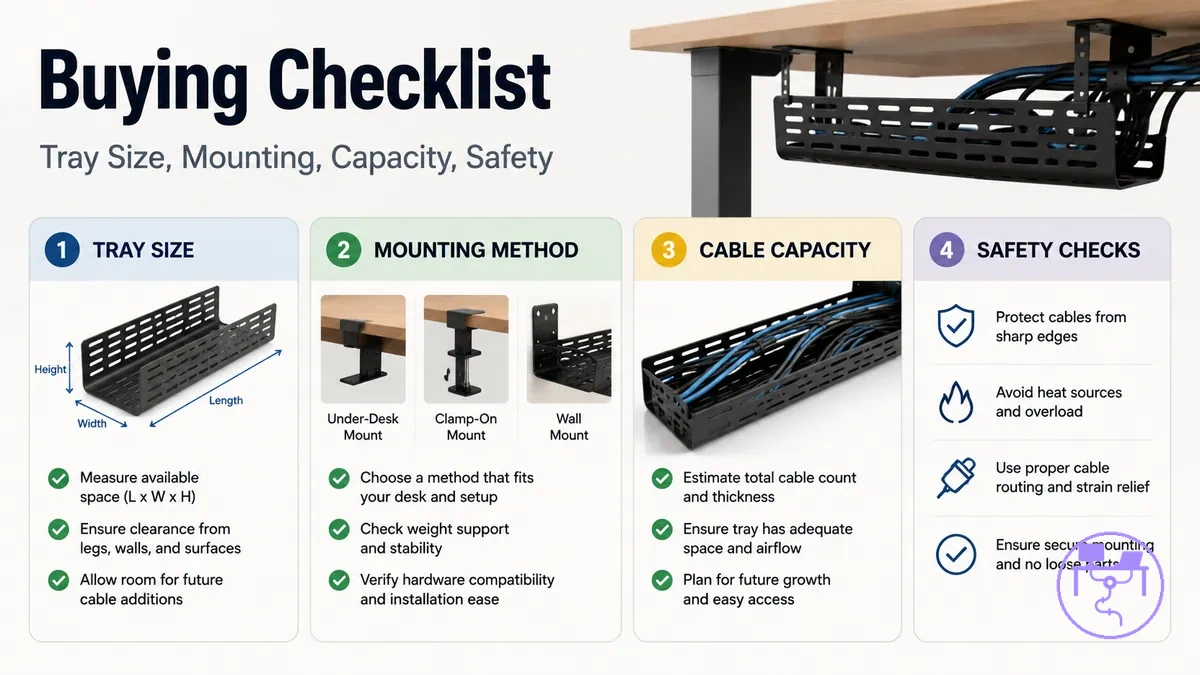
Desk cable management system buying checklist
A desk cable management system buying checklist is a fit-and-selection aid that helps match a cable management kit to the desk, devices, and cable-routing needs of a workspace. The goal is not to find the most accessories, but to verify whether the system can support cable organization, cable access, and future adjustments. Fit usually depends on desk layout, cable load, mounting method, power access, movement requirements, and value checks.
The right kit is the one that matches the actual conditions of the setup rather than a generic specification list. A desk cable management system should be evaluated against device count, under-desk tray requirements, power strip placement, and mounting constraints before selection. For broader context on system types, components, and setup planning, see the desk cable management system guide.
A workstation, home office, or standing desk can create different checklist priorities even when the visible cable count appears similar. A workstation may require more attention to adapter bulk and cable access, while a standing desk may need additional consideration for movement and cable slack. The buying decision should follow the setup requirements rather than the number of included accessories.
This page focuses on verifying buying criteria for a desk cable management system. It does not replace full installation instructions, detailed system comparisons, or product-specific reviews. Product examples, when relevant, belong after the selection criteria and value checks have been completed.
Desk setup and cable inventory checks before buying
The first buying check is to count what must be routed and where it must go. A desk setup should be reviewed by device count, cable inventory, cable route requirements, and available access points before selecting a cable management kit. The buying decision often depends on under-desk space, adapters, power strip placement, and the floor-to-desk route rather than cable count alone.
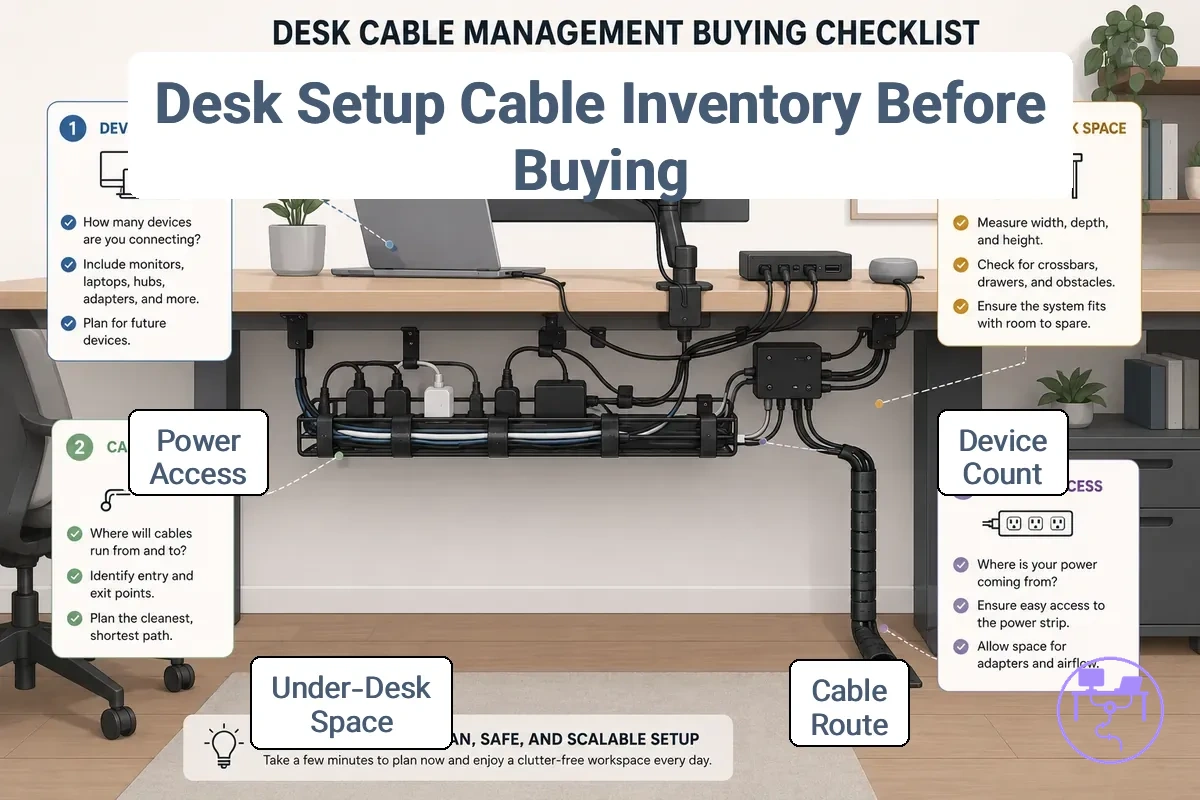
A home office may have a smaller cable inventory but still require careful cable routing around a power strip, monitor arm, and charging devices. A gaming desk often includes additional peripheral cables and adapters, while a workstation or multi-device setup may increase cable count and route complexity. A standing desk can introduce movement requirements that influence cable paths between the desk underside and the floor-to-desk route.
Use the checklist below to identify the conditions that may affect kit selection before reviewing sizing and mounting criteria. The inventory results can help clarify how to choose a system that aligns with workspace requirements.
- Desk setup: Check the desk type, desk underside shape, and available under-desk space. Limited clearance may reduce the suitability of larger organizers.
- Device count: Count computers, monitors, docking stations, chargers, and peripherals. Higher device count may increase cable inventory and routing requirements.
- Cable route: Identify where each cable starts and ends. More complex cable routes may require additional routing points and access clearance.
- Adapters and power strip: Check adapter size, plug access, plug orientation, and power strip location. Bulky adapters can affect usable space and cable organization options.
- Monitor arm: Verify whether monitor arm cables share the same route as power or data cables. Route direction and cable slack may influence organization requirements.
- Floor-to-desk route: Check how cables travel from wall outlets or floor-level power sources to the desk. Obstructions along the cable path can affect the buying implication.
- Setup category: Determine whether the desk is fixed, a multi-device workstation setup, or a standing desk. Different configurations may require different levels of cable flexibility and organization.
Tray size, cable load, and device capacity checks
Tray size should be judged by usable capacity, not only advertised length. An under-desk tray may appear large enough for a cable load, but adapter bulk, power brick space, and access clearance can reduce the area available for cable organization. Device capacity should be evaluated by the combined cable count, cable bundle thickness, and connection requirements rather than tray size alone.
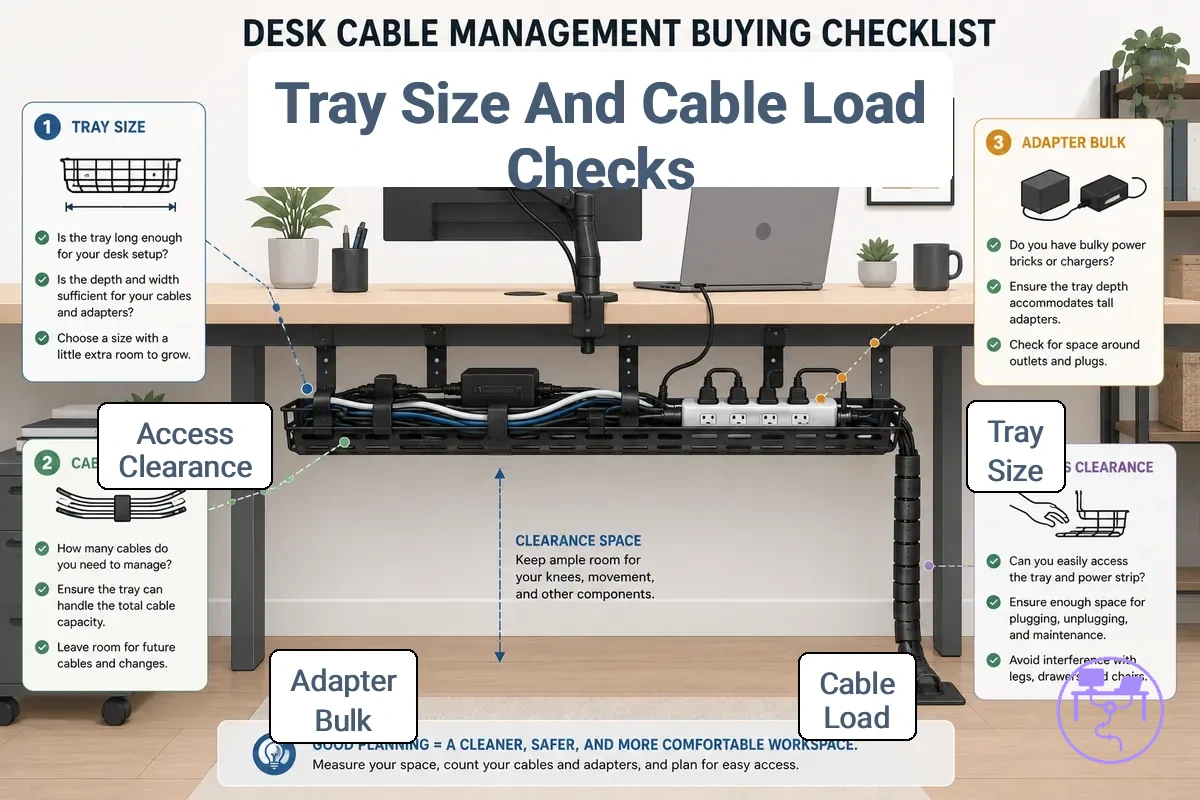
Cable load is influenced by cable groups, adapter bulk, plug orientation, and available access clearance. Monitor cables, peripheral cables, charging leads, and power connections can share the same tray space, increasing the usable capacity requirement. A large under-desk tray may still create a limiting condition when power bricks occupy routing space or when plug orientation restricts cable organization. Access clearance also affects how easily cables can be traced, adjusted, or maintained after installation.
| Cable Group | Capacity Attribute | Condition Found | Selection Outcome |
|---|---|---|---|
| Small cable load | Tray capacity and cable count | Limited bundle thickness and few adapters | Lower usable capacity may be sufficient |
| Mixed adapter load | Adapter bulk and power brick space | Tray space reduced by larger connectors | Additional tray depth may be beneficial |
| Heavy workstation load | Device capacity and cable bundle size | Monitor cables and peripheral cables share space | Higher usable capacity may be needed |
| Power connections | Plug orientation and access clearance | Routing paths partially obstructed | Clear cable access becomes more important |
| Future expansion | Available tray space | Additional devices may be added later | Reserved capacity can support growth |
Future expansion should be considered before making a final buying decision. If additional devices, adapters, or accessories may be added later, extra usable capacity can help reduce reorganization. Access clearance for maintenance should also remain available because cable load and device capacity requirements may change over time.
Mounting method and desk-surface compatibility checks
Mounting method should be chosen from the desk surface and desk underside conditions rather than from accessory preferences alone. A compatibility check depends on desk material, desk thickness, edge clearance, underside access, and any limitations related to desk damage concerns. Different mounting options may suit different desk-surface fit conditions.
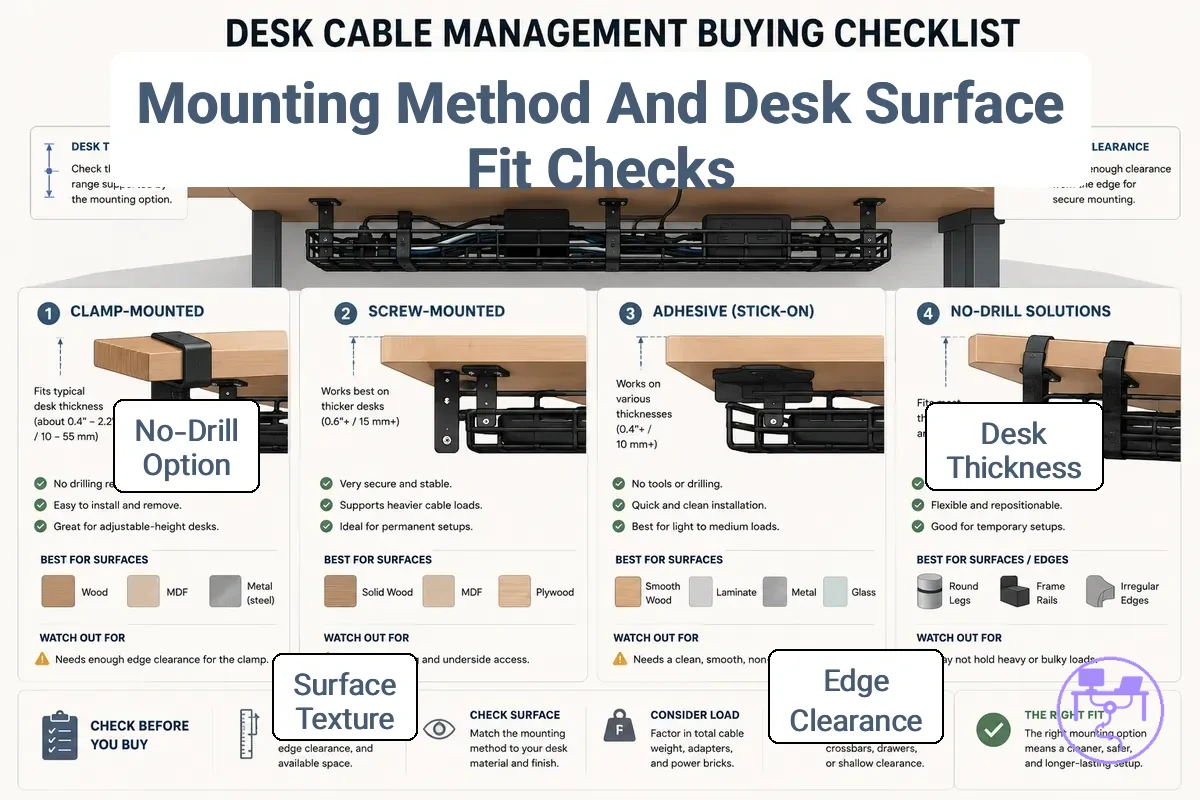
Desk thickness, edge clearance, surface texture, and desk underside obstacles can all affect mounting compatibility. A clamp-mounted option may depend on available edge clearance, while an adhesive mount may be influenced by surface texture and holding strength expectations. A screw-mounted solution may offer a different balance between removability and desk damage risk. For a broader desk fit checklist, evaluate these conditions before comparing mounting choices.
- Clamp-mounted: Check edge clearance and desk thickness. Limited clearance can reduce mounting suitability.
- Screw-mounted: Check desk underside access position and willingness to accept desk damage risk. Removability may be more limited.
- Adhesive: Check desk surface texture and underside finish. Surface conditions can influence holding strength and failure risk.
- No-drill: Check renter constraints, placement flexibility, and available attachment points. Compatibility may depend on desk layout.
- Desk underside: Check for support bars, cable channels, drawers, or other obstacles that may affect mounting position.
- Damage constraints: Verify whether preserving the desk surface is a buying priority before selecting a mounting method.
No-drill or removable options may be preferable when desk damage constraints are important, while stronger fixed mounting approaches may be considered when surface conditions support them. This section is a buying fit check that helps evaluate compatibility before selection, not a physical installation walkthrough.
No-drill, clamp, adhesive, and screw-mount limits
Each mounting type has a limit based on desk condition and removal needs. No-drill, clamp, adhesive, and screw-mount options differ in removability, holding strength, desk damage risk, and placement flexibility.
| Mounting Option | Desk Condition | Primary Limit | Buying Decision Impact |
|---|---|---|---|
| No-drill | Suitable attachment points available | Placement flexibility may be limited by desk layout | May suit renter constraints and removable mount preferences |
| Clamp | Desk edge and thickness support clamp-on fit | Requires sufficient edge access | Depends on desk edge access and thickness |
| Adhesive | Surface texture supports adhesive mount contact | Removal risk and holding strength can vary by surface | Depends on desk finish and placement needs |
| Screw-mount | Desk underside allows screw-mounted positioning | Higher desk damage risk and fixed position | May suit setups where removability is a lower priority |
No-drill options may be preferred when removability is important, while clamp, adhesive, or screw-mount solutions may be considered when the desk condition supports the required holding strength. The appropriate choice depends on the balance between placement flexibility, desk damage risk, limitation, and removal needs.
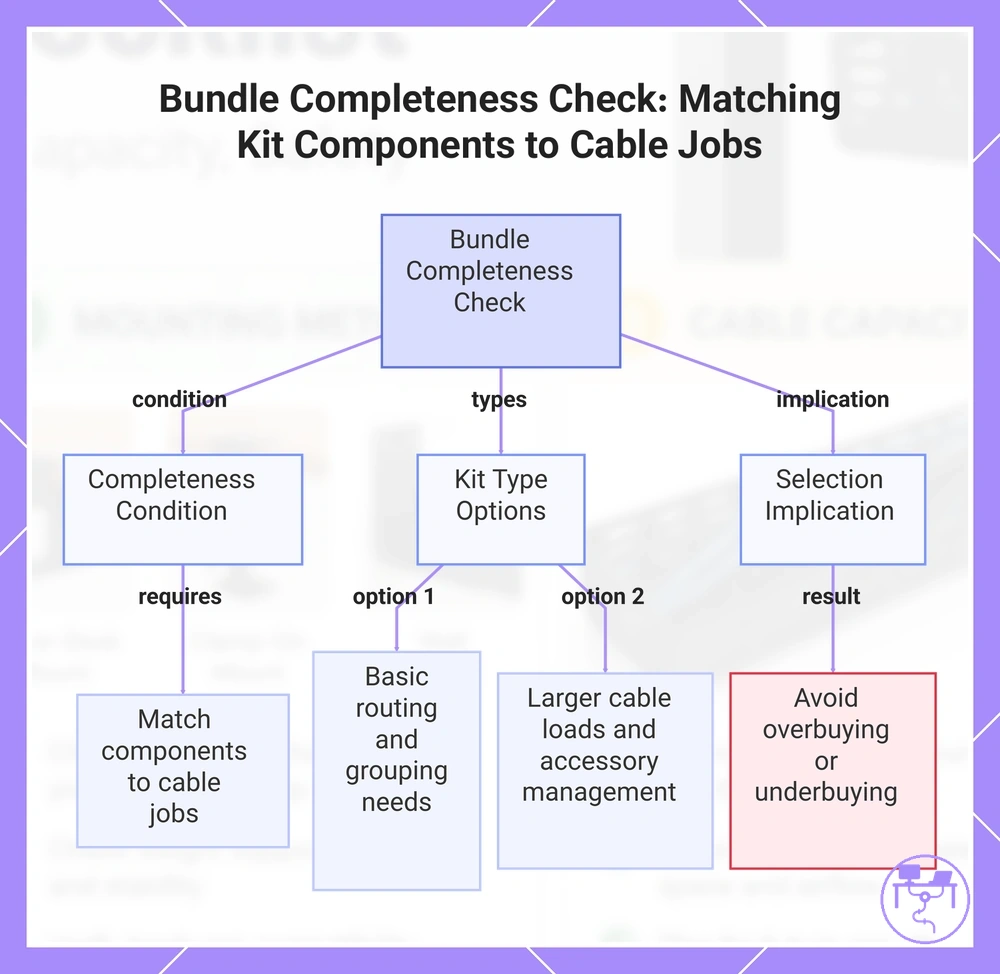
Kit components and organizer bundle completeness checks
A bundle is complete only when its kit components match the cable jobs in the setup. Bundle completeness depends on whether the organizer bundle can support routing, holding, grouping, concealing, and power-access needs without adding unnecessary parts that may never be used.
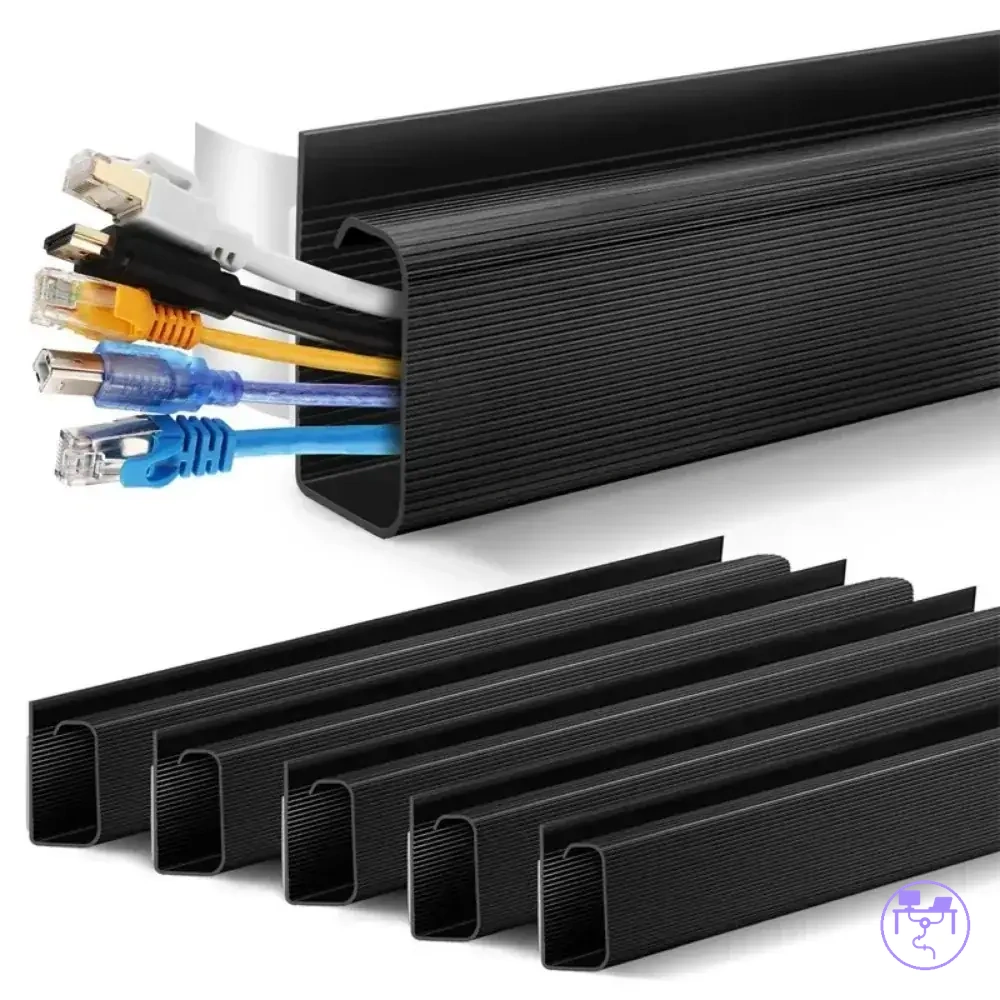
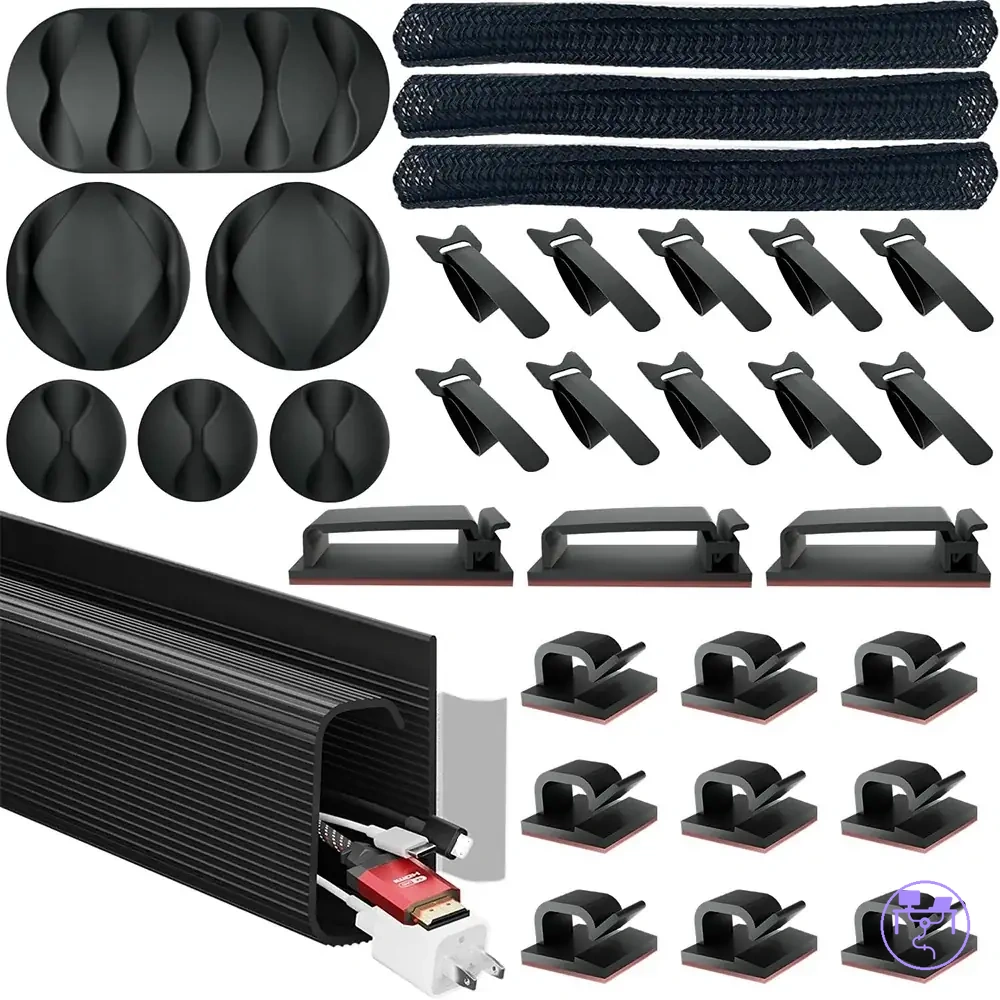
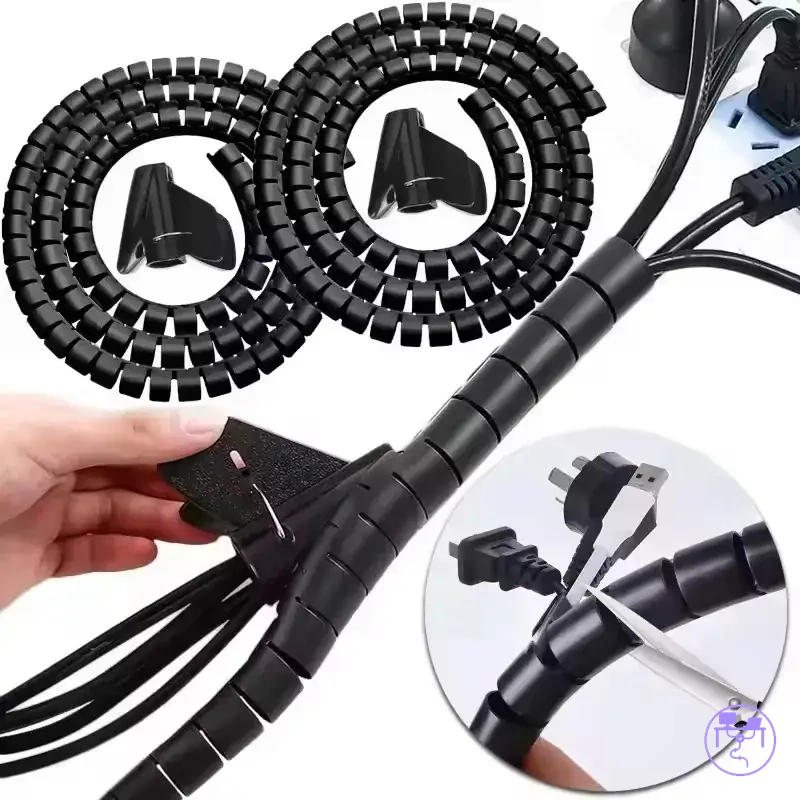
Different kit components serve different functions within a cable management kit. An under-desk tray and holder can support power strip placement and under-desk support, while a sleeve, clips, and ties help with cable grouping and routing. A raceway channel is typically used for concealment along a visible cable path, and cable labels can improve cable identification when multiple connections share the same route. The selection implication depends on which functions are actually required by the setup.
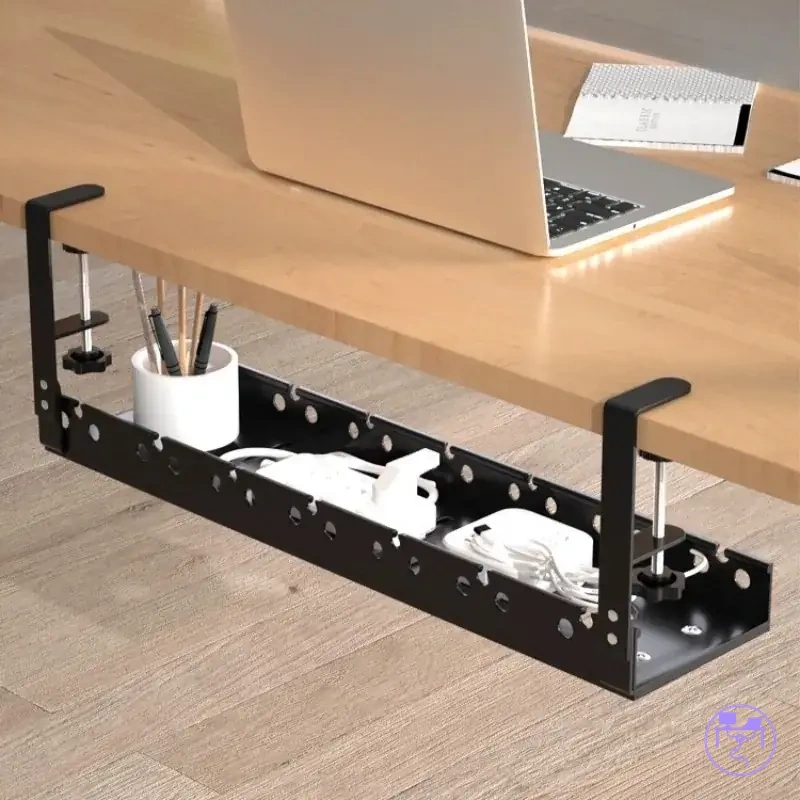
- Under-desk tray: Function attribute: cable storage and power strip placement. Needed condition: multiple cables or adapters under the desk. Selection implication: may improve under-desk organization.
- Sleeve: Function attribute: cable grouping. Needed condition: exposed cable runs. Selection implication: may simplify cable routing.
- Clips: Function attribute: position control. Needed condition: cables need fixed access points. Selection implication: can help maintain routing paths.
- Ties: Function attribute: bundle control. Needed condition: loose cable groups. Selection implication: can reduce cable spread.
- Holder: Function attribute: power-access support. Needed condition: power components need under-desk support. Selection implication: may improve component placement.
- Raceway channel: Function attribute: cable concealment. Needed condition: visible cable routes. Selection implication: may improve cable coverage while retaining access.
- Cable labels: Function attribute: cable identification. Needed condition: multiple similar connections. Selection implication: may simplify future adjustments.
A starter kit may suit a setup with basic routing and grouping needs, while a workstation kit may include additional components for larger cable loads and accessory management. Choosing between them depends on avoiding overbuying unused accessories or underbuying parts needed for the setup. For a broader system type comparison, compare bundle contents against the intended cable management requirements.
This chart shows the completeness condition for an organizer bundle, the available kit type options, and the selection implication to avoid overbuying or underbuying components.
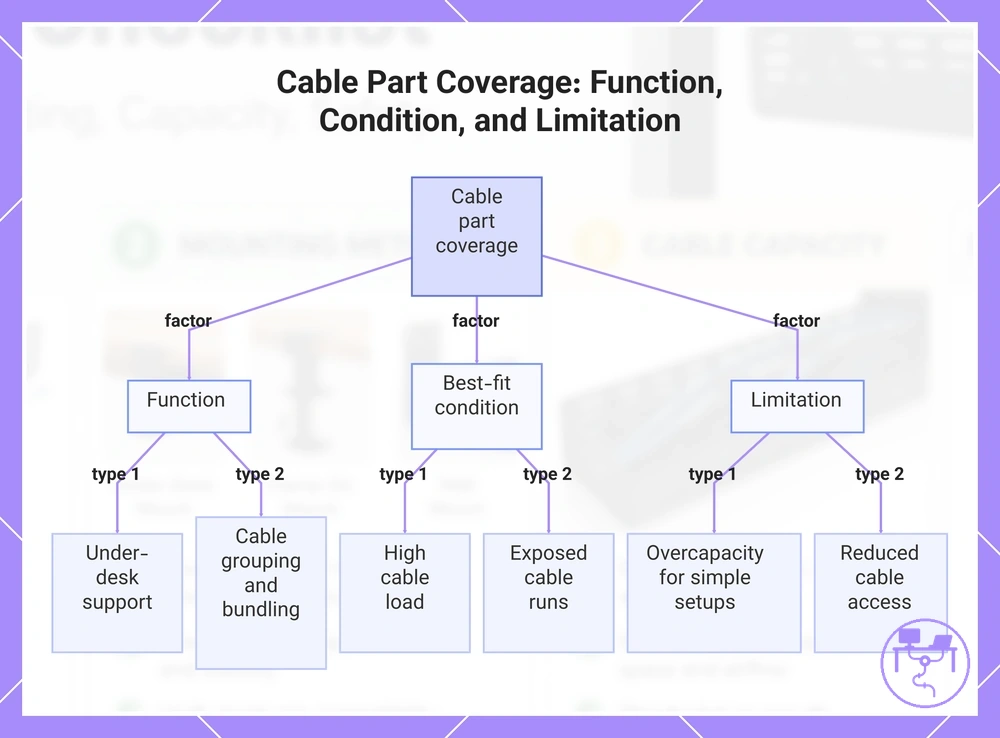
Tray, sleeve, clip, tie, and holder coverage
Coverage means which cable-control job each part handles within a desk setup. A tray, sleeve, clip, tie, and holder each have a different function and address different cable-management conditions.
Missing parts matter only when the setup needs that function. A tray may be more relevant when cable load or under-desk support requirements are higher, while a holder may matter when a power strip needs support and access. Coverage should be judged by function, best-fit condition, and limitation rather than by part count.
- Tray: Function: under-desk support for cable load and accessories. Best-fit condition: multiple cables or power components beneath the desk. Limitation: may provide more capacity than needed for simple setups.
- Sleeve: Function: grouping visible cables into a single path. Best-fit condition: exposed cable runs requiring flexibility. Limitation: access to individual cables may be reduced.
- Clip: Function: route control and cable position management. Best-fit condition: cables need fixed access points or directional guidance. Limitation: placement options may depend on mounting surfaces or adhesive support.
- Tie: Function: bundle control. Best-fit condition: loose cable groups requiring organization. Limitation: cable access may become less convenient when bundles are tightly grouped.
- Holder: Function: support for a power strip or related accessories. Best-fit condition: power components need stable placement and access. Limitation: usefulness depends on whether supported components are part of the setup.
This chart shows the three key criteria for evaluating cable management part coverage: function, best-fit condition, and limitation, along with specific examples.
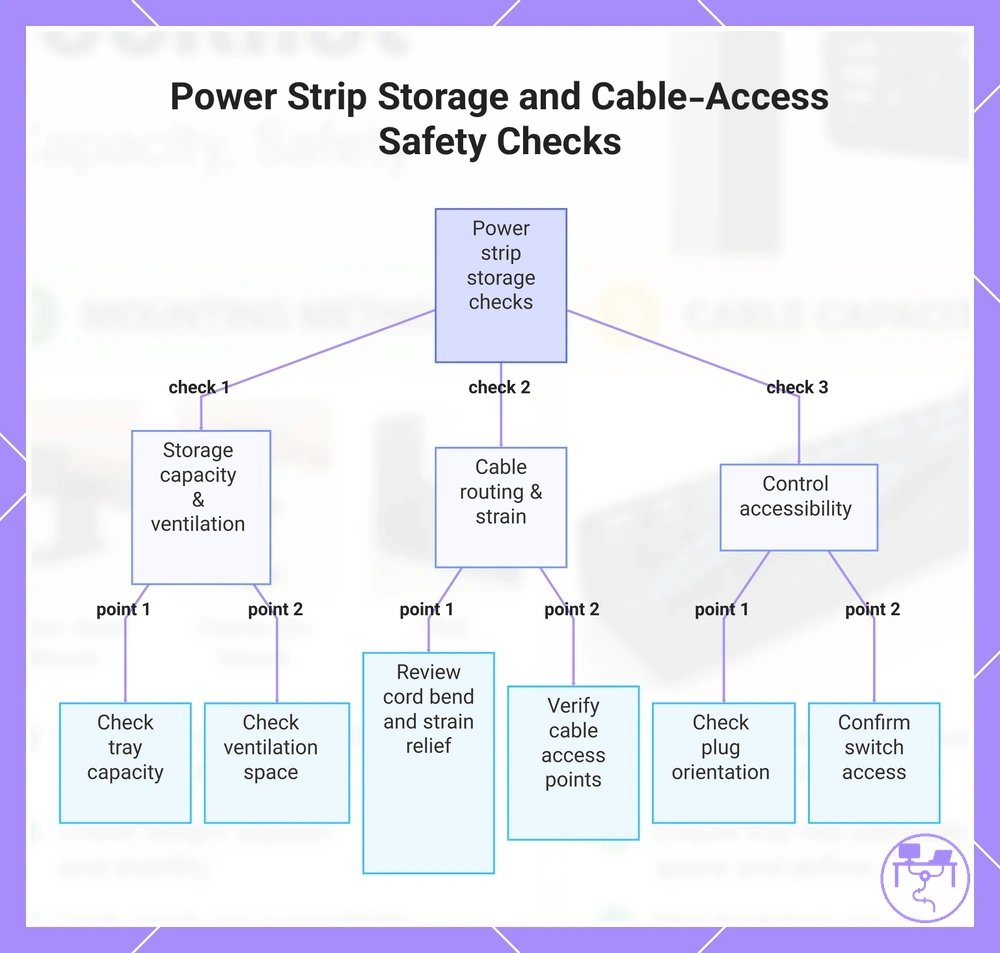
Power strip storage and cable-access safety checks
Power strip storage must preserve cable access, cord relief, and ventilation. A safety check should confirm that the cable management system can support power strips, power cords, and related accessories without creating avoidable access or routing constraints. Tray capacity, ventilation space, and cable access points can influence the buying decision.
Plug orientation, cord bend, strain relief, and reachable switch access should be reviewed before selecting a system. Bulky plugs or adapters may affect how a power strip or surge protector fits within an under-desk tray or power strip holder. Tight cord bends can increase routing limitations, while limited switch access may reduce convenience when power controls need to remain reachable. The suitability of a cable route depends on available access points and the physical arrangement of connected components.
- Power strip: Safety attribute: tray capacity and ventilation. Risky or acceptable condition: limited space may restrict access or airflow, while adequate space may support organization. Selection outcome: choose a system that accommodates the intended placement.
- Surge protector: Safety attribute: plug orientation and reachable switch access. Risky or acceptable condition: obstructed controls may reduce accessibility, while clear access can simplify use. Selection outcome: confirm control access before selection.
- Power cords: Safety attribute: cord bend and strain relief. Risky or acceptable condition: tight routing may increase cable strain, while gentler routing may improve cable positioning. Selection outcome: allow space for cable movement.
- Adapters: Safety attribute: plug bulk and access point clearance. Risky or acceptable condition: larger adapters may occupy routing space, while adequate clearance may support cable access. Selection outcome: consider adapter size during selection.
- Plugs: Safety attribute: cable access and route flexibility. Risky or acceptable condition: crowded connections may reduce accessibility, while clear routing paths may improve access. Selection outcome: evaluate connection layout before purchase.
- Access points: Safety attribute: reachable connections and controls. Risky or acceptable condition: blocked access may complicate adjustments, while reachable access points may simplify maintenance. Selection outcome: prioritize accessible placement options.
Caution: This safety check helps with product selection but does not replace electrical safety instructions from product documentation or qualified guidance. Detailed electrical advice is outside the scope of this buying checklist. For broader power cord safety checks, review installation and usage considerations separately from product selection.
This chart shows the main safety checks for power strip storage, covering storage capacity, cable routing, and control accessibility.
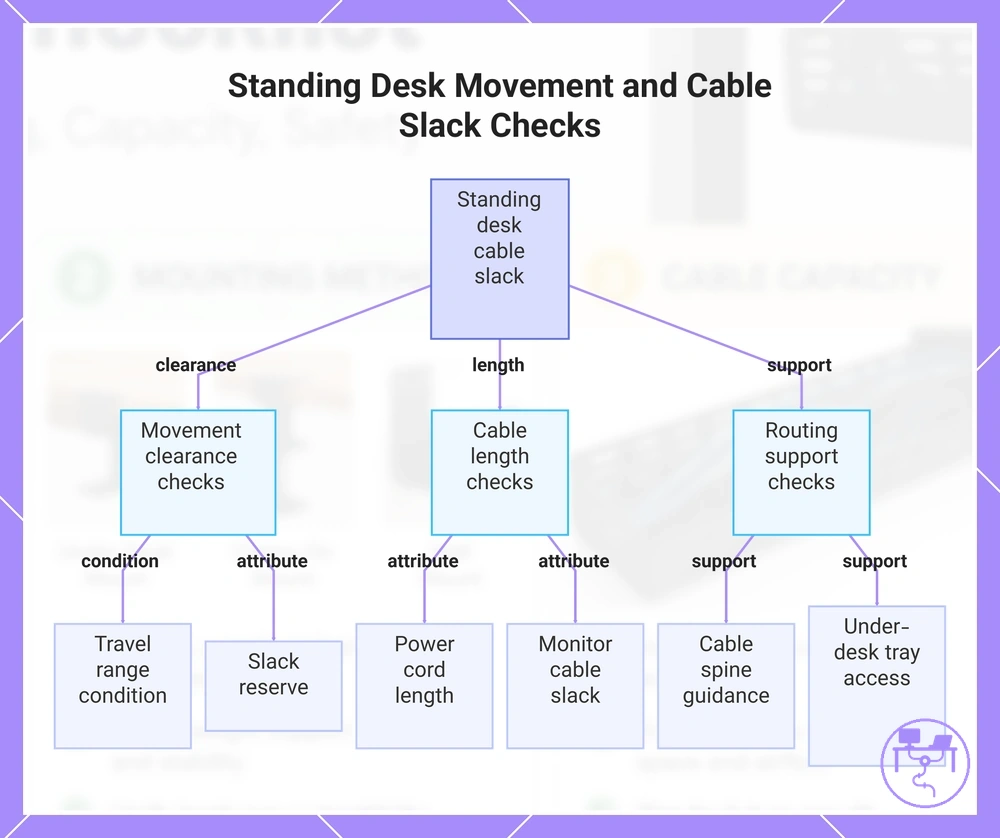
Standing desk movement and cable slack checks
Standing desk movement depends on whether the cable management system can maintain cable slack, movement clearance, and cable access throughout the desk's travel range. A compatible kit should allow height adjustment without creating cable pull, snagging, or blocked access. The fit decision depends on travel range, cable slack, floor-to-desk routing, and support for moving cables.
Cable slack should be evaluated as the desk moves between low and high positions. A slack loop, cable spine, or sleeve support can help guide cables while preserving movement clearance. Power cord length should be sufficient for the intended floor-to-desk routing path, and cable slack should remain available throughout the travel range. Snag prevention depends on how cables, adapters, and routing points are positioned relative to moving components.
Monitor arms and single-cord-to-wall setups can influence buying suitability. Display cables may require additional slack reserve when monitor arms move independently of the desktop. A single power cable route to the wall may also require extra cable reserve and routing support compared with a fixed desk configuration.
- Desk movement: Clearance or slack attribute: travel range. Condition: cables remain free throughout movement. Risk or fit decision: may support standing desk movement.
- Power cable: Clearance or slack attribute: power cord length. Condition: cable reaches desk positions without excessive tension. Risk or fit decision: may reduce cable pull risk.
- Monitor cables: Clearance or slack attribute: slack reserve. Condition: display cables retain movement flexibility. Risk or fit decision: may better support monitor arm movement.
- Cable spine: Clearance or slack attribute: movement guidance. Condition: floor-to-desk routing remains organized during height changes. Risk or fit decision: may improve movement clearance.
- Under-desk tray: Clearance or slack attribute: cable access. Condition: cables can move without obstruction from stored components. Risk or fit decision: fit depends on tray layout and cable load.
- Slack reserve: Clearance or slack attribute: cable reserve. Condition: extra cable length remains available for movement. Risk or fit decision: may reduce snag prevention concerns.
This chart shows the key cable clearance, cable length, and routing support checks for ensuring standing desk movement without cable pull or snagging.
Material, adjustability, and durability checks
Material matters when it changes load support, reuse, adjustability, or long-term cable access. A durability check should focus on whether the material and adjustment features match the expected cable load, desk conditions, and frequency of setup changes. The selection effect depends on load tolerance, mounting stability, and reuse needs rather than appearance alone.
A metal tray may support heavier cable loads when mounting stability is suitable, but the trade-off can include a more fixed under-desk setup. A plastic raceway can help with cable concealment, although rigidity and access limits may matter when cables need frequent adjustment. A fabric sleeve can support flexible grouping, while a silicone clip may help with local cable position control. A Velcro tie or reusable tie can be useful when frequent device changes make reuse and adjustment important.
| Material Or Feature | Durability Attribute | Use Condition | Selection Effect |
|---|---|---|---|
| Metal tray | Load tolerance and mounting stability | Heavier power strips or larger cable bundles | May suit higher under-desk support needs |
| Plastic raceway | Rigidity and concealment | Visible cable paths that need a covered route | May suit concealment when access needs are lower |
| Fabric sleeve | Flexibility and grouping | Cables need a shared path with bend flexibility | May suit grouped cables that still need movement |
| Silicone clip | Position control and local flexibility | Individual cables need guided placement | May help with small routing adjustments |
| Velcro tie | Reuse and adjustment | Devices change often or cables need repeated access | May suit frequent changes and reusable organization |
| Adjustable tray | Adjustability and access | Cable load or component layout may change | May support future adjustment without replacing the system |
Heavy power strips may make load tolerance and mounting stability more important. Frequent device changes may make a Velcro tie, fabric sleeve, or adjustable tray more practical than a fixed arrangement. Removable setups should be evaluated by reuse needs, access requirements, and the level of adjustability needed for future cable changes.
Value checks before selecting a desk wire management kit
Value checks depend on fit and usefulness rather than the longest accessory list. A desk wire management kit offers practical value when its components match the cable load, desk conditions, and organization needs of the setup. Kit price alone does not determine whether the kit supports the intended use.
Practical value is usually filtered through fit, completeness, mounting reliability, safety support, durability, and future adjustability. A kit with many accessories may still have limited value if key components do not match the routing or mounting requirements. Capacity, mounting reliability, and safety support should be evaluated together because they affect daily cable access and organization. Future adjustability can also influence value when device layouts may change later.
For a broader evaluation of cost and value factors, compare the selection criteria below against the actual requirements of the workspace rather than the accessory count alone.
| Buying Factor | Value Attribute | Decision Signal |
|---|---|---|
| Kit price | Price-check context | Keep when functionality matches requirements; avoid when low cost removes needed features |
| Component usefulness | Kit usefulness | Keep when most components serve a clear purpose; avoid when accessories are unlikely to be used |
| Capacity | Cable load support | Upgrade when current capacity may not support the intended cable load |
| Mounting type | Mounting reliability | Keep when desk compatibility is suitable; avoid when mounting conditions do not match |
| Material | Durability | Upgrade when heavier loads or repeated adjustments may require a more durable component |
| Upgrade need | Future adjustability | Keep when future changes are limited; upgrade when layout changes are expected |
Keep signals usually appear when component usefulness, capacity, and mounting reliability align with the setup. Upgrade signals may appear when durability, future adjustability, or cable load requirements exceed the current fit. Avoid signals often occur when kit price is the main decision factor but essential requirements remain unsupported.
A buying decision is usually stronger when value checks confirm fit, completeness, safety support, and upgrade need within the same desk wire management kit. Practical value comes from matching requirements to features rather than accumulating unused accessories.
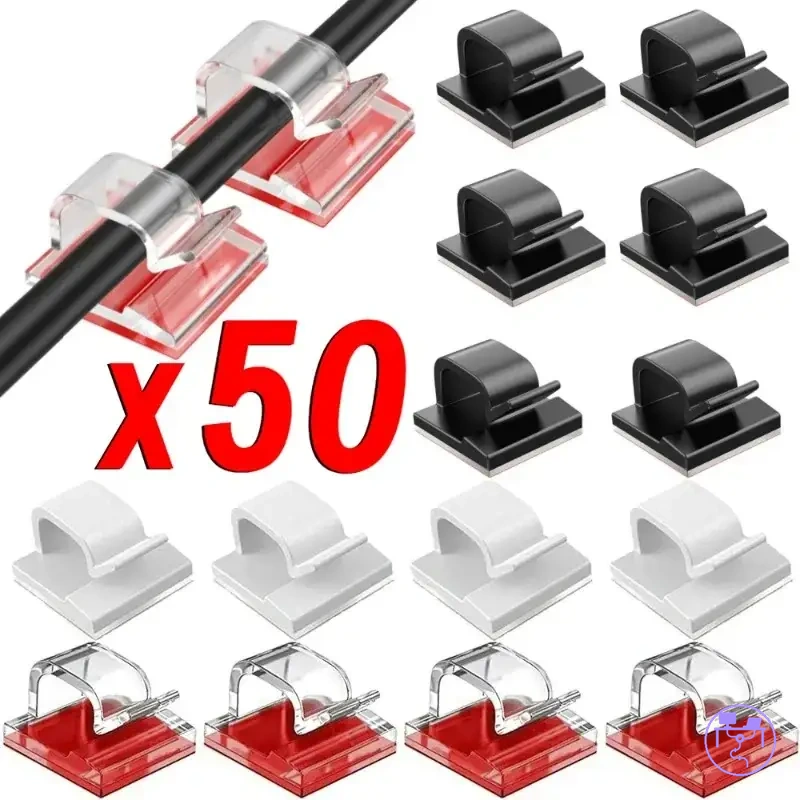
Here are product examples that may make comparison easier. Before buying, always review the compatibility criteria, essential features, and product details.