Desk Cable Management System Selection Guide
A desk cable management system depends on cable load, desk fit, mounting method, cable access, power strip placement, and how the workstation may change later. The right cable organizer is not one universal product; it is a conditional match between the desk, the devices, the cables, and the way the setup is used.
Desk Cable Management System Selection Guide: the main decision is to choose a system that can hold the cable bundle, keep adapters and the power strip accessible, and fit the underside of the desk without forcing an unsuitable mount. A messy workstation may need an under-desk organizer, cable tray, clips, or wire management parts, but the selection should start with the conditions that create clutter rather than with product names.
Use the visible cable path, mounting area, power strip space, and future cable access as the first evaluation frame. Later checks can qualify the choice by desk type, cable bundle size, no-drill or screw-mounted options, safety boundaries, and whether the setup needs easier adjustment over time.
What a Desk Cable Management System Should Solve First
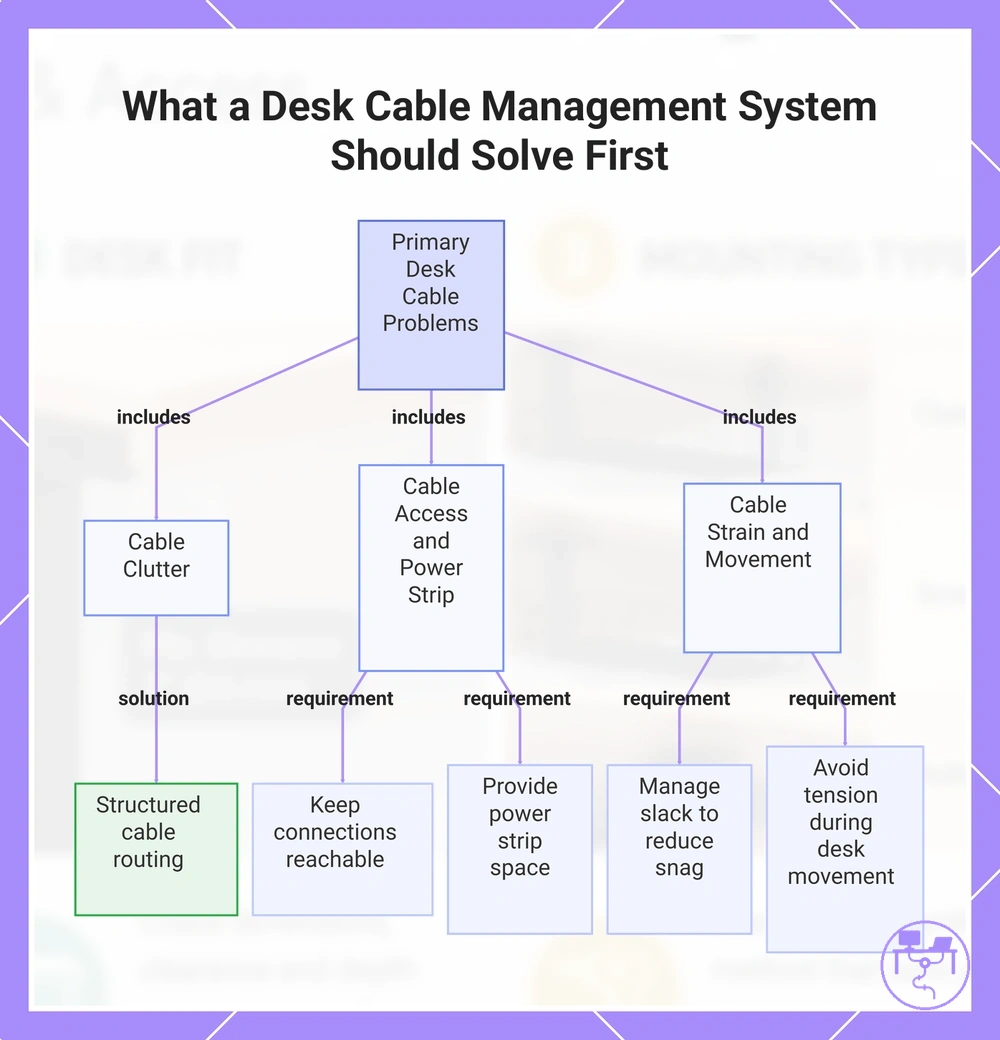
A desk cable management system should solve clutter, cable access, power strip placement, cable strain, and desk movement before product types or mounting styles are evaluated. These are separate decision conditions that affect how cables behave around a workstation. Identifying the problem first helps separate workstation needs from product categories.
When wire clutter, limited cable access, or poorly planned power strip placement create daily friction, the required system capability becomes clearer. A system that improves cable routing may not address cable strain, and a solution focused on hiding cables may not improve access to adapters or connections. The desk cable management system guide defines the broader category, but choosing a system starts with matching capabilities to the workstation problem. This distinction separates selection decisions from mounting styles or product-type discussions.
What the system should solve first:
- Clutter: Organize visible cables and cable mess through structured cable routing, which can influence system layout requirements.
- Cable access: Keep connections reachable when devices need frequent adjustment, which may affect enclosure and routing choices.
- Power strip placement: Provide space and access for a power strip and adapters, which can affect system positioning.
- Cable strain: Manage slack and support cable paths to help reduce snag risk when cables move.
- Desk movement: Accommodate desk movement without creating unnecessary tension, which may influence routing needs.
A workstation with multiple devices or changing cable paths can create a different mix of problems than a simpler setup. Hiding cables, cable routing, and choosing a system are related decisions, but they are not identical and should be evaluated separately.
This chart shows the primary desk cable problems that should be addressed before evaluating product types or mounting styles, and the corresponding requirements for each problem.
Cable Load, Device Count, and Power Needs
Cable load depends on device count, power cords, adapters, and the number of connections that must be managed together. A desk cable management system should provide enough capacity for the cable bundle without creating crowding or reducing access. Matching cable load to capacity helps narrow suitable options before comparing tray designs.
A laptop setup may only require space for a charger, a small cable bundle, and occasional adapters. A computer desk setup with monitors, peripherals, and a docking station often creates thicker cable groupings that can require more capacity in an under-desk tray. A multi-device workstation may add more power cords, adapters, and connection points, which can affect access and organization. Cable load should be estimated by device grouping rather than by device count alone.
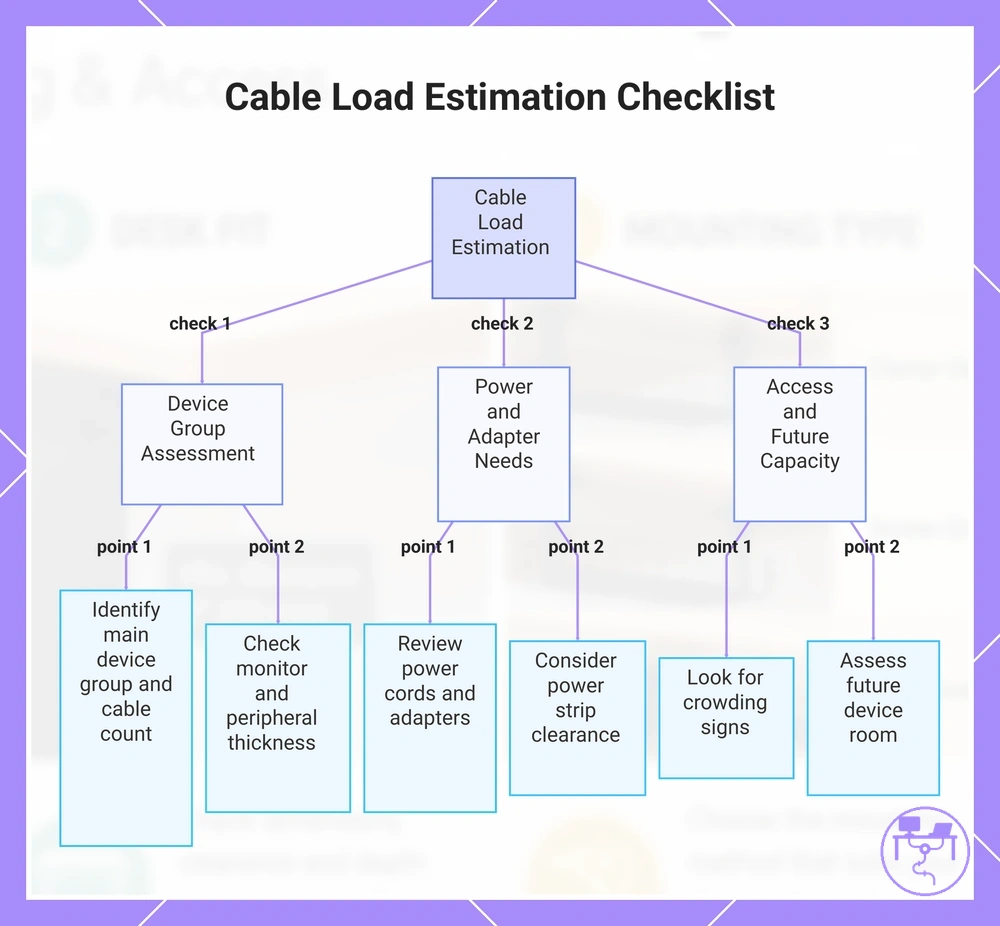
Use this checklist to estimate cable load before comparing cable management systems:
- Identify the main device group and consider how many cables each device contributes to the cable bundle.
- Check whether monitors, a docking station, or peripherals increase cable thickness and require additional capacity.
- Review how many power cords and adapters need space alongside data and display cables.
- Consider whether a power strip requires clearance for access and cable routing.
- Look for signs that cable crowding could make access or organization more difficult.
- Assess whether the under-desk tray or holder may need room for future devices, adapters, or cable changes.
Capacity depends on cable thickness, adapter size, and desk layout rather than a universal size rule. A device setup with fewer components may still require more space when larger adapters or thicker cable bundles reduce access within the cable management area.
This checklist chart shows the main categories of checks for estimating cable load before comparing cable management systems.
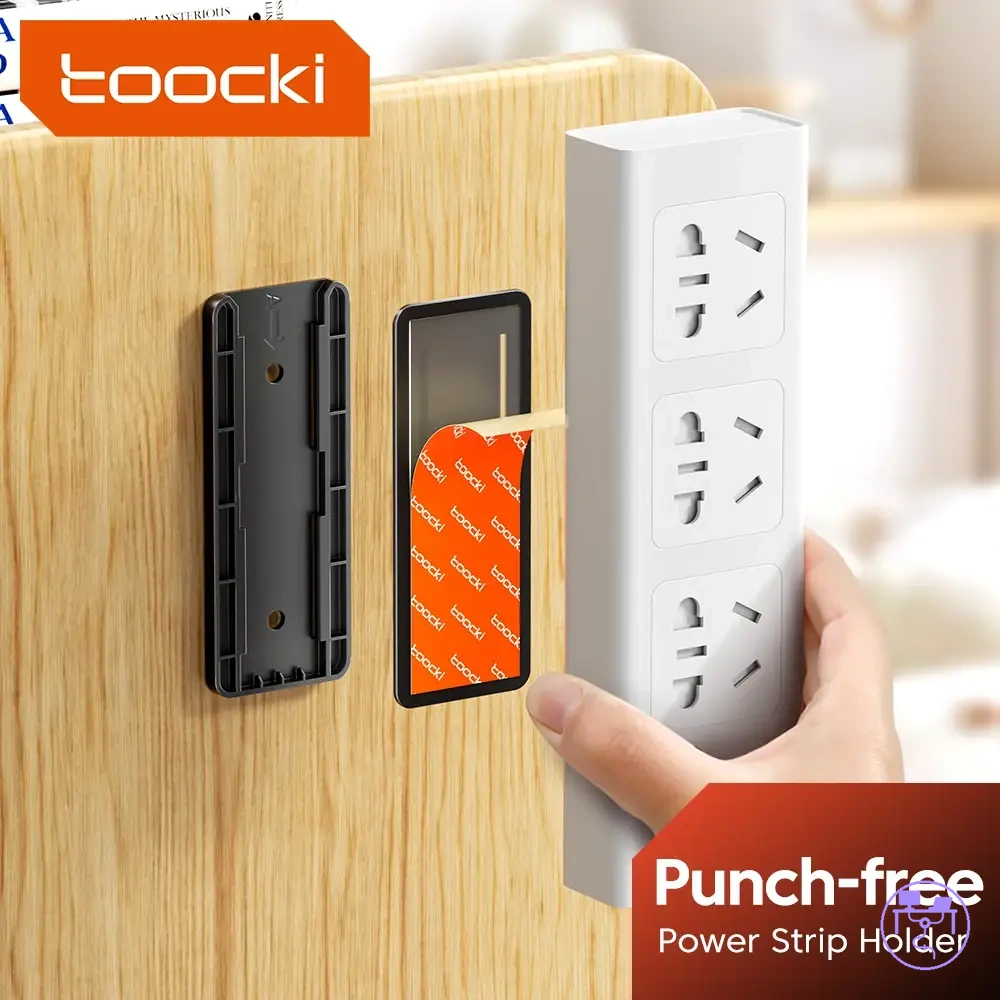
Power Strip and Adapter Space
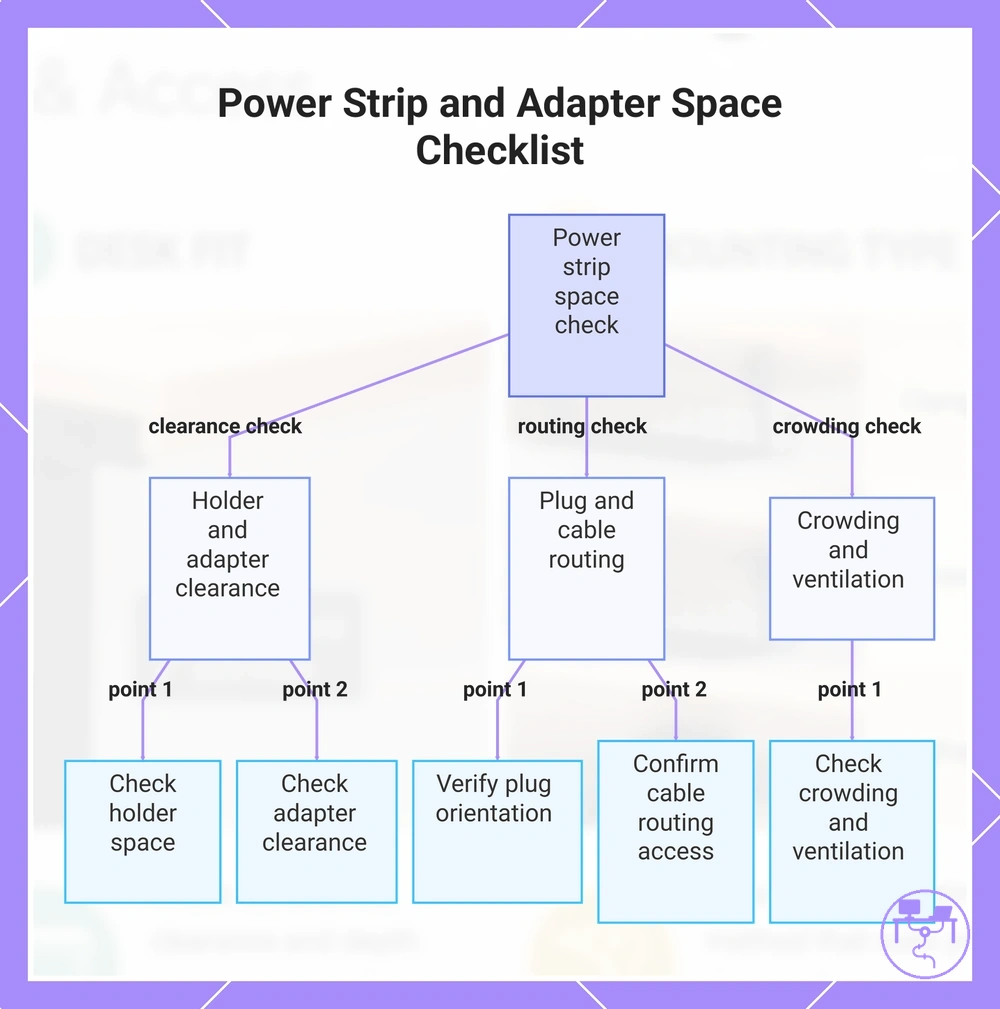
Power strip and adapter space becomes important when cable load includes bulky adapters, multiple power connections, or limited holder space. A power strip requires enough clearance for plugs, cable routing, and ongoing access. Adapter clearance is the local condition that often determines whether the available space remains practical to use.
Use this checklist to verify whether power strip placement and adapter space fit the planned cable load:
- Check whether the power strip has enough holder space without blocking access to cables or connections.
- Verify that adapters or a charger brick have sufficient clearance around nearby cables.
- Review plug orientation to confirm that angled plugs or larger connectors do not reduce usable space.
- Confirm that cable routing leaves enough access for connection changes when needed.
- Look for crowding that may limit ventilation, increase heat buildup, or reduce usability.
When a tray or holder contains a power strip, bulky adapters, and a dense cable bundle, access can become more difficult even when everything fits within the available space. Clearance checks help identify space-related limitations, while safety outcomes may still depend on ventilation, crowding, and manufacturer instructions. For broader guidance beyond storage and access considerations, see power cord safety.
This chart shows the key checks for verifying that power strip placement and adapter space fit the planned cable load.
Desk Fit and Mounting Conditions
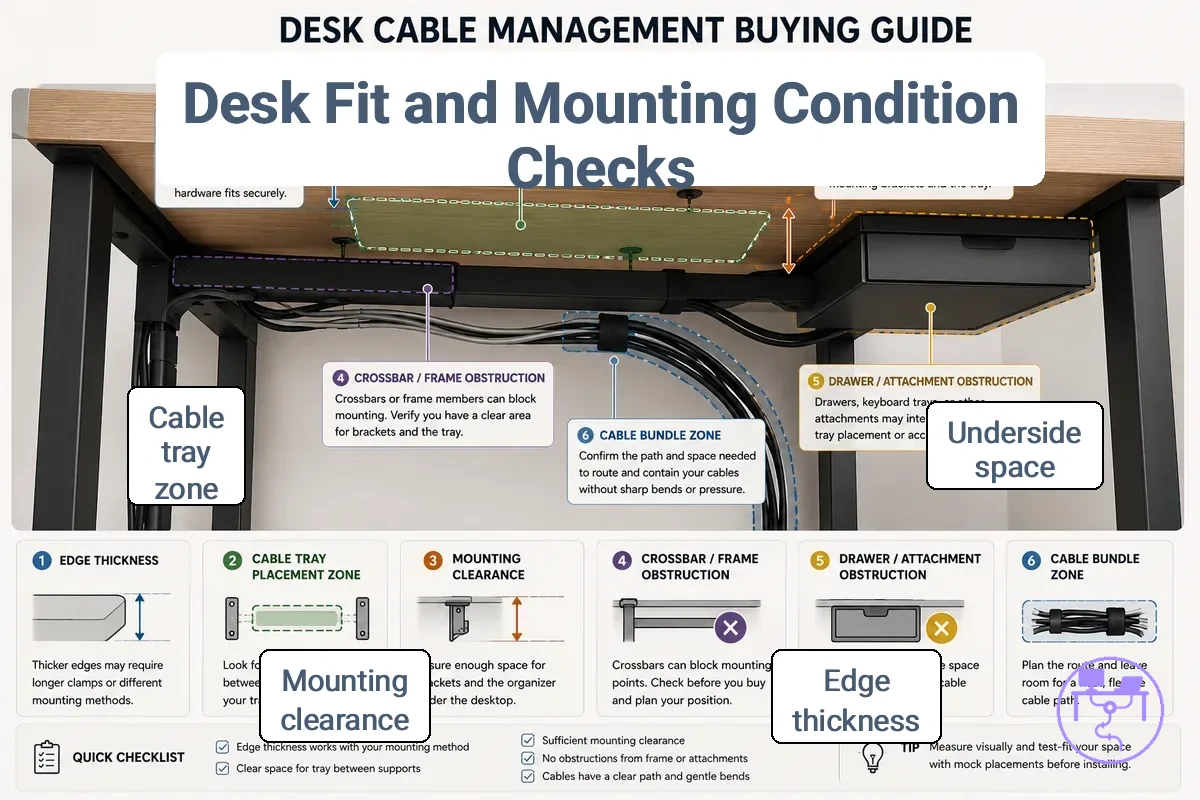
Desk fit depends on underside space, edge thickness, surface material, clearance, and mounting conditions rather than cable capacity alone. A system that fits the cable load may still be unsuitable if the desk underside limits mounting options. Physical desk fit should be verified as a pre-purchase check.
desk fit and compatibility begins with evaluating the mounting area before comparing storage capacity. Desk Fit and Mounting Conditions checks help identify whether desk structure supports a clamp, adhesive, or screw-mounted option under the available constraints.
| Desk feature | Mounting condition | Compatible option | Selection effect |
|---|---|---|---|
| Underside space | Open or restricted desk underside | Option depends on available mounting area | May limit placement or system size |
| Edge thickness | Clamp reach varies by edge dimensions | Clamp when edge conditions are suitable | Can affect stability and placement |
| Surface material | Material and finish influence attachment | Adhesive when surface conditions allow | May affect attachment reliability |
| Crossbars | Structural components reduce clearance | Placement depends on obstruction layout | May restrict mounting locations |
| Drawers | Drawer movement occupies underside space | Requires sufficient clearance | Can reduce usable mounting area |
| Movement clearance | Adjustable components require free space | Option depends on available clearance | May influence ongoing usability |
Crossbars, drawers, and limited underside space are often the most significant desk compatibility conflicts because they can reduce mounting clearance even when cable capacity is adequate. Clamp placement may depend on edge thickness and access to the desk edge, while a screw-mounted option may depend on desk material and available clearance. Adhesive attachment can also vary by surface material, finish, and underside shape.
Desk structure should remain the primary compatibility filter. Cable load determines how much storage may be needed, but desk fit and mounting conditions determine whether that storage can be mounted in the intended location.
No-Drill, Clamp-On, Adhesive, and Screw-Mounted Options
No-drill, clamp-on, adhesive, and screw-mounted options differ in desk condition requirements, reversibility, load tolerance, and stability. The most suitable mounting option depends on desk material, edge access, cable weight, and the available mounting area. Comparing these differences helps balance reversibility and load tolerance before selecting a mounting method.
Mounting method affects stability, attachment conditions, and how easily the setup can be changed later. The comparison below focuses on compatibility trade-offs rather than installation steps.
| Mounting option | Best condition | Trade-off | Avoid when |
|---|---|---|---|
| No-drill adhesive | Smooth surface material with a lighter cable load | Higher reversibility, but attachment depends on surface condition | Surface finish, cable weight, or environment may reduce attachment reliability |
| Clamp-on | Accessible desk edge with suitable edge thickness | Balances stability and reversibility | Desk design limits clamp access or clearance |
| Screw-mounted | Desk material supports fixed attachment | May provide greater load tolerance, but lower reversibility | Desk material or future layout changes make permanence undesirable |
| Hybrid mounts | Mixed mounting conditions or changing requirements | Can combine different attachment methods | Available mounting area limits combined solutions |
Clamp-on options may suit desks with adequate edge access, while an adhesive channel may depend more heavily on surface finish and cable weight. Screw-mounted systems may support higher load tolerance in some desk conditions, but reversibility is usually lower because attachment depends on desk material and mounting method. Surface risk varies by attachment type, surface material, and the conditions under which the mounting option is used.
Tray Capacity, Cable Access, and Adjustability
Tray capacity, cable access, and adjustability influence how usable a cable management system remains after selection. A larger cable tray size may reduce crowding for a growing cable bundle, but usability can still depend on tray depth, access opening design, and how easily removable cables can be reached. Long-term usability improves when tray capacity and cable access are evaluated together.
Tray design and tray attributes affect maintenance, rerouting, and clutter control when devices or cable layouts change. The table below compares the attributes that most directly influence accessibility and long-term usability.
| Tray attribute | What to check | Why it matters | Selection effect |
|---|---|---|---|
| Capacity | Available space for the cable bundle | Can reduce crowding as cable volume changes | May support future device additions |
| Tray depth | Depth relative to cables and accessories | Affects storage usability and cable organization | Can influence long-term access |
| Access opening | Ease of reaching removable cables | Supports cable changes and rerouting | May improve maintenance access |
| Adjustability | Presence of an adjustable tray or movable brackets | Allows adaptation to changing cable layouts | Can accommodate future changes more easily |
| Removal convenience | Ability to access removable cables with minimal disruption | Supports routine cable changes | May help maintain clutter control |
Tray Capacity, Cable Access, and Adjustability are easier to evaluate when visible tray attributes are viewed together. The image highlights tray capacity, an access opening, adjustable layout elements, and a clear cable path that affects future cable changes.
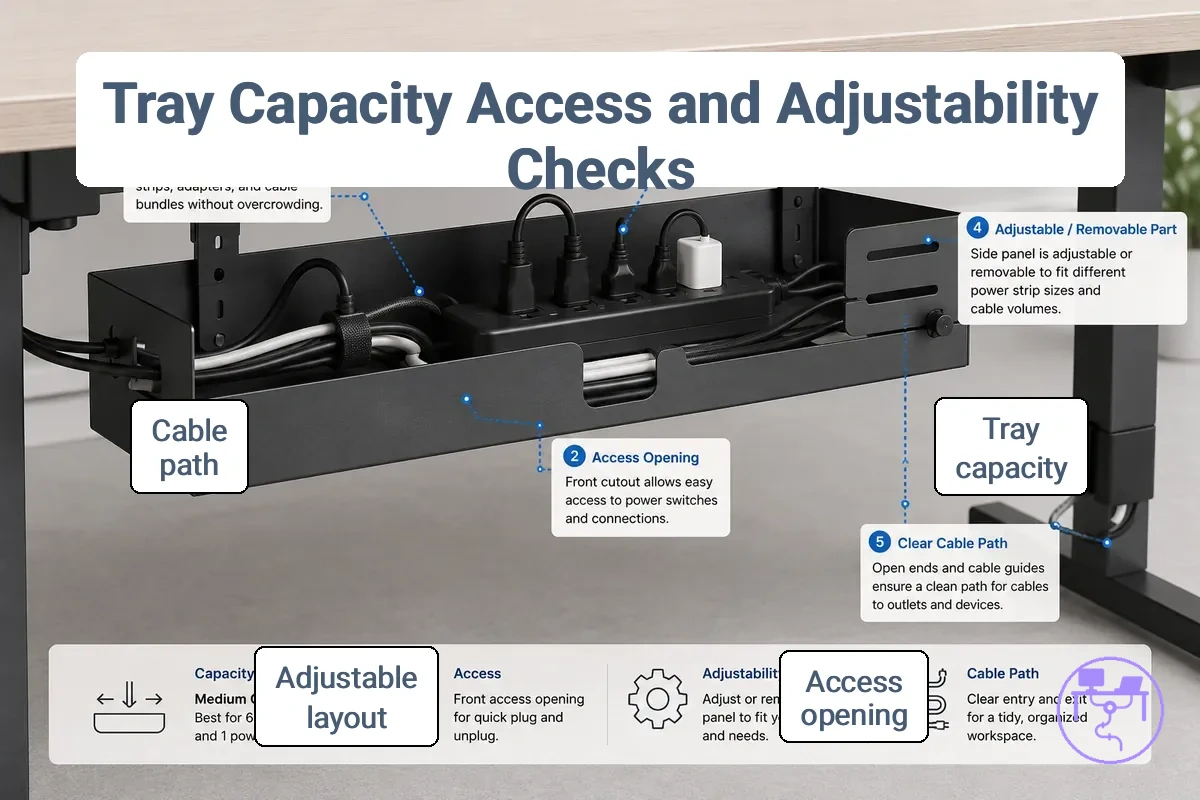
Future changes often determine whether high-capacity storage or easier cable access becomes the more important priority. Users who frequently add peripherals, move equipment, or reroute removable cables may prefer an access opening and adjustable tray design that simplifies cable changes. Users with a stable setup may place greater emphasis on tray capacity and accessible storage, provided tray depth and cable access remain suitable for the cable bundle.
Open Access Versus Covered Cable Storage
Open access versus covered cable storage depends on whether cable access or concealment is the higher priority. An open tray can make cable changes, visibility, and airflow easier to manage, while covered cable storage can place greater emphasis on concealment and reduced cable visibility. The choice is a local tray-usability trade-off between access and concealment.
| Storage style | Advantage | Trade-off | Best fit |
|---|---|---|---|
| Open access | Improves visibility and access to removable cables | Provides less concealment of the cable bundle | Frequent cable changes and ongoing maintenance |
| Covered storage | Provides greater concealment and reduced cable visibility | Access may take longer when cable changes are needed | Setups where concealment is a higher priority |
Storage style affects tray usability through visibility, airflow, dust exposure, and access to removable cables. Open access may suit setups that require frequent cable changes because cable paths and connections remain easier to reach. Covered cable storage may suit setups where concealment is more important, although dust control, access, and maintenance convenience can depend on tray design and the access opening. This comparison focuses only on the local tray-storage trade-off; broader storage approaches can be explored when you compare system types.
Adjustable Trays and Future Cable Changes
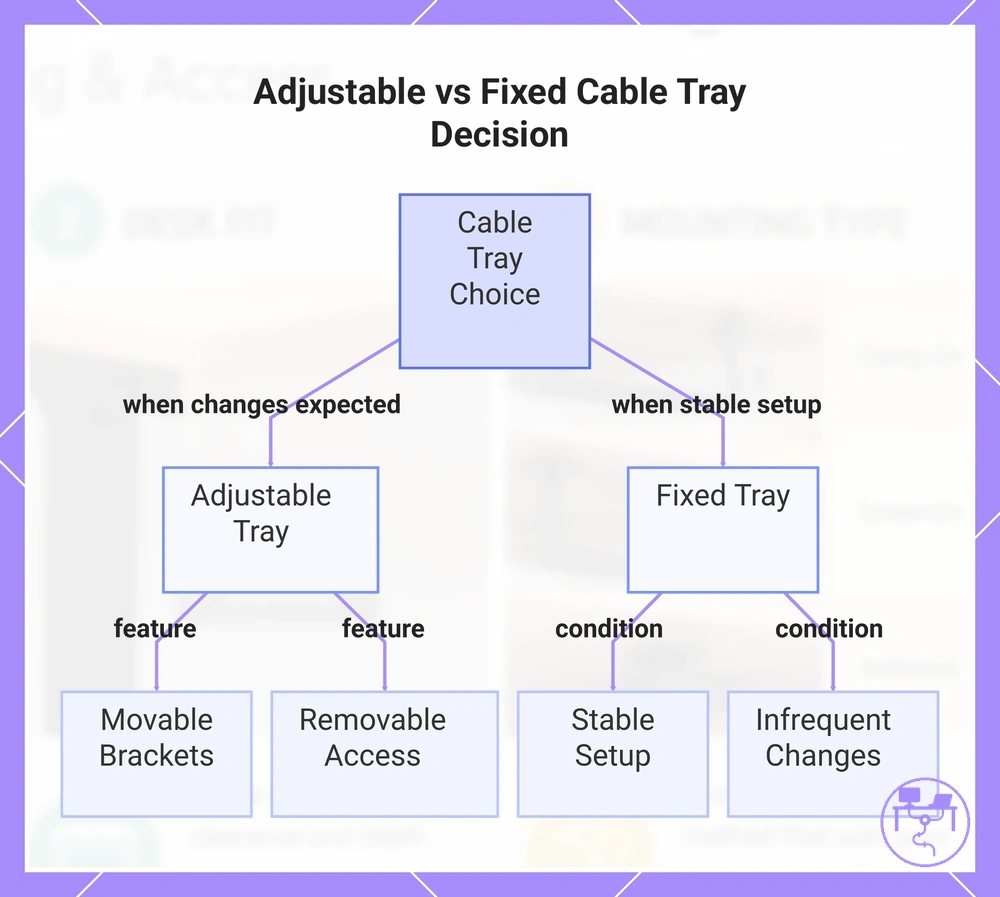
Adjustable trays matter most when a workstation is expected to change after the initial setup. Future devices, changing cable routes, and evolving access needs can make an adjustable tray more useful than a fixed layout. The key decision condition is the likelihood of future cable changes.
Use these adjustability features as buying criteria when future cable changes are expected:
- Movable brackets: Can support repositioning when desk fit requirements or cable paths change.
- Adjustable tray width: May accommodate added cables when future devices increase cable volume.
- Reusable ties: Can simplify cable changes and rerouting while helping maintain neatness.
- Removable access: May improve access to cables without disrupting the entire tray arrangement.
- Repositioning flexibility: Can help adapt the cable layout when equipment or peripherals change location.
An adjustable tray is most useful when access, maintenance, and future device changes are expected. A fixed tray can be sufficient for a stable setup with lower complexity and infrequent cable changes. Prioritize an adjustable tray when expected change frequency, access requirements, and desk layout make ongoing repositioning more valuable.
This chart shows the key decision condition for choosing between an adjustable or fixed cable tray based on the likelihood of future cable changes.
Material, Stability, and Desk Surface Protection
Material, Stability, and Desk Surface Protection depend on how tray material or mounting contact points interact with cable load and desk conditions. Material can influence stability, while contact points can affect surface protection and long-term usability. These factors should be evaluated as functional selection criteria rather than appearance preferences.
Material, Stability, and Desk Surface Protection are easier to compare when visible tray materials and mounting contact points are viewed side by side. The image highlights how material and contact areas may influence stability and desk surface condition.
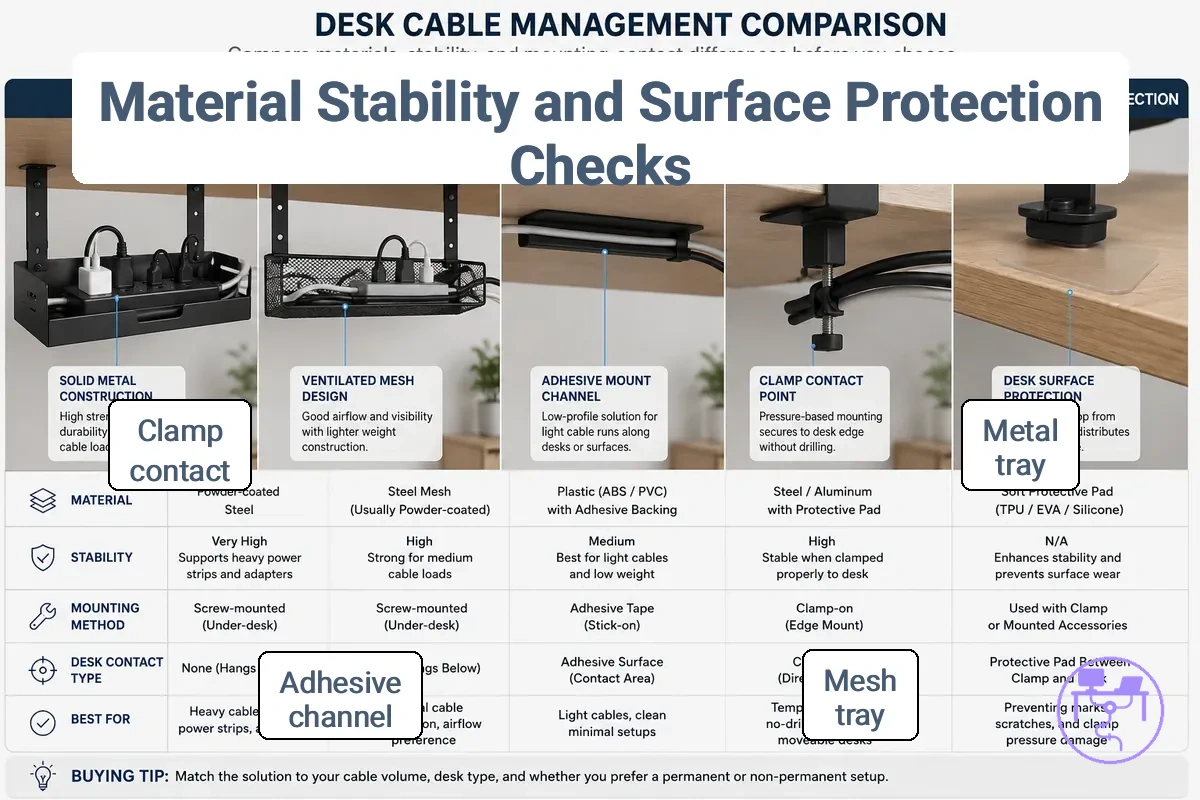
| Material or contact type | Strength | Surface concern | Best fit |
|---|---|---|---|
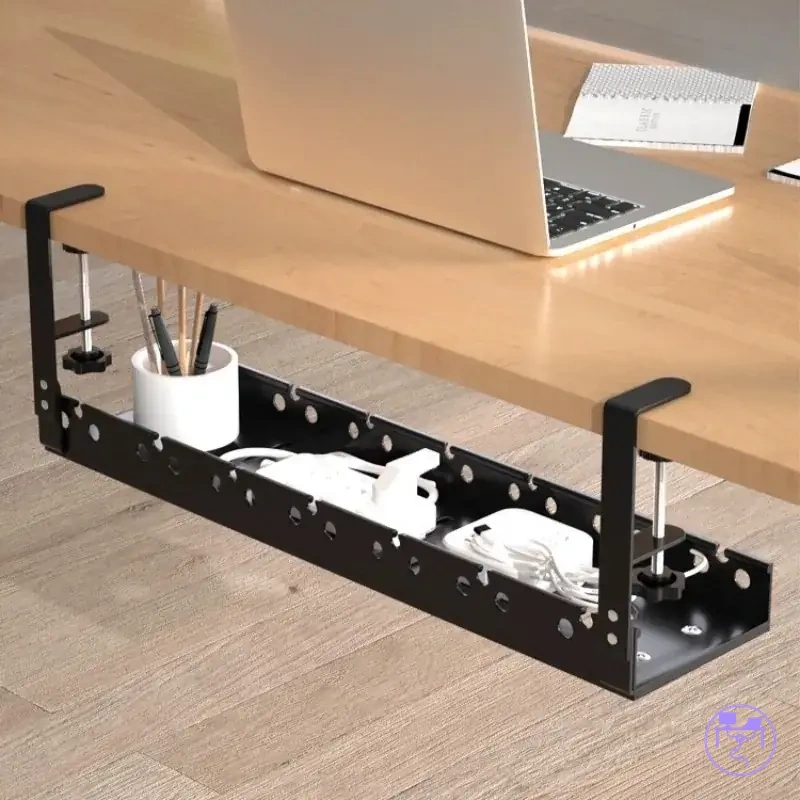
| Metal tray | May provide higher stability for heavier cable loads | Contact areas can depend on mounting method and desk finish | Setups with larger cable bundles |
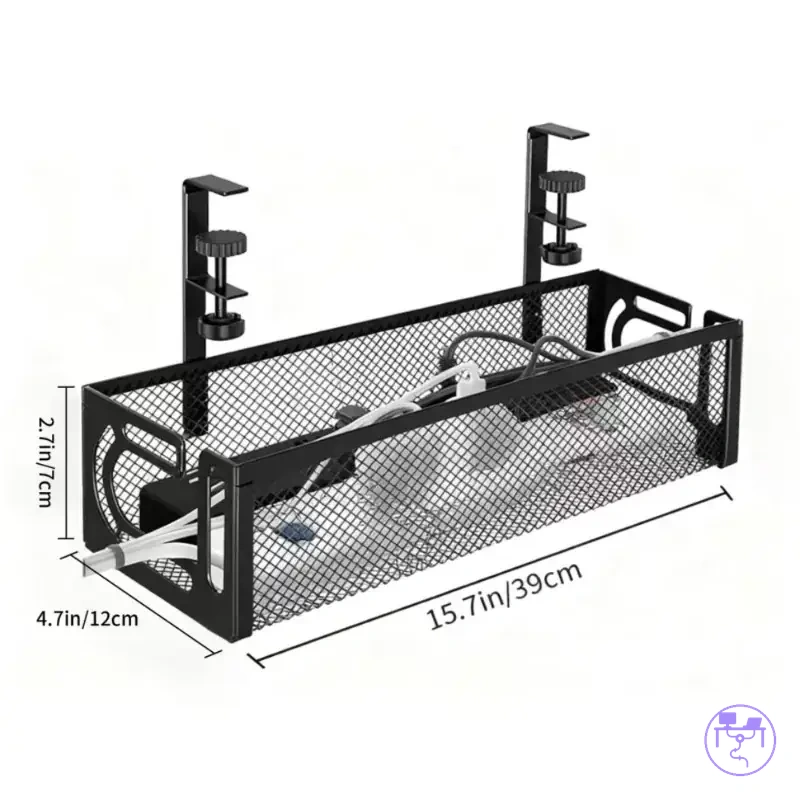
| Mesh tray | Can balance stability, airflow, visibility, and cable access | Surface effects depend on mounting contact points | Users who prioritize cable access and airflow |
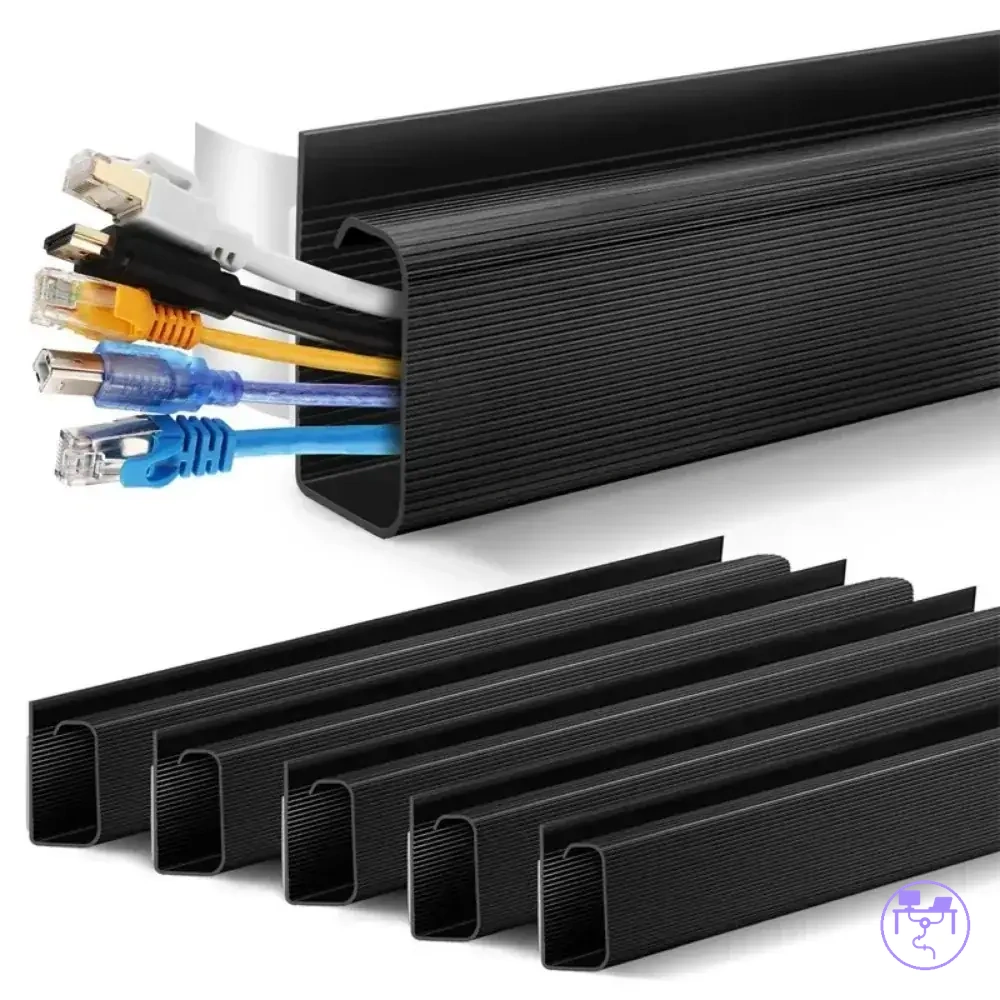
| Plastic raceway | Often suitable for lighter cable routing needs | Surface interaction varies by attachment method | Simple cable paths with lower cable volume |
| Adhesive channel | Stability depends on surface condition and cable load | Surface finish may influence residue risk | Situations where drilling is not preferred |
| Clamp contact | Can provide stable attachment when desk edge conditions are suitable | Clamp pressure may affect delicate desk finishes | Desks with accessible edges and adequate clearance |
A metal tray may suit heavier cable loads, while a mesh tray can improve airflow, visibility, and cable access. An adhesive channel may depend more heavily on surface finish and cable weight, and residue risk can vary by material and usage conditions. Clamp pressure is an important edge case because desk edge protection depends on contact area, pressure distribution, and desk finish. Material and mounting contact point should be selected according to cable load, stability needs, and desk surface condition rather than assumed durability alone.
Best System Fit by Workspace Use Case
A workspace use case determines which selection criteria deserve the highest priority. Cable load, mounting limits, access needs, and desk movement can influence system direction differently across setups. Choosing by workspace use case helps translate earlier criteria into a practical desk setup decision.
The table below maps common workstation types to their dominant constraints and the system attributes that may deserve greater attention during selection.
| Workspace use case | Main constraint | System direction | Watch-out |
|---|---|---|---|
| Home office | Light cable load and simple access needs | Prioritize straightforward cable organization and easy access | Avoid adding unnecessary complexity for a small cable bundle |
| Computer desk | Peripherals, power strip placement, and tray capacity | Focus on capacity and organized cable routing | Check whether adapters and power connections reduce usable space |
| Multiple devices | Large cable bundle and higher cable load | Prioritize stronger mounting and adequate storage capacity | Confirm that access remains practical as cable volume increases |
| Standing desk | Movement, cable path management, and slack | Focus on cable routing that accommodates desk movement | Watch for cable tension during position changes |
A home office may place more emphasis on simple access and basic organization, while a computer desk often benefits from greater attention to tray capacity and power-strip management. A workstation with multiple devices may require more attention to cable load and mounting limits. A standing desk usually shifts the focus toward cable path management and movement-related access needs.
System direction should follow the dominant constraint of the workspace use case rather than a universal recommendation. When cable load, mounting limits, and access needs are evaluated together, the resulting use-case fit is usually clearer and easier to apply to a specific desk setup.
Here are product examples that may make comparison easier. Before buying, always review the compatibility criteria, essential features, and product details.
Home Office and Computer Desk Setups
A home office or computer desk setup should be matched by cable pattern rather than by desk label alone. A laptop desk may have a lighter cable pattern, while a desktop or docking station setup can create denser access needs around chargers, monitors, and peripherals. The selection difference is usually between light cable use and computer-desk cable patterns.
Use these setup patterns to choose the likely organizer direction:
- Laptop setup: A laptop and charger may only need clips, simple routing, or a compact organizer when cable density is low.
- Desktop setup: A desktop, monitor, and peripherals may need a tray when cables and access points collect under the desk.
- Docking station setup: A docking station with adapters may need easier access and space near a power strip.
- Mixed charger use: Shared chargers and removable cables may need accessible storage rather than a fully enclosed path.
The right fit depends on cable density, charger count, docking use, and how often access is needed.
Multiple Devices and Larger Cable Bundles
Multiple devices and larger cable bundles require selection decisions that prioritize tray capacity, cable weight, and access needs rather than device count alone. A multi-device setup with monitors, a docking station, USB hub, and power adapters can create a denser cable path that affects organization and maintenance access. The key local condition is bundle size and how that bundle behaves inside the available cable-management space.
Verify these larger-bundle conditions before choosing a system:
- Device cluster: Check whether monitors, display cables, and peripherals create a grouped cable path that requires additional tray capacity.
- Access need: Confirm whether a docking station or USB hub requires frequent access to connections or adapters.
- Cable weight: Review whether power adapters and bundled power cords increase the weight carried by the mounting system.
- Bundle routing: Check whether a heavy cable bundle can be organized without creating congestion around connections.
- Mounting strength: Verify that tray size and mounting method remain suitable as cable volume and cable weight increase.
- Clutter control: Assess whether a large-capacity tray provides enough room to separate workstation cables and maintain access.
When larger cable bundles approach the limits of available tray space, capacity, access, and mounting support may become more important than adding additional cable-routing accessories.
Standing Desk Movement and Cable Slack
Standing desk movement changes compatibility because the cable path must allow height travel without pulling, snagging, or restricting access. Cable slack needs to match how the desk moves and where the power strip position sits in the setup. The local selection issue is whether movement leaves enough usable cable slack.
Use this checklist to verify height travel, cable slack, power strip position, and snag risk before choosing a system. For a full use-case treatment, standing desk cable management should be evaluated beyond this local compatibility check. Safety and usability still depend on desk travel range, cable path, power-strip position, and accessory placement.
- Height travel: Check whether the cable path can move with the standing desk through its normal range.
- Cable slack: Confirm that cables have enough slack without creating loose loops that increase snag risk.
- Power strip position: Place the power strip where cable movement and access remain manageable.
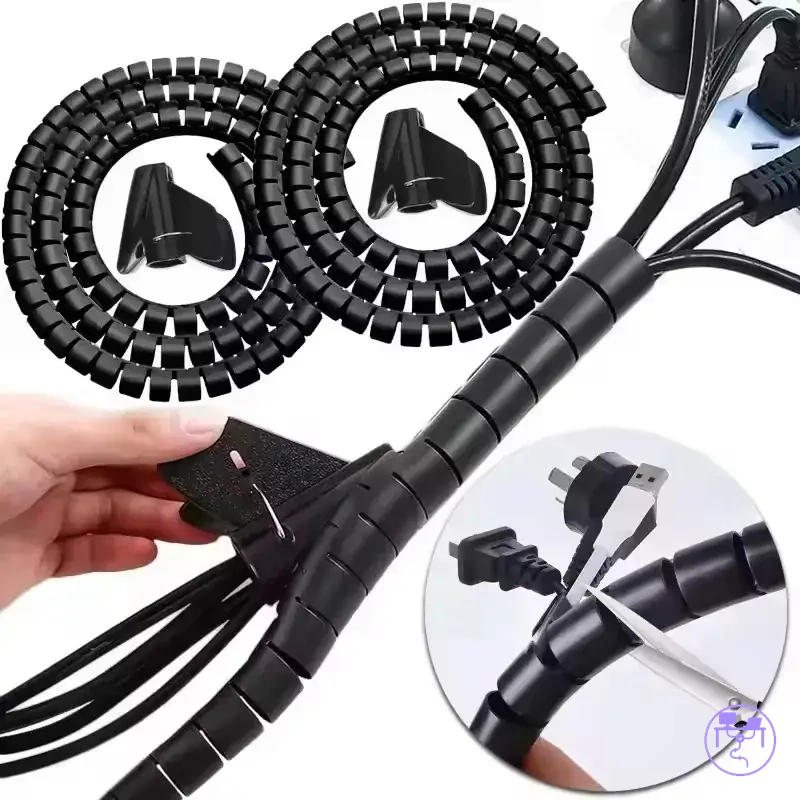
- Routing support: Consider whether a tray, sleeve, clips, or holder can keep the moving cable path controlled.
- Snag risk: Watch for contact points where cables may catch during desk movement.
Selection Mistakes That Create Cable Clutter Again
Cable clutter often returns when the chosen system does not match the desk, cable load, access needs, or power-strip space. Mismatched capacity, weak mounting, poor access, and an ignored power strip can make the setup look organized at first but difficult to maintain. Recurring clutter is usually a selection error rather than a repair task.
Use this diagnostic table to connect each mistake to the visible symptom and the better selection decision:
| Mistake | Visible symptom | Attribute mismatch | Better choice |
|---|---|---|---|
| Choosing too little capacity | Crowding, sagging, or cables spilling out | Tray size does not match cable bundle volume | Select capacity that fits cable thickness and access needs |
| Choosing the wrong mount | Weak hold or unstable placement | Mounting method does not match desk surface or edge condition | Match mounting style to desk material, edge thickness, and clearance |
| Hiding cables without access | Cables become hard to adjust or remove | Concealment is prioritized over cable access | Choose storage with an access opening when changes are likely |
| Ignoring power-strip space | Bulky adapters crowd the tray or block plugs | Power strip clearance is not included in the layout | Allow space for the power strip, adapters, and reachable connections |
| Ignoring future changes | New cables recreate a recurring mess | System does not account for device changes or rerouting | Choose adjustable or accessible storage when future changes are expected |
Before buying, re-check tray capacity, mounting strength, cable access, power-strip clearance, and the likelihood of future changes. A better selection should address the attribute mismatch that creates the visible clutter, not just hide the current mess.
Final Buying Criteria Before Comparing Products
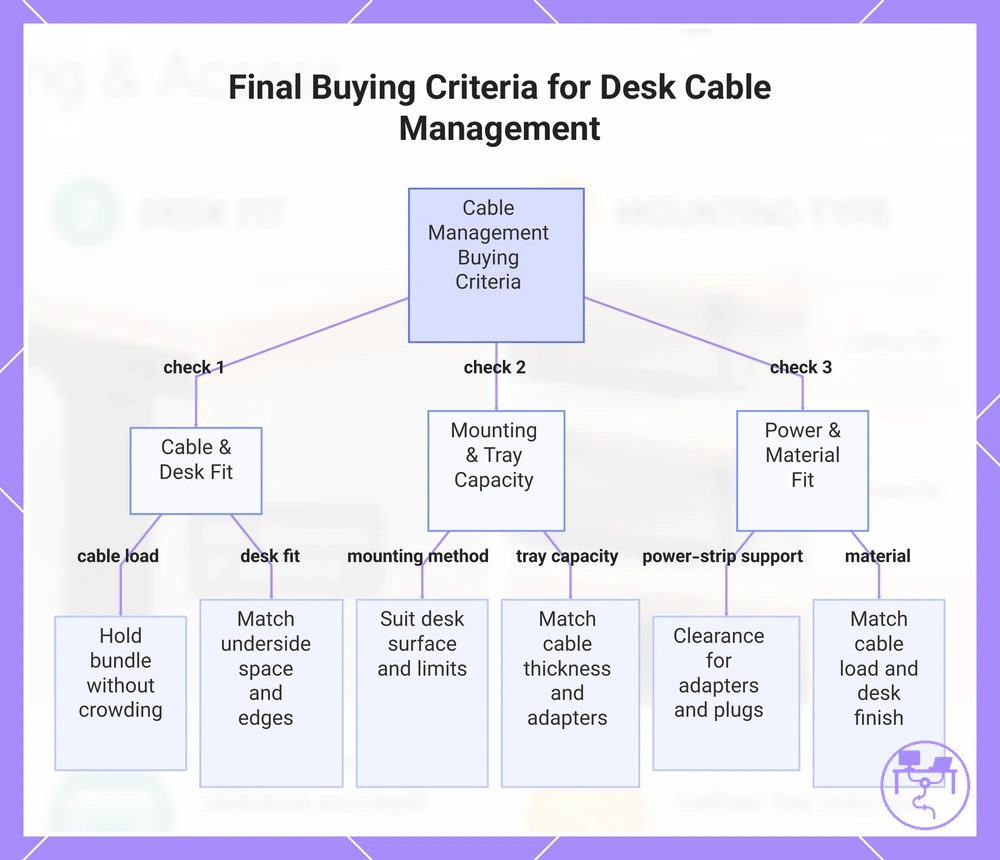
Final buying criteria should verify whether a desk cable management system matches the cable load, desk fit, mounting method, tray capacity, power-strip support, access, and future adjustment needs. The goal is to compare options by fit conditions rather than by product claims. Use this checklist as the final decision filter before comparing products.
Use these final checks to confirm the acceptable condition, the risk if ignored, and the buying decision:
- Cable load: The system should hold the cable bundle without crowding; ignored cable load can cause sagging or cable clutter to return.
- Desk fit: The system should match underside space, edge thickness, and surface condition; ignored desk fit can block mounting or reduce stability.
- Mounting method: The method should suit the desk surface and mounting limits; the wrong mounting method can create weak hold or surface risk.
- Tray capacity: Tray capacity should match cable thickness, adapters, and access needs; an undersized tray can make cables harder to manage.
- Power-strip support: Power-strip support should leave clearance for adapters and plugs; ignored power-strip space can affect access and safety judgment.
- Material: Material should match cable load and desk finish; the wrong material or contact point can reduce stability or surface protection.
- Access: Access should allow removable cables and changes when needed; poor access can make maintenance harder.
- Future adjustment: Future adjustment should match expected device changes; ignoring future changes can recreate cable clutter.
For a more detailed transition from criteria to purchase checks, use the desk cable management buying checklist after the main fit conditions are clear.
Must-have criteria are the conditions that affect fit, safety interpretation, access, and stability. Nice-to-have features can improve convenience, but they should not override cable load, desk fit, mounting method, tray capacity, power-strip support, access, or future adjustment requirements.
Product examples can be compared after these buying criteria are satisfied, with final suitability still depending on desk conditions, cable bundle size, partner offer details, and available product information.
Here are product examples that may make comparison easier. Before buying, always review the compatibility criteria, essential features, and product details.
This chart shows the final buying criteria to verify before comparing desk cable management products, focusing on fit, installation, and compatibility conditions.