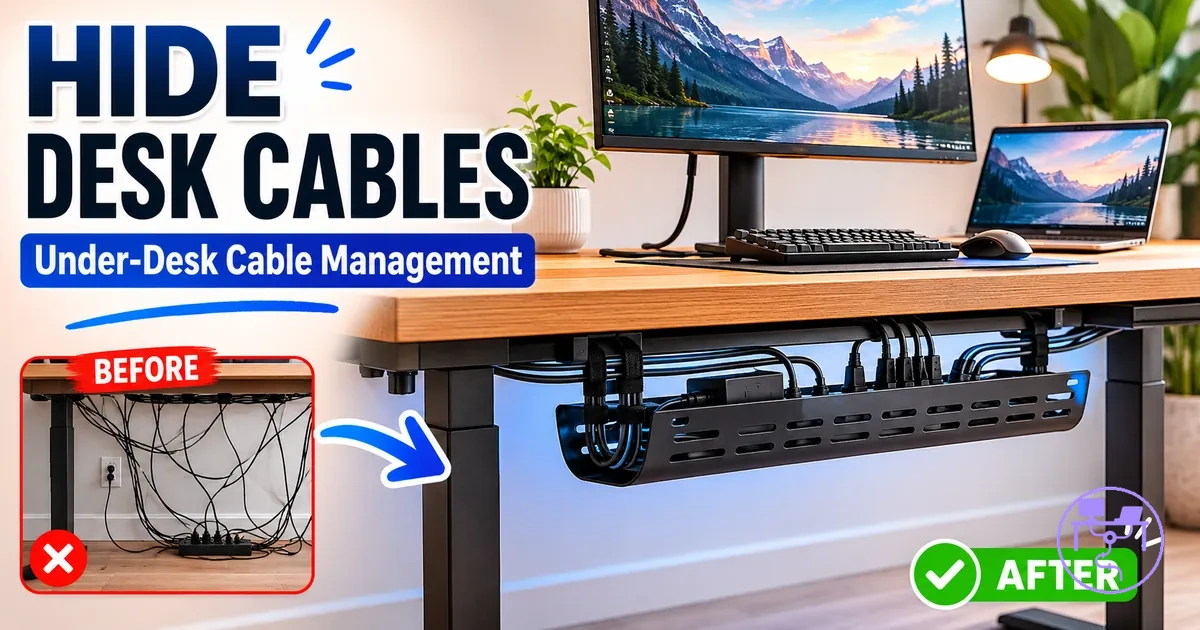
Hiding Desk Cables With a Desk Cable Management System
Hiding desk cables starts with reducing the visibility of cords, bundles, and connection points while keeping them accessible when changes are needed. The goal is to hide desk cables by guiding them through controlled cable paths that reduce visual distraction during normal use. A desk cable management system provides the structure that supports cable concealment while preserving cable access.
Problem to solution, visible cable clutter often comes from visible cables on the desktop, under-desk cables that sag below the work surface, and exposed surface runs that remain in view. Cable concealment can improve when cable paths are matched to appropriate support, such as a tray for under-desk sagging or a cord cover for surface runs. The amount of concealment that is practical depends on desk shape, cable load, device placement, cable length, mounting method, and access needs.
For a typical clean desk setup, the practical sequence often involves grouping related cables, supporting under-desk cables, covering exposed runs, matching visible covers to nearby finishes, and correcting any remaining cable clutter. This approach can help organize cables and conceal wires without making future adjustments unnecessarily difficult. For a broader understanding of planning and organizing cable routes, see the desk cable management system guide.
Direct cable concealment works best when cable access remains part of the plan. Concealment can reduce visibility, but cables may still need slack for movement, reachable connection points, and access around power-related components. These practical limits help define the concealment scope covered throughout the rest of the page.
What Desk Cable Concealment Needs to Hide
Desk cable concealment is the process of reducing visible cable clutter by controlling where desk cables remain visible during everyday use. The objective is to reduce each visibility point through a suitable cable path rather than simply reducing the number of cables. Effective desk cable concealment also preserves necessary cable access for maintenance, device changes, and power connections.
Problem to solution, desk cables typically become noticeable through above-desk exposure, under-desk sagging, and wall-facing visibility. A monitor cable across a desktop creates a different visibility point than under-desk sagging near a cable bundle, while a wall run may require a different approach than adapter bulk near a power source. The hiding method usually depends on the relationship between the visibility point and the cable path.
Direct answer first: cable path usually matters more than cable count when evaluating what needs concealment. A workspace can contain many desk cables yet show less visible cable clutter if key visibility points are controlled. What desk cable concealment needs to hide is determined by where cables remain visible, where cable access is still required, and how wire concealment affects everyday use. Cable hiding should reduce visibility without trapping plugs, blocking cable access, or suggesting that every cable can become invisible.
- Visible-from-use cables such as a monitor cable crossing the desktop
- Hanging-under-desk cables affected by under-desk sagging
- Adapter bulk that remains exposed near power connections
- Wall run sections that may require a cord cover for wire concealment
- Access-needed cables that still require regular connection or adjustment
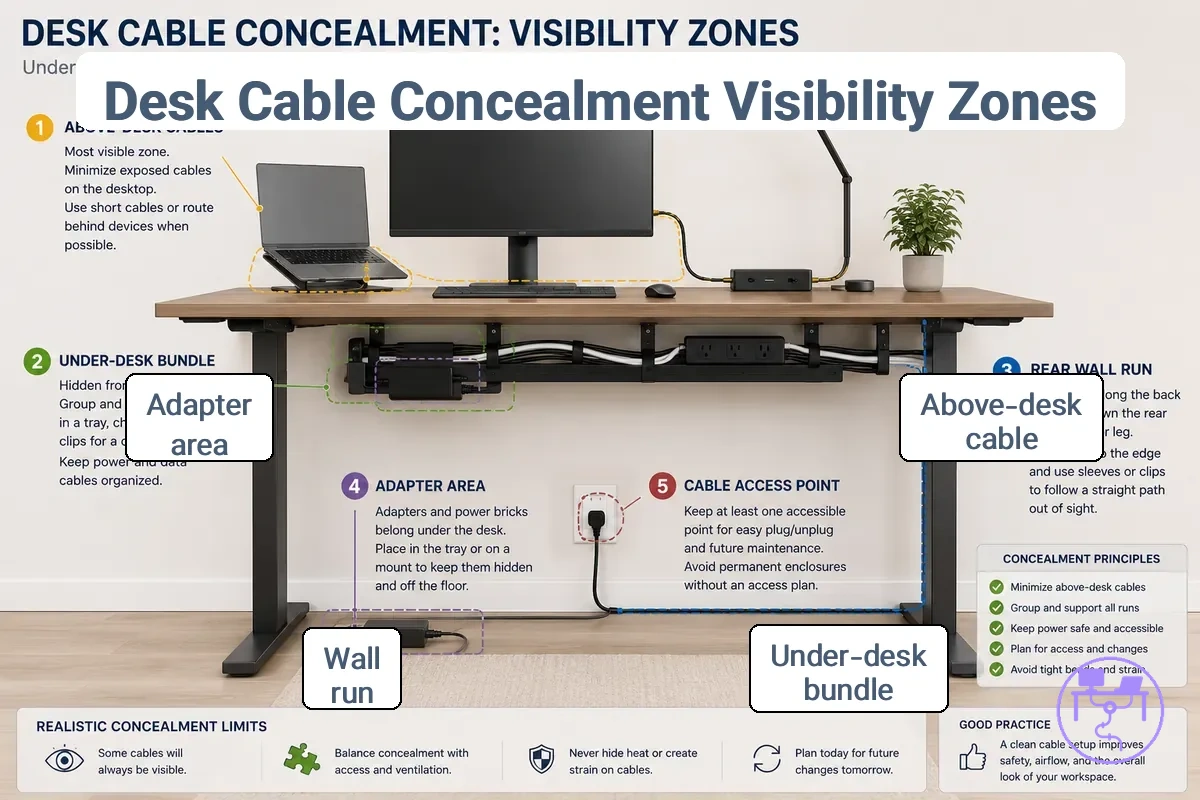
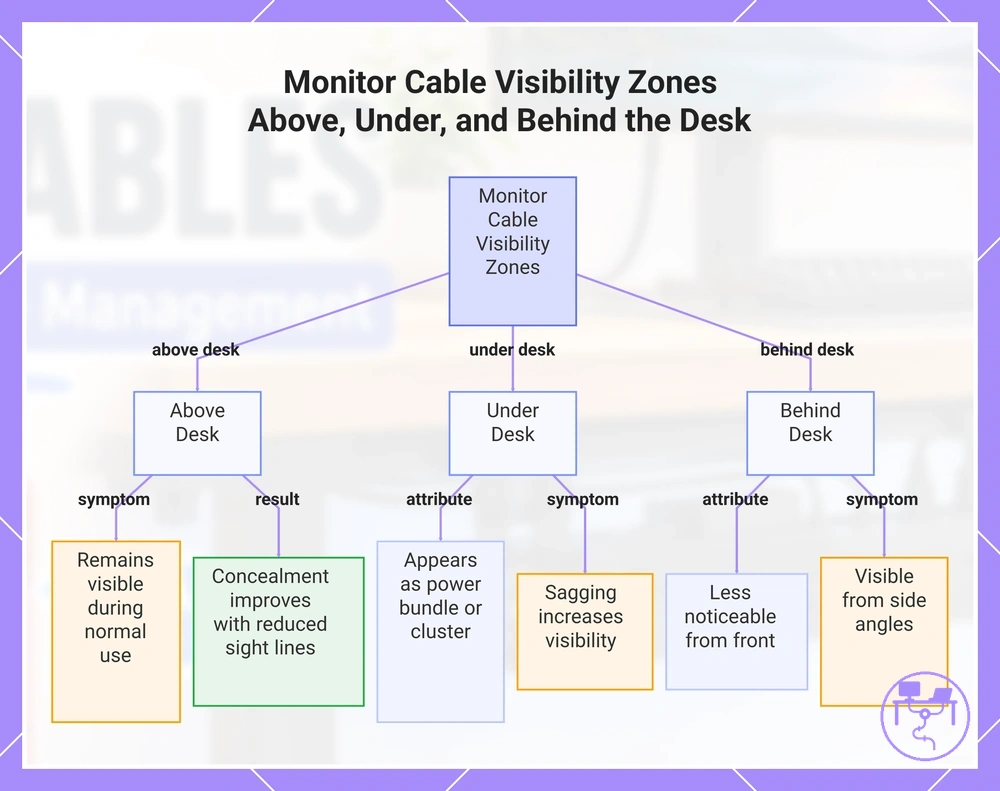
Cables Above the Desk, Under the Desk, and Behind the Desk
A monitor cable can create different visibility problems depending on whether it appears above the desk, under the desk, or behind the desk, making the visibility zone the key factor in zone-based concealment choices.
- Above the desk: Above-desk cables such as a monitor cable or desktop wire remain visible during normal use; the concealment effect may improve when the cable path reduces direct sight lines.
- Under the desk: Under-desk cables often appear as a power bundle, adapter cluster, or underside cable group; under-desk sagging can increase visibility and may affect concealment results.
- Behind the desk: A wall run or rear run along a rear leg is often less noticeable from the front but may remain visible from side angles; the concealment effect depends on cable path and access needs.
- Zone distinction: The same monitor lead can appear above the desk, become part of a power bundle under the desk, or continue as a wall run behind the desk, with each visibility zone affecting the concealment choice differently.
This chart shows how a monitor cable's visibility changes depending on its location above, under, or behind the desk and how each zone affects concealment choices.
Choose Concealment Hardware for Each Cable Path
Concealment hardware should match the cable path because visibility, access frequency, and cable grouping needs can vary across a desk setup. Hardware selection is usually more effective when it reflects the mounting surface and the level of cable exposure rather than the cable type alone.
Problem to solution, an under-desk bundle often needs open support, while an exposed run may benefit from more coverage. Open support, closed coverage, flexible grouping, and local direction control each influence visibility, removability, capacity, and access effect.
| Hardware | Best cable path | Visibility effect | Access trade-off | Use when |
|---|---|---|---|---|
| Under-desk tray | Large under-desk bundle | Reduces direct visibility | Usually keeps cables accessible | Access frequency is high |
| Cable basket | Grouped power bundle | Reduces hanging visibility | May require reaching underneath | Bundle size may change |
| Raceway | Exposed cable path | Covers visible runs | Access may take longer | Surface visibility is high |
| Cord cover | Wall run | Conceals exposed sections | May reduce quick access | A wire cover is preferred |
| Sleeve | Grouped cable path | Combines multiple cables | Usually remains flexible | Cables move together |
| Cable clip | Local direction control | Reduces stray cable visibility | Typically allows easy access | Only a few cables need guidance |
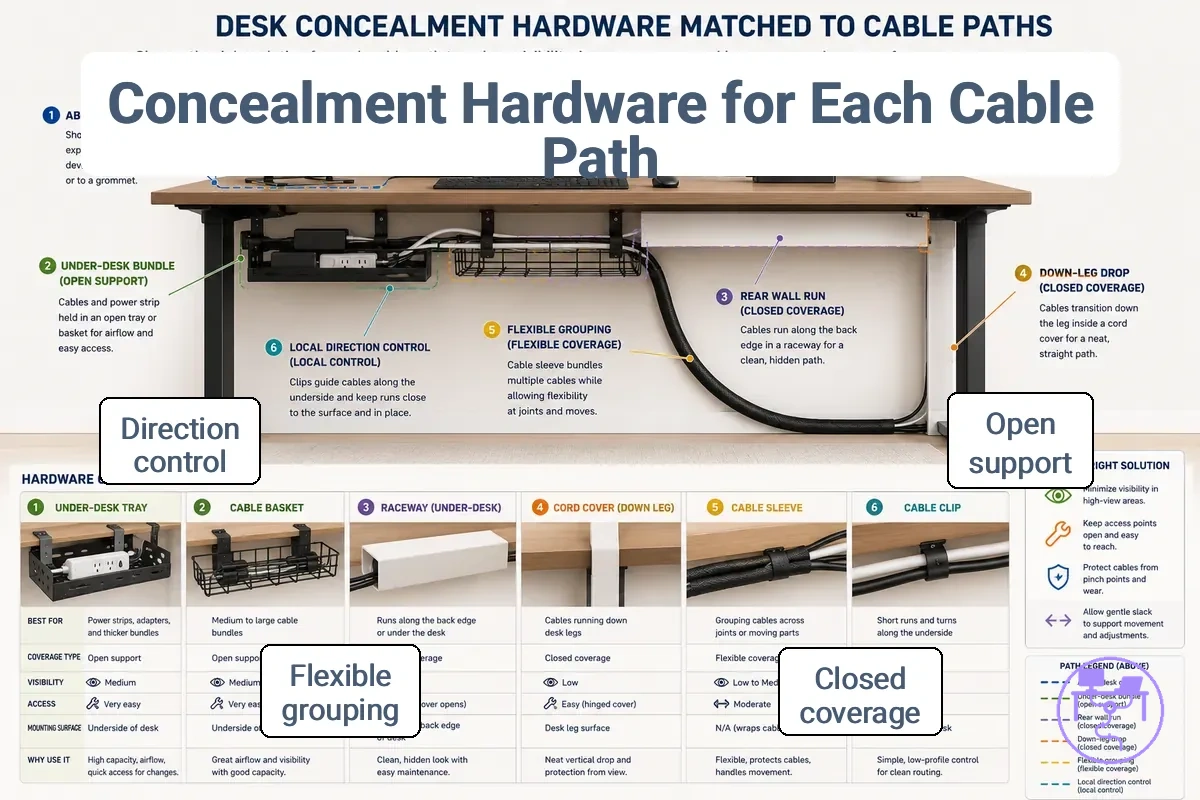
The table separates hardware by path, visibility, and access effect rather than treating every cable organizer the same. An under-desk tray or cable basket generally supports open bundles, while a raceway or cord cover is often chosen for an exposed cable channel or wall-facing run. A sleeve groups related cables, and a cable clip helps manage local direction changes. For a more detailed comparison, see choose parts for cable concealment.
Mounting planning matters when the mounting surface affects removability, future cable changes, or ongoing access needs. The access effect of concealment hardware can vary depending on how often cables are adjusted and where the hardware is installed. When you are ready to apply the selected hardware, see install cable management hardware.
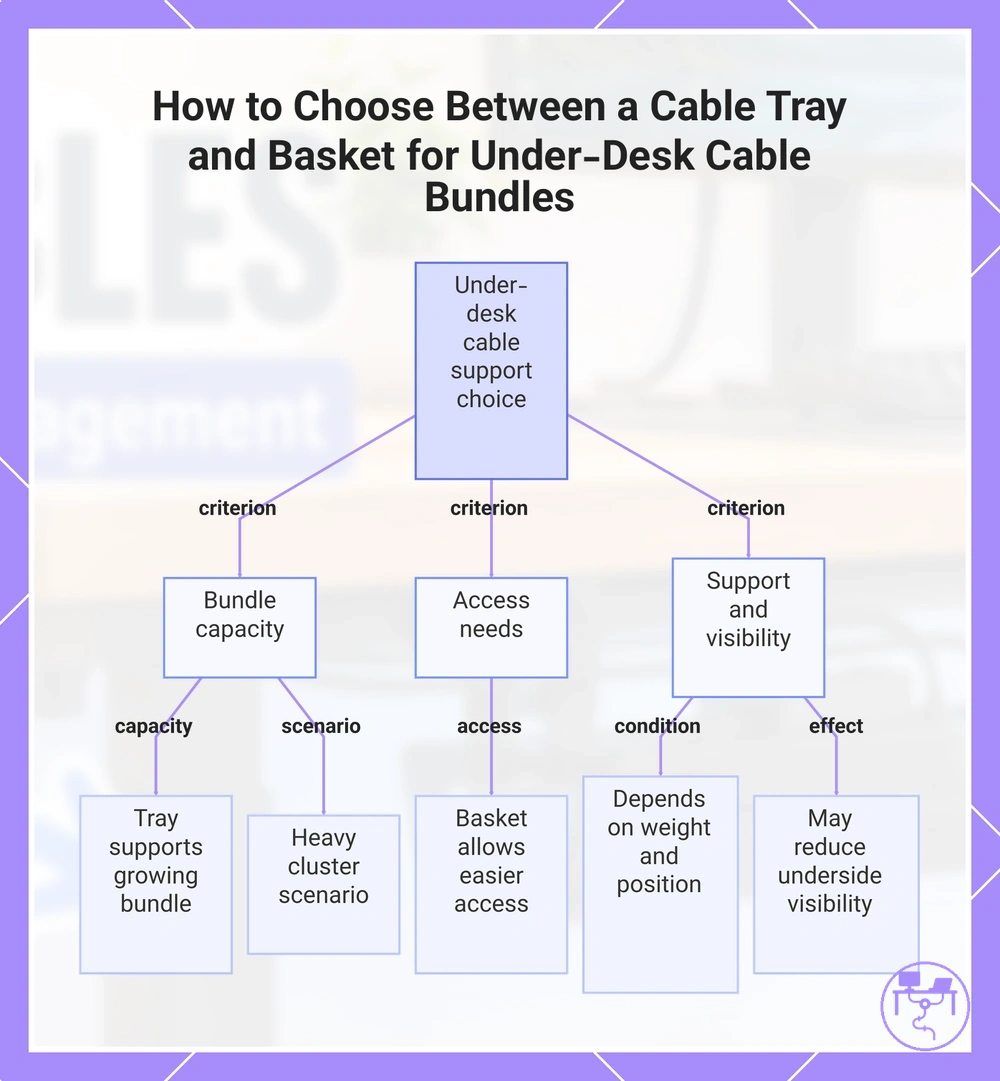
Trays and Baskets for Under-Desk Cable Bundles
Tray and basket selection depends on the size of the under-desk bundle, the required cable capacity, and the level of access needed below the work surface. A tray or basket is often suitable when loose cables, adapters, and power connections benefit from open under-desk support rather than enclosed storage.
Scenario first: when multiple power bricks or a heavy cable cluster collect beneath a desk, a cable tray or wire basket may provide more practical adapter support than smaller under-desk holder solutions. The mounting position can affect underside visibility, while access needs may influence whether a tray or basket is the more appropriate choice.
Bundle weight, cable capacity, and access requirements help qualify open under-desk support.
- Capacity: A tray can support a growing bundle when cable capacity requirements increase over time.
- Access: A basket uses openness to allow easier access when cables, adapters, or connections need adjustment.
- Support: Adapter support depends on bundle weight, mounting position, and the amount of power hardware being held.
- Visibility: A tray or basket may reduce underside visibility, although parts of the under-desk bundle can remain exposed depending on cable path and placement.
This chart outlines the key factors—bundle capacity, access needs, and support conditions—that help decide whether a cable tray or wire basket is the better under-desk cable management solution.
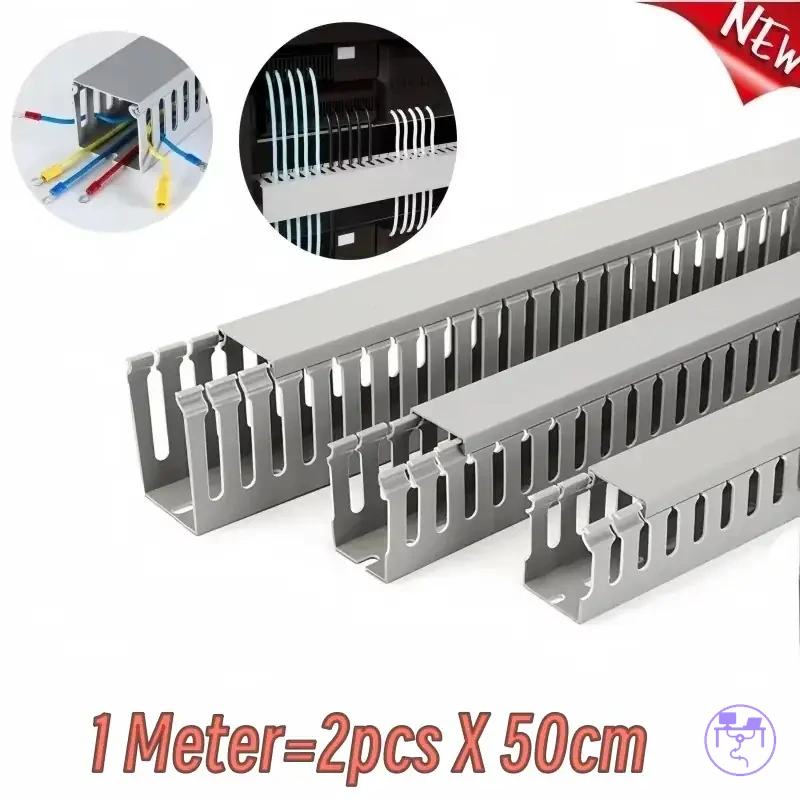
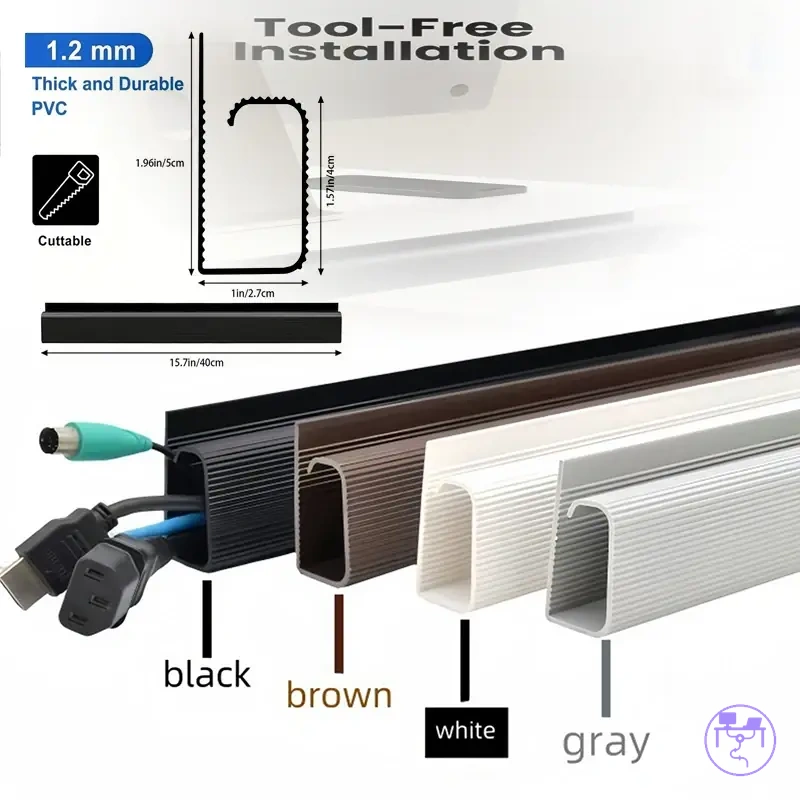
Raceways and Cord Covers for Exposed Cable Runs
Raceway and cord cover selection depends on whether an exposed cable run follows a visible surface path that needs coverage rather than bundling alone. A raceway or cord cover is intended to cover and conceal cables along desk-adjacent surfaces where the cable path remains visible.
| Cover type | Visible path | Access need | Main trade-off |
|---|---|---|---|
| Low-profile cord cover | Short exposed cable run | Occasional plug changes | Lower visibility, limited internal space |
| Openable raceway | Longer surface path | Regular removable access | Improved access, larger profile |
| Adhesive channel | Straight cable path | Infrequent changes | Mounting fit may vary by surface |
| Removable cover | Accessible desk-side run | Frequent cable updates | Easier access, less concealment |
Problem to solution, an exposed cable run often requires coverage because bundling does not conceal a visible surface path. A raceway can route cables through a cable channel, while a cord cover, cable cover, or wire cover can reduce visibility when color, length, mounting method, and opening style suit the surrounding surface. Covers can reduce visual exposure, but removable access may still be needed where plugs change, and the cable path should usually retain enough bend room to avoid overly restricted routing.
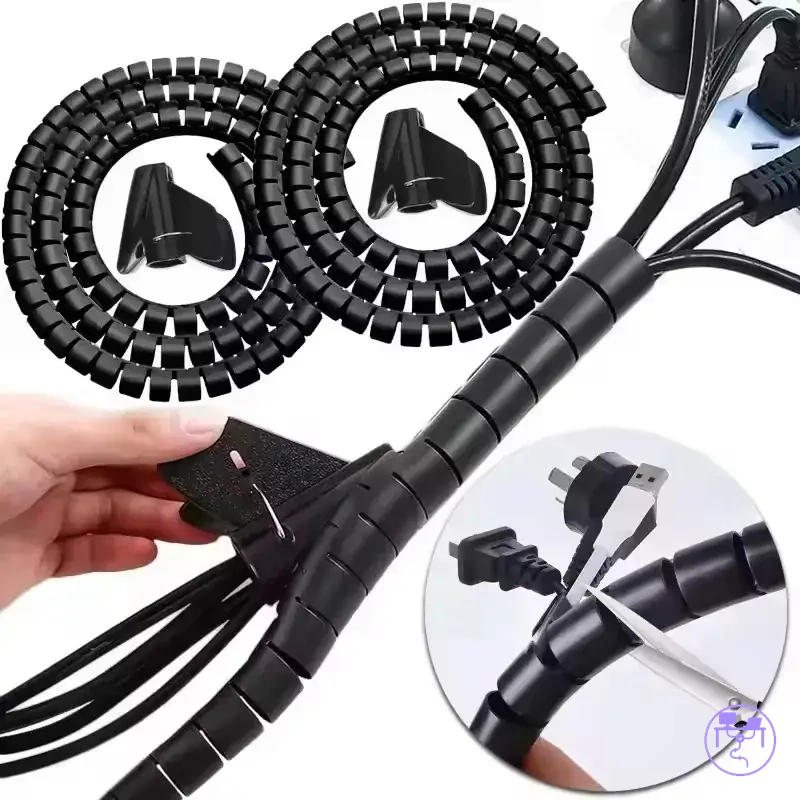
Sleeves and Clips for Grouped Computer Cables
Cable sleeve and cable clips selection depends on whether grouped computer cables need flexible bundling or fixed direction control. A cable sleeve is typically used to bundle related cables together, while cable clips are intended to grip and guide cables along a chosen desk surface path.
Scenario first: when monitor, peripheral, and charger cables form a lightweight cable group, a wire sleeve may keep them together as a single bundle, while cord clips may guide that bundle toward a preferred desk edge. Sleeves and clips support lightweight grouping and direction control, but they are not a universal substitute when cable weight or adapter bulk requires separate support.
The local choice depends on whether flexibility or fixed path guidance is the priority.
- Sleeve: A cable sleeve emphasizes flexibility and can bundle grouped computer cables when cable count may change over time.
- Clip: A clip relies on grip and direction control when cables need guidance across a desk surface.
- Cable count: A sleeve may become more suitable as a cable group grows, while clips often fit smaller cable counts.
- Repositioning: Cable clips may allow easier repositioning when routes change, although grip performance can vary by desk surface.
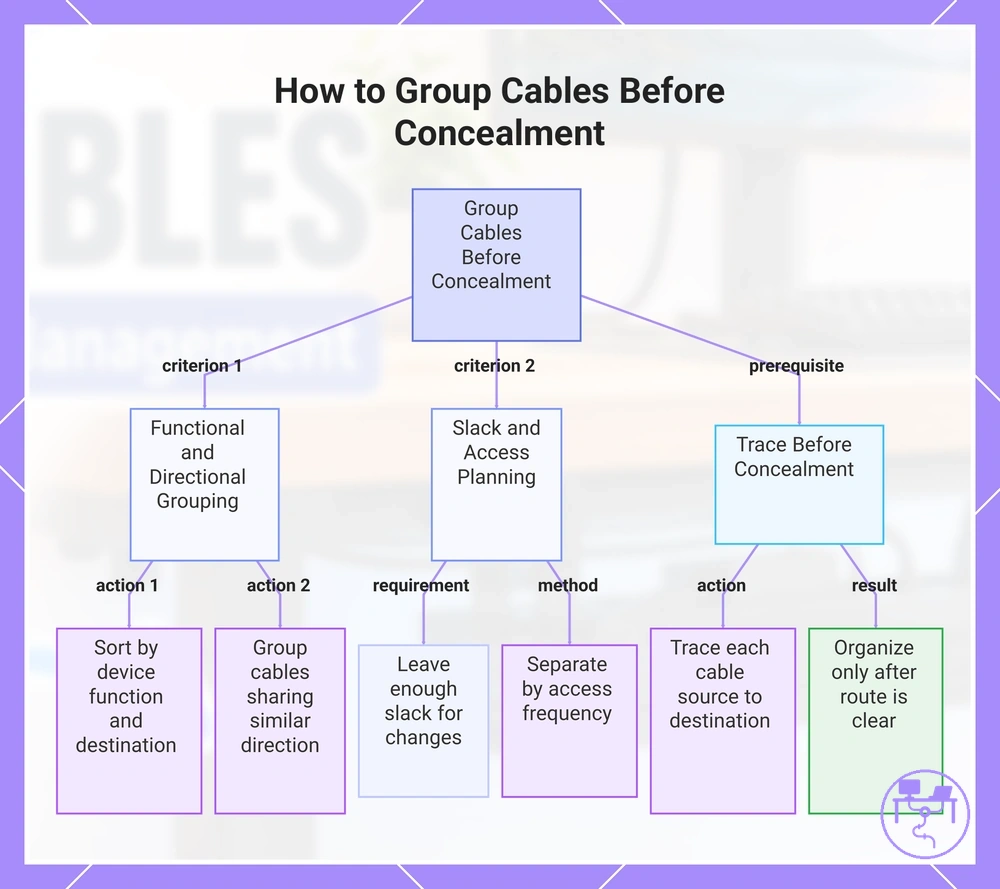
Group Cables Before Concealing Them
Hiding tangled cables can create later adjustment problems because crossing cables and mixed destinations remain harder to identify once concealed. Grouping cables before concealment reduces unnecessary bulk, improves cable tracing, and can lower pull risk when cable count, slack, or connected devices change over time.
Direct answer first: group cables by device function, cable direction, slack, and access frequency before covering or mounting them. These criteria help create a cleaner cable bundle, preserve access where needed, and make future cable tracing easier when changes occur.
Scenario first: on a computer desk, group power cables by destination, display cables by display connections, and peripheral cables by peripheral devices rather than appearance alone. This approach usually makes cable tracing easier than managing a single mixed bundle of wires.
- Sort cables by device function and destination, then check whether each cable group serves a clear purpose so cable tracing remains easier later.
- Group cables that share a similar cable direction to reduce crossing cables and create a cleaner cable bundle.
- Leave enough slack for movement or future device changes because an overly tight bundle may make adjustments more difficult.
- Separate cables by access frequency and preserve access to connections that are adjusted more often.
- Trace each cable from source to destination before concealment, then organize cords only after the route remains clear and identifiable.
This chart shows the key criteria and steps to group cables before concealing them, including grouping by function and direction, planning slack and access, and tracing cables first.
Separate Power, Display, and Peripheral Cables
Separate power, display, and peripheral cables by function before concealment because function-based sorting improves cable tracing and helps reduce accidental unplugging during later adjustments. A power cable, display cable, data cable, and peripheral cable often differ in plug size, thickness, movement sensitivity, and access need, which makes each cable group easier to identify after it is hidden. On a typical computer desk, keeping a monitor cable separate from USB cable and charger cable groups can make tracing and access easier when devices are moved or replaced.
A compact checklist can help organize cable groups before concealment.
- Power cable: Separate by plug size and access need when power connections may require occasional access.
- Display cable: Keep each display cable with its monitor connection, especially when cable thickness may make tracing harder inside a larger cable group.
- Data cable: Group USB cable and other data cable connections together when they share a similar device function and destination.
- Peripheral cable: Separate peripheral cable connections by device type when movement sensitivity or regular reconnection may affect access need.
- Cable group review: Check cable group thickness and identification before concealment so cable tracing remains easier later.
Hide Cables Under the Desk Without Sagging
Hiding under-desk cables without sagging starts with placing enough support points, managing cable slack, and keeping access to reachable plugs. When under-desk cables follow a supported cable route that matches cable weight and access conditions, sagging is usually reduced and future adjustments remain easier.
Problem to solution, sagging often occurs when cable weight hangs between distant support points, when mounting support does not match the cable bundle, or when excess cable slack drops below the underside cable path. Reducing dangling wires depends on balancing support, weight, and access rather than tightening every cable.
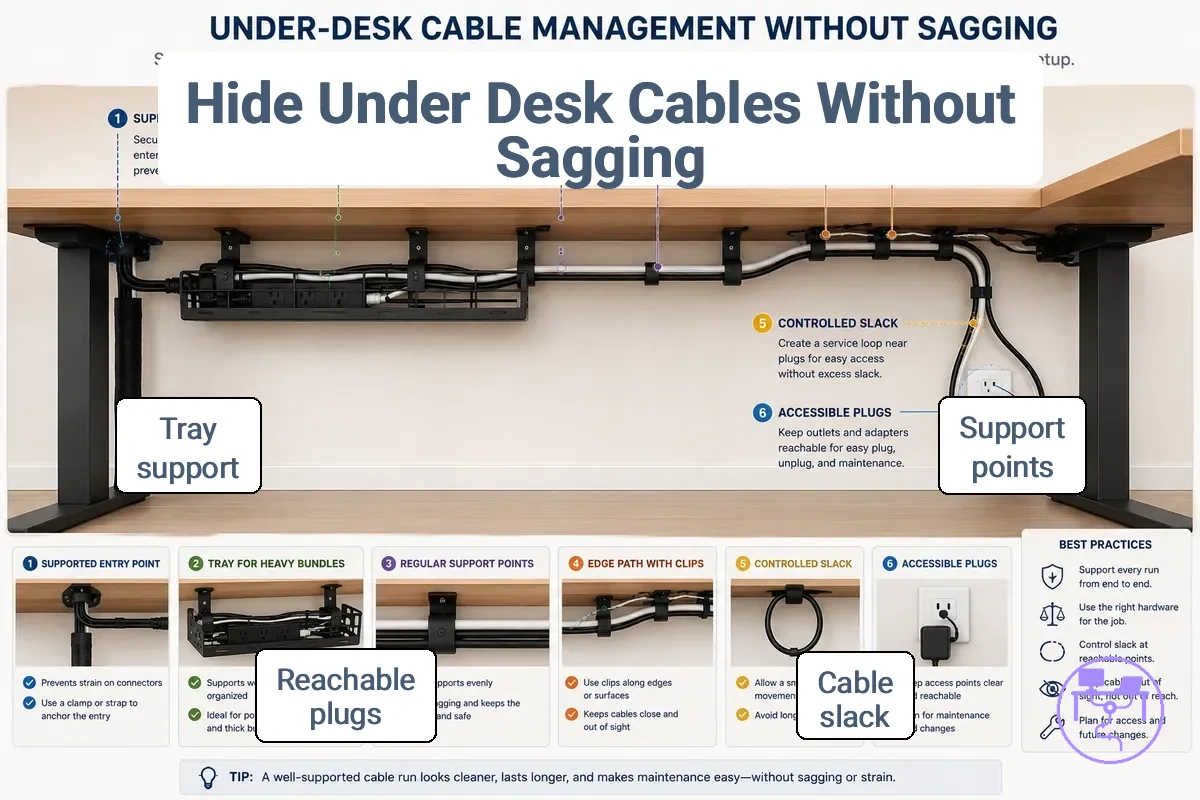
Scenario first: on a typical computer desk, under-desk routing is often easier to manage when power, display, and peripheral cables follow a planned underside cable path instead of hanging between devices and outlets. The goal is to keep the cable route supported while preserving enough movement for normal adjustments.
- Identify the main cable route under the desk and check where under-desk cables currently sag so support points can be placed where support is needed most.
- Group cables into a cable bundle and check cable weight because heavier bundles may require more mounting support along the route.
- Add mounting support along the underside cable path and verify that the cable bundle remains supported between connection points to reduce sagging.
- Leave controlled cable slack near devices and reachable plugs so future changes remain possible without creating large hanging loops.
- Use clips along an edge path when individual cables need direction control and the cable route stays close to the desk edge.
- Use a tray when cable weight, adapter count, or bundle size makes edge-mounted support less practical for the route.
- Caution: Adjust the route if cable slack becomes overly tight around reachable plugs or if cable strain appears during normal device movement.
A tray may suit heavier cable weight and larger bundles, clips may help maintain an edge path for lighter runs, and controlled slack may be sufficient when movement or access is expected. For more detailed planning, see route cables under the desk.
Keep Power Strips, Plugs, and Adapters Reachable
Concealed power components should remain reachable because a power strip, plugs, adapters, and a charger brick may still need access after cable concealment. Reachable placement and ventilation-aware positioning help maintain practical access while reducing the likelihood that cable weight, plug orientation, or routine adjustments create unnecessary strain on concealed power hardware.
Problem to solution, bulky adapters and a larger power block can place additional strain on connections when cable weight hangs directly from plugs or unsupported hardware. Heat exposure may also become a consideration when adapters are placed in confined areas with limited airflow, so support and access should remain part of the concealment plan. Caution: a bulky adapter may need support beneath the desk, but it should not be buried behind fixed covers where access becomes difficult and ventilation-aware placement becomes harder to maintain.
The following do-and-do-not checks help keep concealed power hardware accessible.
- Do: Keep a power strip reachable for normal access. Do not: Position it where plugs become difficult to reach.
- Do: Support adapters or a charger brick when cable weight pulls on connections. Do not: Leave heavy adapters hanging from plugs alone.
- Do: Check plug orientation when routing cables. Do not: Create unnecessary strain through tight bends or pulling force.
- Do: Use ventilation-aware placement when adapters may generate heat during use. Do not: Place power hardware in a tightly enclosed space that may limit access or airflow.
Conceal Cables Around Desk Edges, Legs, and Wall Runs
Problem to solution, visible cables often reappear when they leave the underside of the desk and follow a perimeter path around the desk boundary. Desk edge, desk leg, rear panel, wall run, and floor-to-desk run routes usually need different levels of coverage because visibility angle, surface material, cable movement, and cover fit can vary across each path.
- Desk edge: Check the visibility angle from normal viewing positions, confirm the surface material can support clips or covers, and verify that cover fit follows the desk edge without interfering with cable movement.
- Desk leg: Use a desk leg or leg route when the cable path needs a vertical transition, check for cable movement during desk use, and confirm that clips or covers fit the desk leg shape.
- Rear panel: Follow a rear cable path when the rear panel is less exposed than side-facing routes, and verify that cable movement does not reduce attachment stability.
- Wall run: Use a wall run when a wall-facing path may reduce exposure, check the wall surface material, and confirm cord cover fit before concealing the route.
- Floor-to-desk run: Verify the floor-to-desk run follows a controlled path, check visibility from standing angles, and confirm cover fit along the transition point.
Direct answer first: a desk edge usually suits horizontal cable guidance when visibility angle is the main criterion, while a desk leg often helps guide cables through vertical changes where cable movement may occur. A rear panel can support a rear cable path when the back of the desk is less exposed, whereas a wall run may be more suitable when the desk sits close to a wall and cover fit matches the wall-facing surface.
Scenario-first: a wall-facing desk may allow a wall run or rear panel route to conceal cables along less visible boundaries, while an open-room desk may rely more on a desk leg or back-edge path because side-facing visibility becomes a stronger consideration. The route choice depends on visibility angle, surface material, cable movement, and whether cover fit remains practical along the perimeter path.
This chart shows the three main cable concealment route categories and the key checks for each, based on visibility, surface material, cable movement, and cover fit.

Use Covers for Desk-Facing and Center-of-Room Cable Paths
Direct answer first: a cable cover is most useful when a desk-facing path or center-of-room cable path remains visible from normal seating or room angles. Cover choice depends on whether the cable path faces the user, the room, or the wall because visibility angle, profile height, removability, color, and cover fit can affect how well the path stays controlled while access remains possible. The contrast below helps match cover selection to the visible cable path.
| Path type | Cover criteria |
|---|---|
| Desk-facing path | A cable cover or cord cover may use a lower profile when visibility angle is the main concern. Color can be matched to the nearby surface, and removability may help when access is needed. |
| Center-of-room cable path | A low-profile cover may be more suitable when the path crosses an open area. Profile height, cover fit, and foot-contact risk should be considered when the cable path remains exposed from multiple room angles. |
Scenario-first: when a desk is placed away from a wall, a center-of-room cable path may remain visible from more directions than a wall-adjacent route. In that situation, a low-profile cover can help guide the floor-facing path while remaining removable if cable access is required later. A cable cover may reduce visual exposure and help manage foot-contact risk when cover fit matches the path, but suitability still depends on the specific visibility angle and access needs.
Match Visible Cable Covers to the Desk Finish
Direct answer first: visible cable covers should match the desk finish closely enough to reduce visual contrast, with color and profile usually doing most of the work. A lower-profile cord cover or raceway cover may draw less attention when its color, material finish, surface texture, and placement align with the desk or nearby surface.
Scenario-first: a white cover may suit a white desk or light wall-facing surface, while a black cover may blend better against darker legs, frames, or rear panels. Wood-tone surfaces usually need a closer material finish cue rather than only a similar color, and wall-facing surfaces may depend more on wall color and viewing angle than the desk finish alone.
Problem to solution, finish matching can reduce visual attention, but a cable cover still needs to remain accessible where plugs or cables may change. Placement should balance lower visual contrast with removability, because a cover that blends well but blocks access can make later adjustments harder.
| Surface or finish | Cover color cue | Profile cue | Access note |
|---|---|---|---|
| White surface | Use a white cover when the nearby surface is light | Lower profile may reduce shadow contrast | Keep removable sections reachable |
| Black surface | Use a black cover near dark frames or legs | Match profile to the visible edge | Avoid hiding frequently changed plugs |
| Wood-tone surface | Choose a wood-tone cue that reduces contrast | Surface texture may affect how visible the cover looks | Confirm access before covering longer runs |
| Wall-facing surface | Match the wall or rear surface when it dominates the view | A slim wire cover may be less noticeable from the front | Use placement that still allows later removal |
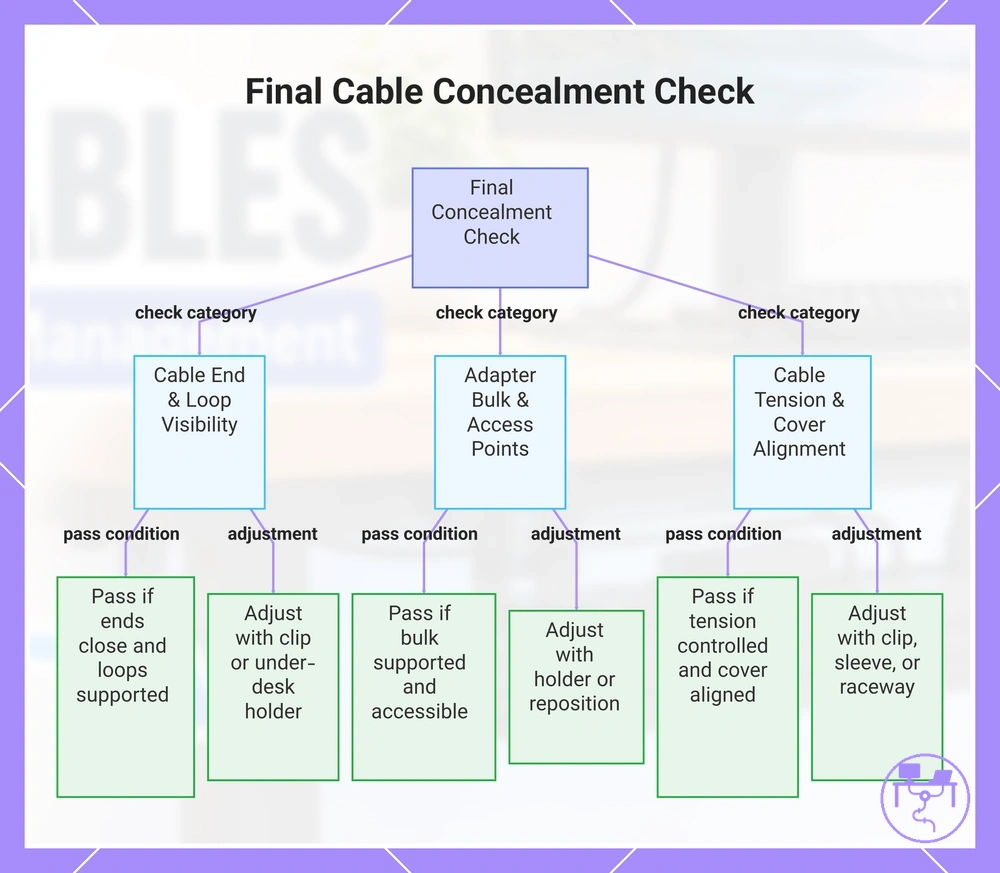
Check the Clean Desk View After Concealment
Direct answer first: the clean desk view should be checked from normal use positions by verifying visible cable ends, hanging loops, adapter bulk, cable tension, access points, and cover alignment. A final visibility check helps confirm what still appears from seated, standing, side, and rear angles after concealment.
Scenario-first: a clean setup may look finished from the front but still show cable ends near a monitor, hanging loops below the desktop, adapter bulk near power connections, or misaligned covers along a side path. These remaining details usually determine whether the concealment passes or needs a small adjustment.
- Visible cable ends: Pass if cable ends sit close to devices or covers; adjust with a clip or sleeve if loose ends remain exposed.
- Hanging loops: Pass if loops stay supported under the desk; adjust with an under-desk holder if loops drop into view.
- Adapter bulk: Pass if adapters remain supported and accessible; adjust placement if bulk is visible or difficult to reach.
- Cable tension: Pass if cables have controlled slack; adjust if tension appears near plugs, devices, or access points.
- Access points: Pass if reachable connections remain usable; adjust if concealment blocks plugs that may need changes.
- Cover alignment: Pass if covers follow the cable path cleanly; adjust if gaps, uneven edges, or exposed runs remain visible.
- Remaining path control: Pass if stray wires stay guided; adjust with a small clip, sleeve, raceway, or under-desk holder when the remaining issue matches that part.
Problem to solution, the final check should not restart the whole process; it should identify the remaining visibility or access issue and apply the smallest correction. If the desk still looks cluttered after the cable path is controlled, compare the setup with a broader cleaner workspace layout.
Direct answer first: use a small clip when one cable end drifts, a sleeve when grouped wires still separate, a raceway when an exposed run remains visible, or an under-desk holder when hanging loops or adapter bulk need support.
The products below are useful examples for comparing available options. Before buying, check that the compatibility criteria, key features, and product details match your needs.

This chart shows three check categories, their pass conditions, and the corresponding adjustment actions for a clean desk view after cable concealment.
Fix Cables That Still Hang, Show, or Pull
When hanging cables, visible cables, or pulling cables remain after concealment, the likely cause is often a support issue, cable path problem, insufficient slack, or poor cover fit. Diagnosing the symptom first helps identify whether the adjustment involves support, routing, repositioning, or hardware fit rather than simply adding more clips.
Problem to solution, each symptom should be checked against its likely cause before making changes. Observable issues such as dangling wires, an exposed run, cable pull, or loose adhesive clips often point to a specific condition that can be inspected and adjusted.
| Symptom | Likely cause | Check | Adjustment |
|---|---|---|---|
| Hanging loops | Support issue or excess slack | Check whether the cable route remains supported between connection points | Reduce excess slack or add appropriate support where needed |
| Exposed runs | Cover fit or routing issue | Check whether the cable path extends beyond the cover | Reposition the cover or reroute the cable path |
| Pulled plugs | Insufficient slack causing cable pull | Check for tension near plugs and device connections | Adjust slack and reduce strain along the route |
| Loose adhesive clips | Surface condition or load mismatch | Check clip attachment and cable weight | Reinstall the clip or use a different support method when appropriate |
| Overloaded sleeves | Bundle size may exceed sleeve capacity | Check whether the sleeve compresses or separates cables | Split the bundle or use a larger routing solution |
| Unreachable adapters | Placement limits access | Check whether adapters remain accessible after concealment | Reposition the adapter or adjust the support location |
Scenario-first: when a hanging cable continues to reappear, a visible run remains exposed, or a loose clip returns after adjustment, rerouting or reinstalling hardware may be more effective than adding additional adhesive clips. This approach can be appropriate when support, slack, surface conditions, or hardware fit continue to limit the cable path after earlier adjustments.