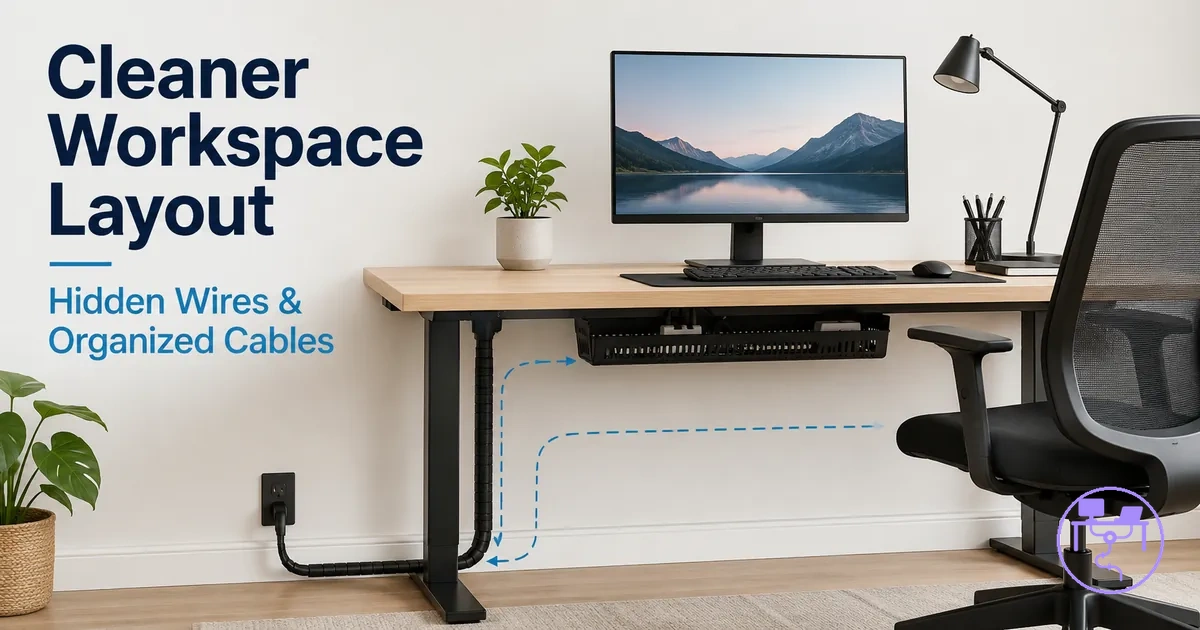
Desk Cable Management System for Clean Workspace Layouts
A desk cable management system is a cable-control method that helps organize cable paths around and under a workstation. Its role is to support a clean workspace layout by reducing cable clutter while keeping important connections reachable. A cleaner layout is closely connected to how visible wires are managed and how easily cable access is maintained.
A desk cable management system can improve visual order by guiding cables into more predictable paths and reducing unnecessary cable exposure. Under-desk organization often separates power and device connections from the main work surface, which can make a clean desk setup easier to maintain. A cable tray, cable sleeve, and cable clips may each contribute to controlling different cable zones without requiring every cable to follow the same route. For a broader definition and related concepts, see the desk cable management system guide.
Cable clutter often comes from a mix of floor wires, unmanaged cable paths, changing device connections, and inconsistent cable access. The most useful evaluation usually focuses on layout visibility, cable zones, organizer parts, charger reach, power strip placement, and how easily cables can be adjusted later. Rather than assuming one cable organizer or cable hiding kit fits every desk, it is more useful to match desk wire management choices to cable load, device positions, and access needs. A cleaner layout also does not always mean every cable is invisible, because visible wires may still be necessary for convenient use and future device changes.
The outcome of any desk cable management system depends on factors such as desk shape, under-desk routing space, cable quantity, and how often devices are added, removed, or repositioned. These conditions help determine which layout characteristics contribute to a cleaner and more practical workspace.
What makes a desk cable layout look clean
A clean desk cable layout depends on what remains visible, what is managed through under-desk routing, and what stays easy to reach when needed. The goal is not simply to reduce cable count but to lower cable density while maintaining access to chargers, plugs, and connected devices. Visibility and access are the controlling ideas behind a clean desk cable layout.
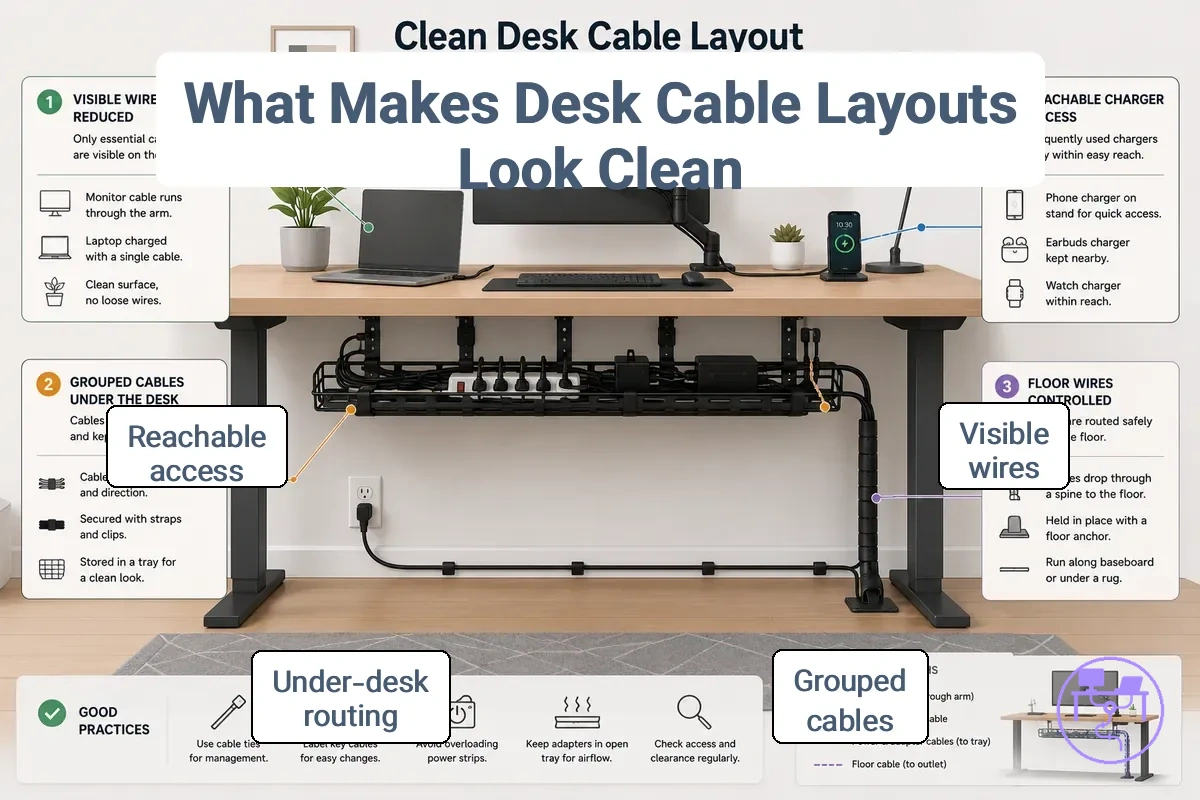
A desk with monitor cables, charging cords, and power connections can appear cluttered when visible wires cross the work surface, hang around desk legs, or create exposed floor wires. The same cable load may look more organized when grouped cables follow a consistent cable path and unnecessary wire exposure is reduced. Under-desk routing can help keep cables aligned while preserving access for chargers, plugs, and device changes. In many cases, routing changes perception more than cable quantity.
A clean desk setup does not always require every cable to be hidden. Visible wires can remain part of a tidy cable layout when they follow organized paths and support reachable cables where access is needed. The difference between visible clutter and a clean layout often comes from grouping, routing, and workspace symmetry rather than complete concealment. The comparison below highlights the distinction between hidden, grouped, and reachable cables.
| Layout Approach | Main Visual Effect | Access Consideration |
|---|---|---|
| Hidden cables | Reduces visible wires and surface clutter | Access may take longer when cables are fully concealed |
| Grouped cables | Creates cleaner cable paths and improves workspace symmetry | Usually keeps cables organized while remaining manageable |
| Reachable cables | May leave limited cable visibility | Supports chargers, plugs, and device changes without disrupting the layout |
Visible clutter, floor wires, and under-desk cable paths
Cable location changes both appearance and practical risk within a clean desk layout. A cable path that stays on the desktop, crosses the floor, or follows under-desk cable paths can create different visibility levels and different outcomes for daily use. The three states to compare are visible clutter, floor wires, and under-desk cable paths.
A desk with monitor, charging, and power cables may look crowded when cable runs remain exposed across the floor. When the same cables are moved into routed cables beneath the desk with grouped cables supported by a cable tray or cable clips, the visual effect can change even though the cable load remains similar. The result still depends on desk layout, device position, and how much of the cable path remains visible.
| Cable State | Cable Location | Visibility Level | Snag Risk | Visual Effect |
|---|---|---|---|---|
| Visible clutter | Desktop cables | High | Usually low | More visual noise |
| Floor wires | Around desk legs and floor areas | Medium to high | Can increase with movement | Less organized appearance |
| Under-desk cable paths | Beneath the desk surface | Usually lower | May be reduced when routed | Cleaner layout appearance |
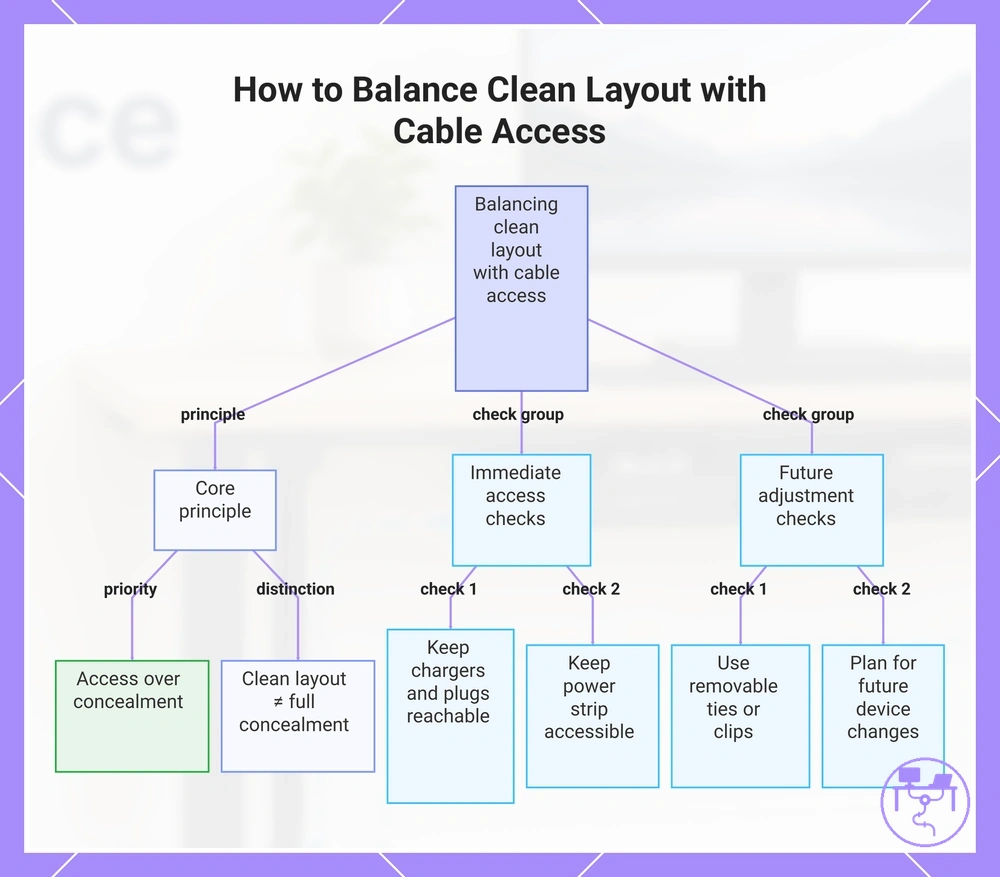
Clean layout goals without losing cable access
Clean layout goals should balance reduced visible mess with practical cable access. Chargers, plugs, and device connections still need to remain reachable when the desk setup changes or when a cable must be unplugged. The main access criteria are reachability, removable connections, cable slack, power-strip access, and future device changes.
Over-hiding cables can make a tidy setup harder to adjust. If cables are too tightly concealed, small changes such as moving a charger, replacing a plug, or adding a device may require more work than the clean layout saves. Use these checks before choosing how much concealment is useful:
- Reachability: Keep frequently used chargers and plugs close enough for normal access.
- Removable connections: Use removable ties or accessible clips where cables may need to change.
- Cable slack: Leave enough slack for device movement without creating loose visible mess.
- Power-strip access: Keep the power strip reachable for switching, unplugging, or rearranging connections.
- Device changes: Plan for future device changes so the layout can adjust without being rebuilt.
Clean layout and full concealment are related outcomes, but they are not identical. A clean layout can still include accessible cables when access matters more than hiding every visible segment.
This chart shows the key checks and principle for balancing a clean desk layout with practical cable access.
Cable zones that shape a cleaner desk setup
Cable zones are the main areas where desk cables appear, travel, collect, or require access within a desk setup. These cable zones help identify where visibility, access, and cable movement affect the overall appearance of a clean desk setup. Understanding cable zones before selecting hardware helps ensure that organizer choices match actual cable path areas.
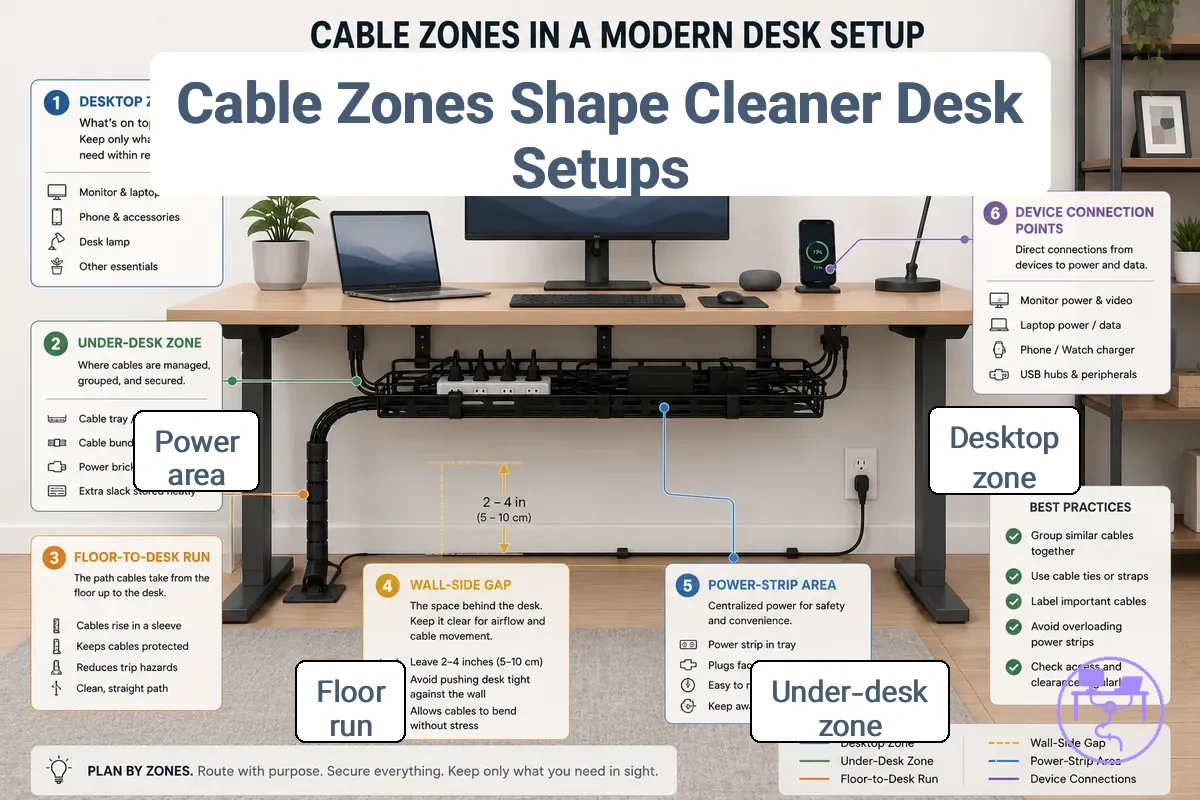
A desk typically includes a desktop zone where cables remain visible near devices, an under-desk zone where cables often collect along the underside, and a floor-to-desk run where cables travel between the floor and desk surface. Additional cable areas may include a wall-side gap behind the desk and a power-strip area near outlets. Each device connection point introduces its own access requirement. Reviewing these desk zones from the desktop to the underside and then to the floor provides a practical inspection path.
Choosing organizers before identifying cable zones can lead to unnecessary parts. For example, a user may focus on the desktop zone even though most cable load exists in the under-desk zone or power-strip area. Mapping routing zones first helps connect cable load, access needs, and organizer choice. The checklist below can be used to inspect each zone before selecting cable management solutions.
Check each cable zone individually and note how its condition affects visibility, access, and future decisions.
- Desktop zone: Inspect visible cable paths around devices; this affects surface visibility and organizer choice.
- Under-desk zone: Inspect cable collection points beneath the desk; this affects routing and access decisions.
- Floor-to-desk run: Inspect cables traveling between the floor and desk surface; this affects visibility and cable path control.
- Wall-side gap: Inspect exposed back cables and available space; this affects cable visibility and routing direction.
- Power-strip area: Inspect outlet distance, charger reach, and cable concentration; this affects access and grouping decisions.
- Device connection point: Inspect where cables connect to monitors, chargers, and peripherals; this affects cable access and future device changes.
Desktop, under-desk, and floor-to-desk cable zones
The desktop zone, under-desk zone, and floor-to-desk run are the three cable zones that most often determine whether a workspace looks tidy. The desktop zone is the visible device area where device cables and charger access are most noticeable, the under-desk zone is the main routing area where grouped cables are managed, and the floor-to-desk run is the transition area between the floor and desk surface. Each zone creates a different visibility problem and a different layout effect.
A typical cable path starts in the desktop zone near connected devices, moves through the under-desk zone where cables may be grouped with a cable tray, and continues along the floor-to-desk run beside a desk leg or cable drop. Visible clutter is usually most noticeable in the visible device area, while the routing area beneath the desk often influences overall cable order. The transition area affects how cables move between levels and remain visible. The layout effect of these zones may vary depending on desk shape and cable paths. For a broader routing discussion, see how to route cables under the desk.
| Zone | Primary Role | Typical Layout Effect |
|---|---|---|
| Desktop zone | Visible device area | Influences visible clutter and charger access |
| Under-desk zone | Routing area | Influences cable grouping and visual order |
| Floor-to-desk run | Transition area | Influences cable visibility between floor and desk |
Power strip, charger, and device position planning
Power strip location, charger reach, and device position control cable reach, cable visibility, and long-term layout usability. A clean layout depends on planning power access before cables are hidden or bundled because cable paths are influenced by where devices connect and where power is available. The main planning criteria are outlet distance, mounting position, charger frequency, adapter size, cable slack, and access.
Hiding cables before planning power access can create access problems later. A power strip that is difficult to reach, a charger used frequently, or a device position that changes often may require cables to be adjusted after routing is complete. Reviewing power and device placement first can help align cable organization with daily use. Use the checklist below to evaluate the main planning criteria.
- Power strip: Check outlet distance and mounting position; this affects cable reach and overall cable visibility.
- Charger reach: Identify chargers used regularly; this affects access and whether charging cords should remain easy to reach.
- Device position: Review device placement before routing cables; this affects cable length needs and layout flexibility.
- Adapter size: Check how power adapters fit within available under-desk space; this affects visibility and heat clearance around connections.
- Cable slack: Leave enough cable slack for movement and removable cable connections; this affects future device changes and cable strain.
If chargers, plugs, or connected devices require frequent access, access may matter more than maximum concealment. Layout decisions often depend on desk type, cable length, and device load rather than on hiding every visible cable.
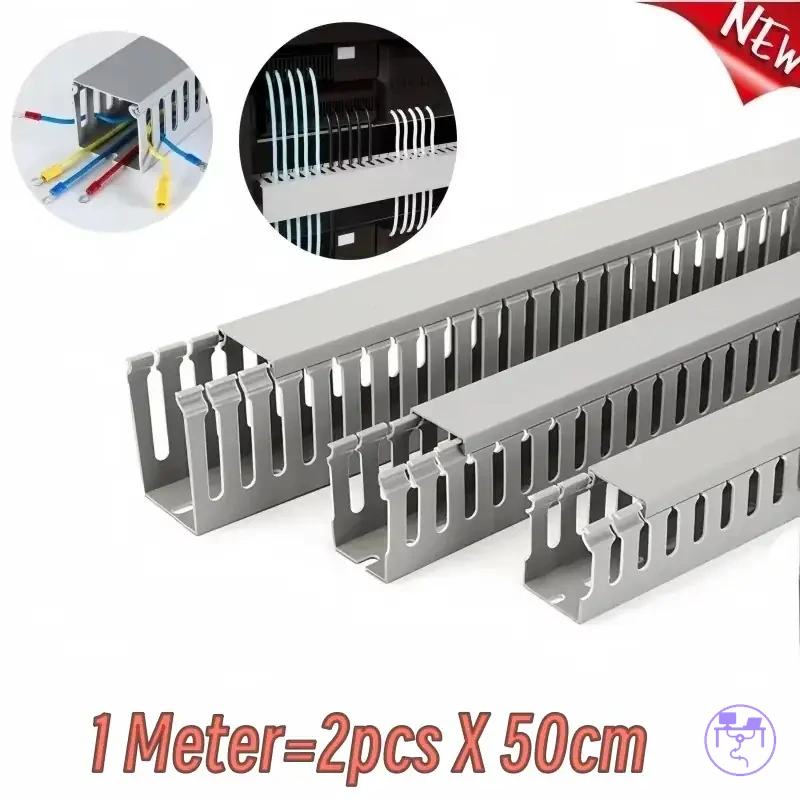
Cable management parts for a cleaner visual layout
Cable management parts are layout functions rather than product categories. They contribute to visual cleanliness by helping cables follow organized paths, remain grouped, stay concealed where appropriate, or remain secured while preserving necessary access. The main functions of cable management parts are grouping, hiding, directing, and securing.
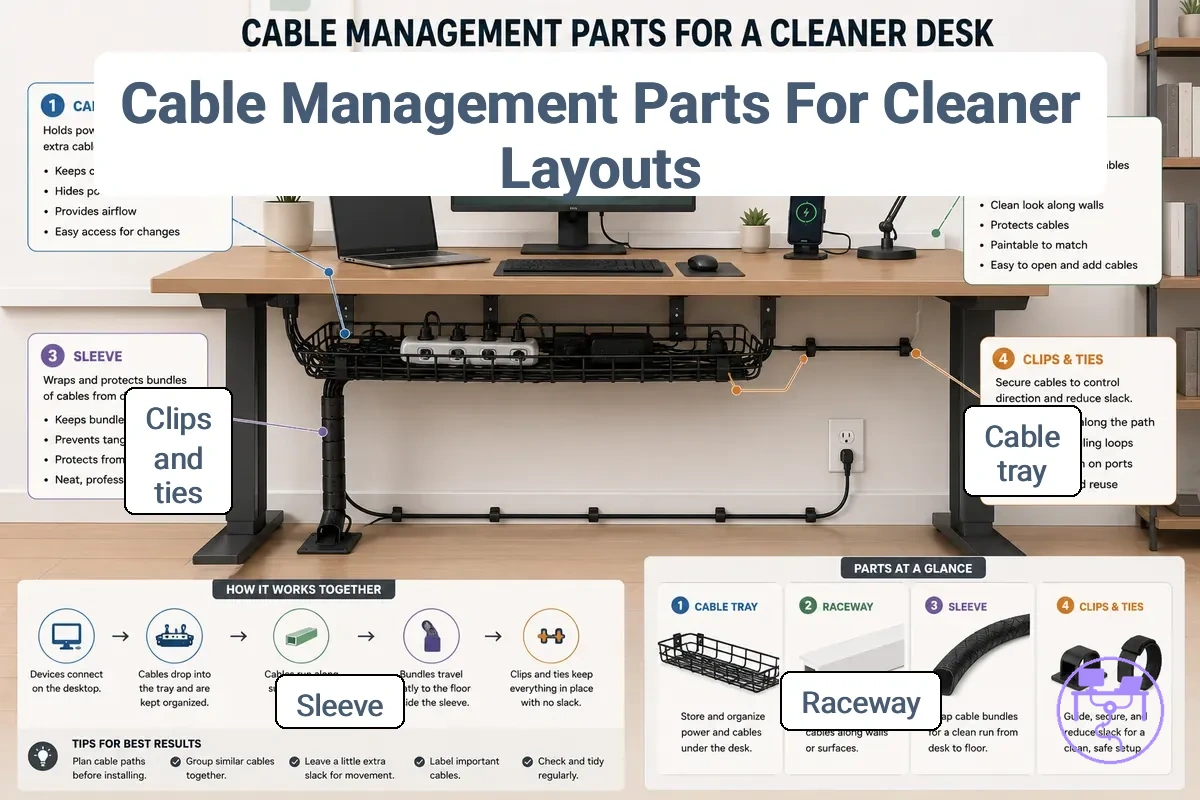
Mismatched organizer parts can create unnecessary complexity when their function does not match the cable zone or visibility goal. A solution focused on concealment may not improve access, while a solution intended for cable grouping may not significantly reduce visibility. Understanding the role of each part helps connect cable organizers to layout needs. The table below compares common parts by function and related attributes.
| Part | Primary Function | Related Attributes |
|---|---|---|
| Cable tray | Supports grouped cables in an under-desk area | Capacity, access, under-desk storage |
| Raceway | Covers a cable run along a mounting surface | Concealment, visibility control |
| Sleeve | Bundles cables into a single visible segment | Flexibility, cable grouping |
| Clips | Guide cable direction along edges or surfaces | Direction control, removable access |
| Ties | Manage slack and keep cables together | Cable grouping, adjustment |
Part choice depends on the cable zone and the level of access needed after cables are organized. A cable tray may suit areas with higher capacity needs, while clips, sleeves, or ties may be more useful where flexibility and access remain important. Cable management parts should be selected for layout function rather than kit size alone.
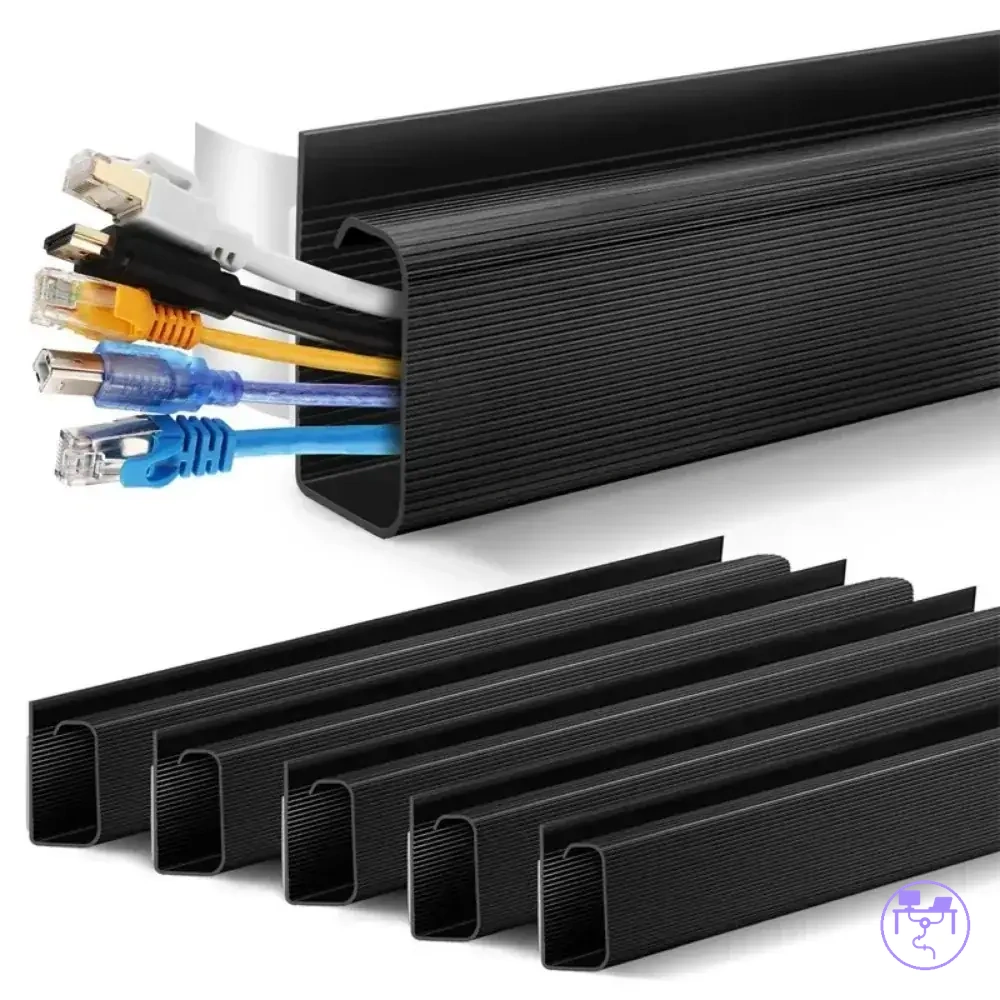
Under-desk trays and raceways for hidden cable runs
Under-desk trays and raceways both support hidden cable runs, but they address different visibility challenges within a clean layout. Under-desk trays help organize grouped cables beneath the desk while maintaining relatively open access, whereas raceways reduce visibility by covering a cable path along a mounting surface. The main distinction is tray openness compared with raceway coverage.
When cables collect beneath a desk, under-desk trays can support cable load and provide open access for adjustments or changes. When cables travel behind the desk or along a wall-side edge, raceways can create a covered run that reduces exposure along a visible edge. The more suitable option depends on cable load, mounting surface, access frequency, and where the hidden cable runs are located.
| Attribute | Under-desk Trays | Raceways |
|---|---|---|
| Visibility reduction | Organizes grouped cables beneath the desk | Covers a cable path along a visible edge or surface |
| Tray openness / raceway coverage | Open structure | Covered run |
| Cable load | Often supports larger cable groups | Often supports defined cable paths |
| Mounting surface | Desk underside | Rear edge, wall-side area, or other mounting surface |
| Access frequency | Usually allows easier cable access | Usually reduces exposure with more controlled access |
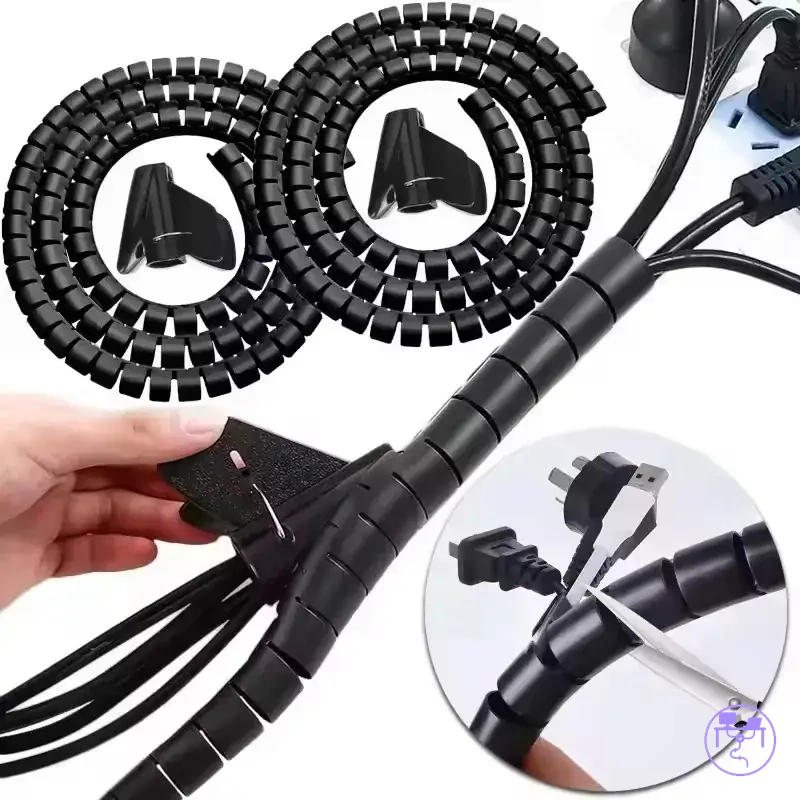
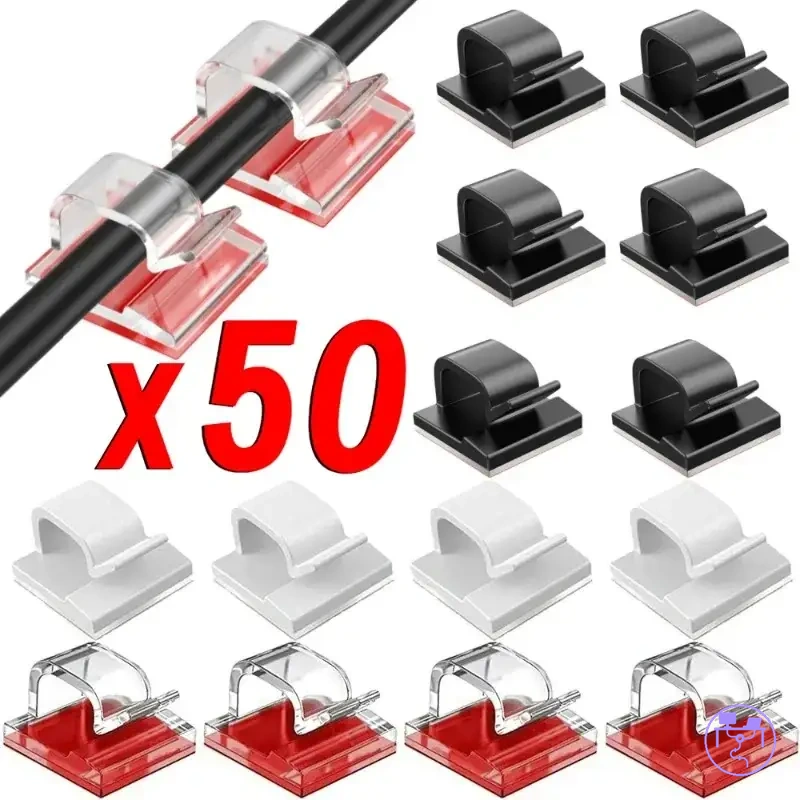
Sleeves, clips, and ties for controlled visible segments
Sleeves, clips, and ties help control visible segments that cannot be fully hidden. A clean layout often depends on managing cable position, shape, and access rather than concealing every visible cable run. The main control methods are bundling, direction control, bend points, removable access, and cable grouping through sleeves, clips, and ties.
When a reachable cable segment remains near a charger, desk edge, or frequently used device, visibility may be necessary for convenience and access. In these situations, cable control parts help organize the visible cable run while preserving usability. The bullet points below outline the local role of each part.
- Sleeves: A cable sleeve bundles cables into a single visible segment with a flexible cover. This can reduce visual clutter while maintaining access when cable changes are needed.
- Clips: Cable clips provide direction control along a desk edge and around bend points. They help guide a reachable cord while keeping the cable path accessible.
- Ties: Cable ties support cable grouping and slack control around visible segments. Removable ties can make adjustments easier when access frequency is higher.
- Sleeves, clips, and ties together: A sleeve can bundle cables, clips can guide direction, and ties can manage slack. This combination may balance cable grouping with removable access for visible segments.
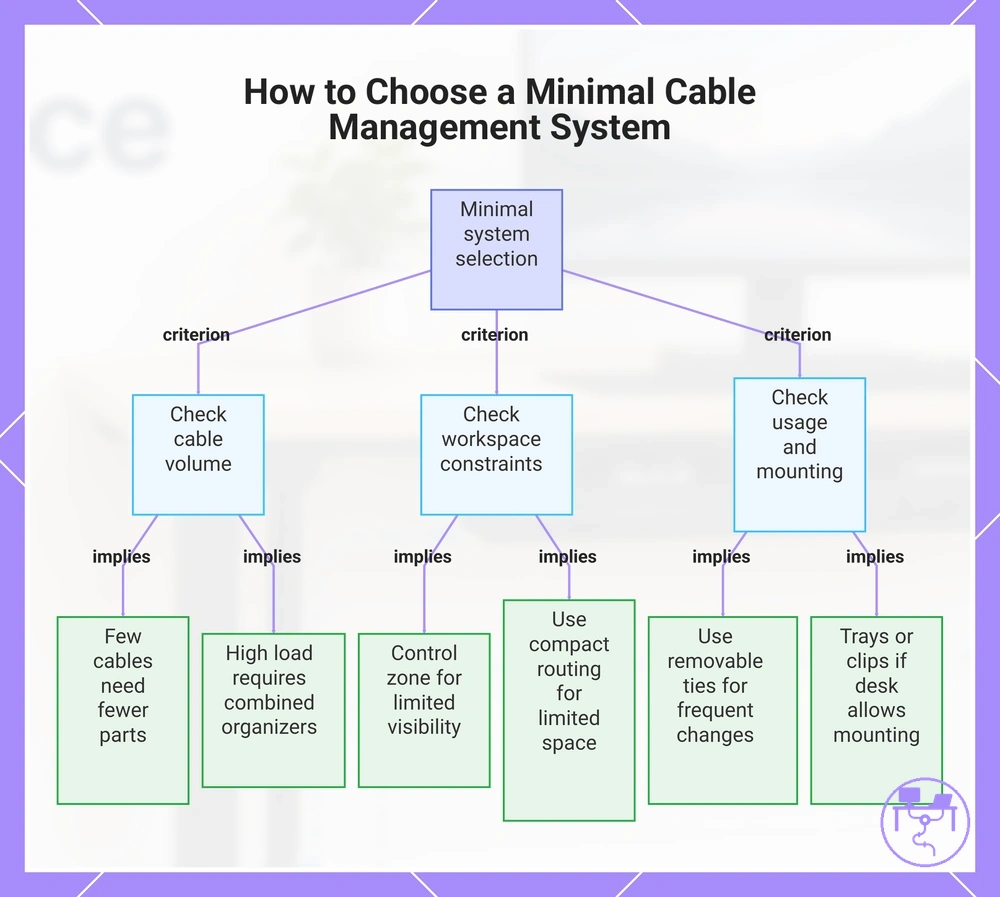
Choosing a minimal system for a tidy workstation
A minimal system is the smallest setup that controls the actual cable problem without adding unnecessary parts. The right choice depends on cable count, visible zones, cable access needs, and available desk underside space. These criteria help determine whether a tidy workstation needs a single organizer, a small combination of parts, or no additional hardware.
Adding more organizers than the cable layout requires can create extra routing paths, reduce access, and increase adjustment time when devices change. A simple cable setup often starts with the most visible or disruptive cable area rather than every cable zone at once. The checklist below focuses on the main selection criteria.
A small workstation with a low cable count and limited visible zones may only need clips or ties to manage cable paths. A medium setup with multiple devices and moderate cable load may benefit from combining cable grouping with basic routing support. For broader selection criteria, see how to choose a system for a cleaner layout; use one part for a local issue, combine parts for multiple cable zones, and delay extra organizers when the current setup already controls the visible problem.
Use these criteria to identify the smallest sufficient cable management approach.
- Cable count: If only a few cables are present, fewer organizer parts may be needed.
- Visible zones: If visibility is limited to a small area, controlling that zone may have the greatest effect on a tidy workstation.
- Desk underside space: If desk underside space is limited, compact routing methods may be easier to use than larger organizers.
- Mounting tolerance: If the desk allows mounting options, trays or clips may become practical choices for cable control.
- Device-change frequency: If devices are moved or replaced often, removable ties and easier cable access may reduce future adjustments.
- Cable load: If cable load increases, additional capacity or a combined organizer approach may become more suitable.
- Workspace style: If a clean workstation relies on minimal visibility, part choice may focus on the cable zones that remain most noticeable.
This chart shows the main criteria for selecting a minimal cable management setup, helping you avoid unnecessary parts.
When a cable tray is enough for a clean setup
A cable tray is often enough for a clean setup when most clutter comes from grouped cables or a power strip beneath the desk. In these situations, a cable tray can provide under-desk storage that reduces visible cable concentration while keeping related connections together. This condition is most common when cable bundle size and power-strip clutter are the primary sources of disorder.
When visible edge cables, wall runs, or desktop charging clutter remain the main problem, a cable tray may not address those cable paths because they exist outside the tray area. An under-desk tray helps organize cables within its mounting space, but suitability still depends on desk underside clearance, cable bundle size, and access frequency. Use the checklist below to verify whether a tray organizer is likely to be sufficient.
Check these conditions before relying on a cable tray as the main organizer.
- Cable bundle size: If most cables form a single grouped bundle, a cable tray may provide adequate organization.
- Power strip: If the power strip creates most of the visible under-desk clutter, a cable basket may help centralize that area.
- Desk underside clearance: If enough mounting space exists beneath the desk, a tray organizer may fit more comfortably.
- Access frequency: If cables and plugs require only occasional adjustment, a cable tray may remain convenient while preserving access.
- Visible cable paths: If visible edge cables, wall runs, or desktop charging cables remain the main concern, a cable tray alone may not be sufficient.
When a hiding kit needs multiple organizer parts
A hiding kit is useful only when multiple organizer parts are needed to control cables across more than one visibility zone. If grouped cables collect beneath the desk, exposed runs appear near a wall-side gap, and loose cords remain visible along edges, a multi-part setup may help address those different conditions more effectively than a single organizer. This decision depends on whether clutter exists in separate visibility zones such as under-desk storage areas, exposed back runs, and visible cable paths.
Unused kit parts can add complexity without improving a clean layout when they do not match a specific cable problem. A desk cable hiding kit is most useful when each part has a clear role, such as grouped storage, covered runs, bundle management, direction control, or slack control. Use the checklist below to match trays, raceways, sleeves, clips, and ties to the layout issue they are intended to address.
Verify that each organizer solves a different visibility problem before choosing multiple organizer parts.
- Trays: Use when grouped cables or a power strip create under-desk clutter and need centralized storage.
- Raceways: Use when exposed back cables or wall-side gap runs need covered runs.
- Sleeves: Use when a cable bundle remains visible and needs to be grouped into a single segment.
- Clips: Use when cable direction needs control along desk edges or routing points.
- Ties: Use when excess cable length requires slack control and cable grouping.
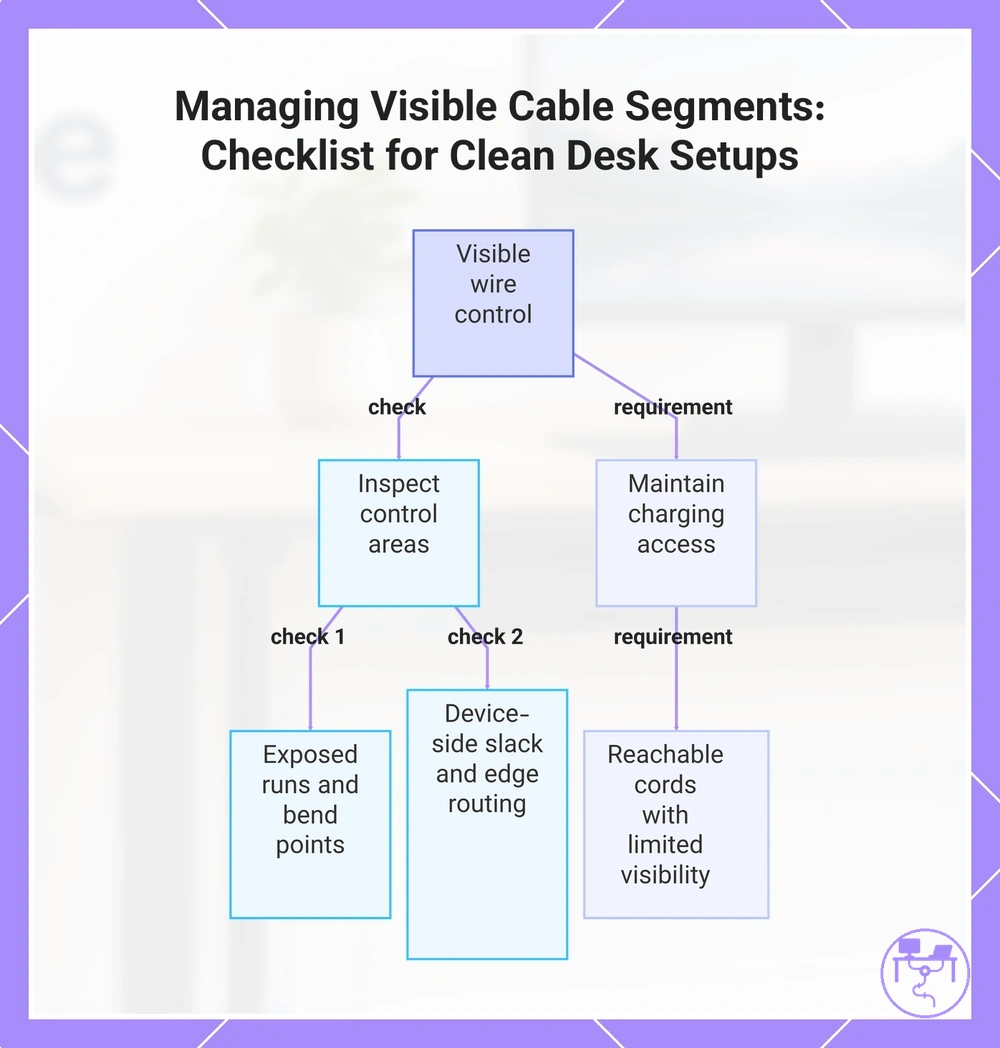
Visible wire control for clean desk setups
Visible wire control starts with managing the necessary exposed segments that remain after the main under-desk layout is organized. In clean desk setups, the goal is not to hide every cable but to reduce attention drawn to visible segments while preserving charging access and normal device use. Hiding cables and controlling necessary visible segments are different but connected tasks.
When exposed runs remain along desk edges, desk legs, or near reachable cords, those cables often become the most noticeable part of an otherwise organized workspace. A monitor cable, charging cord, or peripheral connection may need to stay partially visible because of movement or access requirements. In these situations, visible wire control depends on managing exposed runs around desk edges, legs, and other local control points.
Visible clutter often develops when device-side slack collects near equipment or when bend points create abrupt direction changes. Cable clips, removable ties, or a cable sleeve can help support edge routing and direction control while maintaining charging access where cords must remain reachable. Readers who need broader cable hiding methods can also hide visible desk cables, but visible wire control remains focused on managing necessary exposed segments. Use the checklist below to inspect the most common control areas.
Review these visible segments after organizing the main under-desk cable path.
- Exposed runs: Inspect cable sections that remain visible along desk edges and open surfaces.
- Bend points: Check where cables change direction and become more noticeable.
- Device-side slack: Reduce excess cable loops near connected devices.
- Edge routing: Follow cable paths along desk edges to improve direction control.
- Charging access: Keep reachable cords accessible while limiting unnecessary visibility.
This chart shows the main control areas and requirements for managing exposed cable segments in a clean desk setup, focusing on reducing visual clutter while preserving charging access.
Cables along desk edges, legs, and open backs
When visible cables remain along desk edges, desk legs, or open backs, the most effective control method depends on the surface they follow and the direction they travel. A visible cable running across desk edges may attract attention because it interrupts a clear line, while cables following desk legs can appear more organized when aligned with the desk frame. For visible cable control, surface and direction are the primary controlling factors.
Visible clutter often develops when cables cross open areas, separate from their intended path, or collect at slack points. Edge clips can help keep a visible cable aligned with desk edges, while leg routing can guide cables along desk legs where the cable path remains more predictable. Cable ties can help manage slack points and support direction control, although the result may depend on cable length, routing needs, and adjustment frequency.
For desks with open backs, rear-panel visibility may become more noticeable than side-facing cable runs. In these situations, cable color contrast can influence how visible a cable appears against the desk surface, while controlled slack points can help maintain a cleaner layout. An exposed back often benefits from cable alignment that follows existing lines rather than allowing cables to cross open spaces unnecessarily.
Charging cords that still need reachable access
Charging cords should stay reachable when they are used frequently, even in a clean desk setup. A charging cord that is plugged in and unplugged throughout the day often benefits from a visible but controlled path rather than being routed out of reach. The main balance is between reachable access, slack, and visibility.
When a phone, laptop, or peripheral charging cord sits near a desk edge, the cable may need enough movement for daily use without creating excess clutter. Charger cables with excessive cord length can collect unnecessary slack, while a poor dock position may make charger reach less convenient. Before adjusting charging leads, review the checklist below to balance access and appearance.
Use these criteria to keep charging cords accessible without making the desk look messy.
- Cord length: Choose a cable path that limits excess slack while maintaining reachable access.
- Dock position: Place charging points where devices are commonly used to reduce unnecessary cable travel.
- Clip placement: Use clip placement near a desk edge to guide charging cords along a predictable path.
- Removable ties: Use removable ties when charger cables may need frequent adjustment or replacement.
- Device-use frequency: Cords used often may benefit from easier access than cords connected only occasionally.
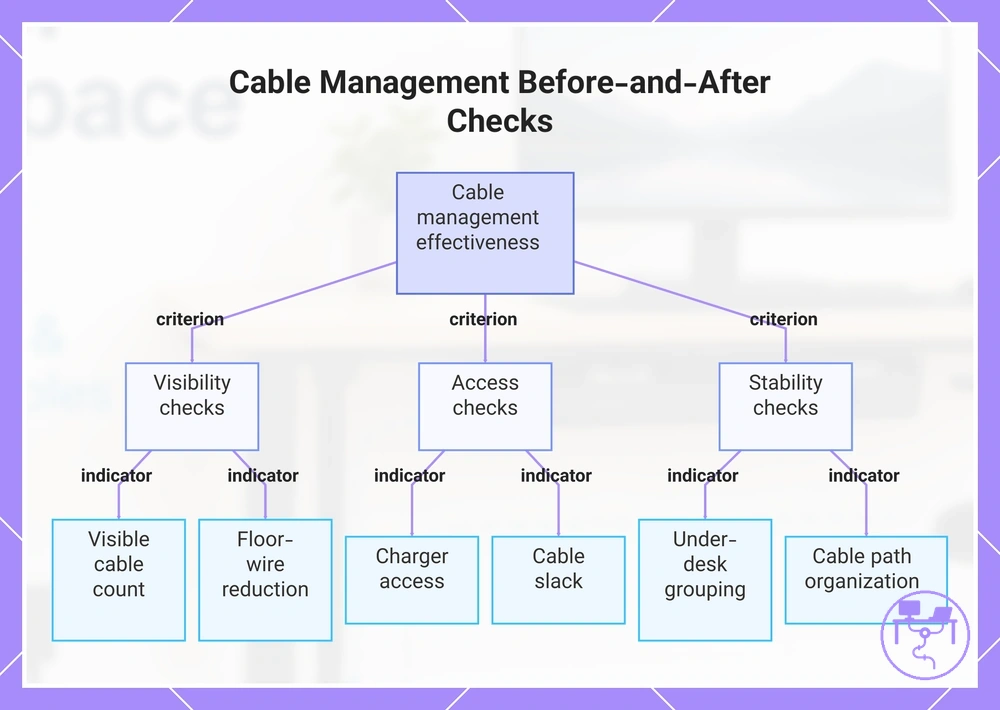
Before-and-after checks for a cleaner workspace
Before-and-after checks should compare both function and appearance to determine whether a desk cable management system supports a cleaner workspace. A useful review focuses on how cables behave during normal use rather than on appearance alone. The main comparison points are visibility, access, and stability.
A layout review is most useful when the same desk is compared before and after cable changes using the same devices and working conditions. Instead of relying on visual impressions alone, compare cable paths, access to connections, and cable organization during daily use. Use the checklist below to perform an after-setup check.
Decision signals should come from the checklist results rather than appearance alone. If most conditions are satisfied, no extra parts may be needed. If one area such as charger access, cable slack, or visible cable count still needs attention, a small add-on may help. If multiple conditions remain unresolved, a layout adjustment may be more appropriate before adding more organizers.
Here are product examples that may make comparison easier. Before buying, always review the compatibility criteria, essential features, and product details.

- Visible cable count: Check whether fewer cables remain visible across the desk and surrounding workspace.
- Floor-wire reduction: Check whether cables between the floor and desk are less exposed and easier to control.
- Under-desk grouping: Check whether related cables remain grouped instead of spreading across the desk underside.
- Charger access: Check whether charging points remain reachable without creating unnecessary clutter.
- Cable slack: Check whether excess cable length is controlled without limiting normal movement.
- Maintenance readiness: Check whether cables can still be adjusted when device changes occur.
- Stability: Check whether cable paths remain organized during routine workstation use.
This chart organizes the key before-and-after evaluation criteria—visibility, access, and stability—to help determine if a desk cable management system is effective.
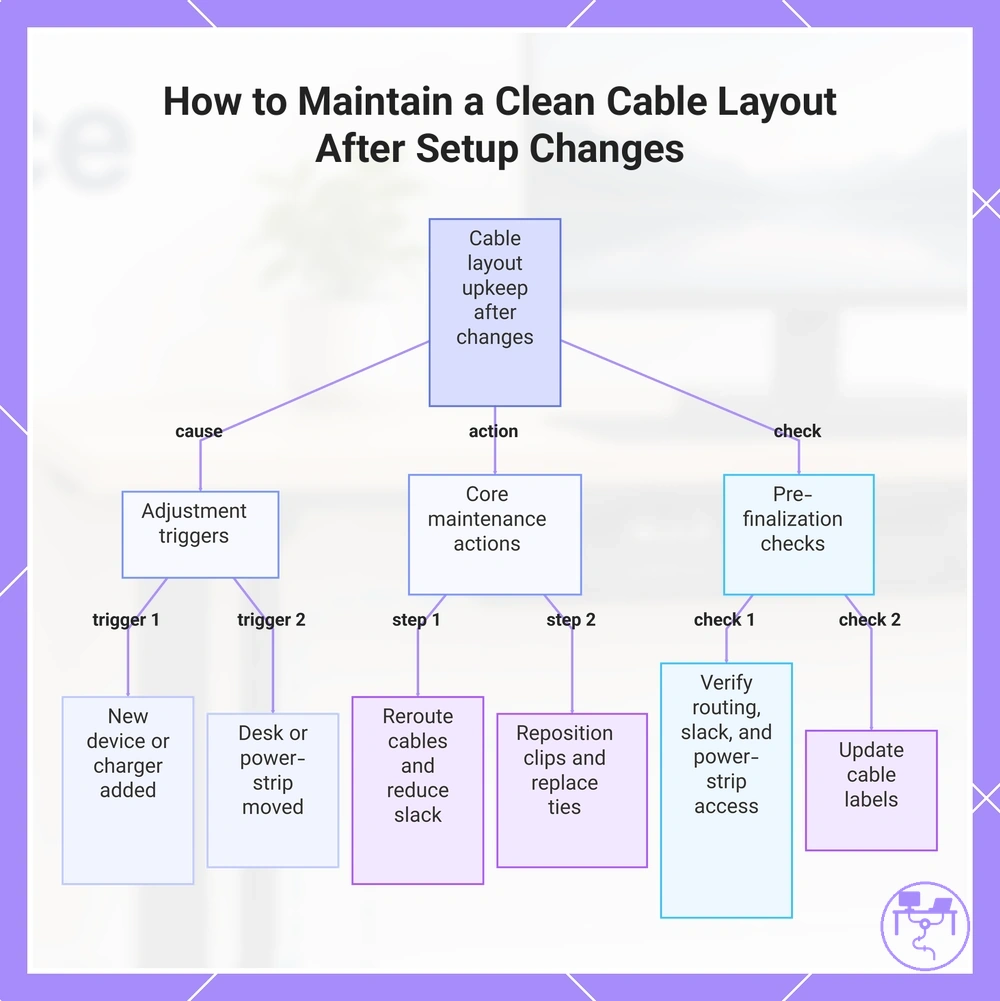
Keeping the cable layout clean after setup changes
A clean cable layout needs adjustment after setup changes rather than one-time concealment. Devices, chargers, and desk positions can change cable paths, access needs, and visible slack over time. Common triggers include a new device, charger changes, a moved desk, or a revised power-strip position.
When setup changes create new cable paths, rerouting can help align cables with the updated layout. Slack correction can reduce loose cable loops that appear after devices are added or moved. Clip repositioning can restore direction control when cable paths shift, while removable ties help simplify future adjustments. Use the maintenance steps below to support ongoing cable upkeep.
- Rerouting: Check whether each cable path still matches the current device position.
- Slack correction: Reduce excess cable length that has developed after equipment changes.
- Clip repositioning: Move clips when cable direction changes because of a layout adjustment.
- Removable ties: Replace or adjust ties that no longer fit the updated cable layout.
- Power-strip access: Keep plugs reachable for charger changes and routine cable maintenance.
- Cable labels: Update cable labels when new connections or devices are added.
When adding a new monitor, laptop dock, charger, or peripheral, the cable layout may need a small adjustment to remain organized. Check whether the new device affects rerouting, power-strip access, or cable slack before finalizing the layout. For a broader upkeep process, see how to maintain a clean cable layout.
Here are product examples that may make comparison easier. Before buying, always review the compatibility criteria, essential features, and product details.
This chart shows the common triggers for cable layout adjustments, the core maintenance actions to perform, and the pre-finalization checks to ensure ongoing organization.